
 .
.P, S, A, and M Modes
P, S, A, and M modes give you varying degrees of control over shutter speed and aperture.
- Mode P: Program AE
- Mode S: Shutter-Priority AE
- Mode A: Aperture-Priority AE
- Mode M: Manual Exposure
- Front Command Dial Roles by Mode
Mode P: Program AE
Let the camera choose shutter speed and aperture for optimal exposure. Other values that produce the same exposure can be selected with program shift.
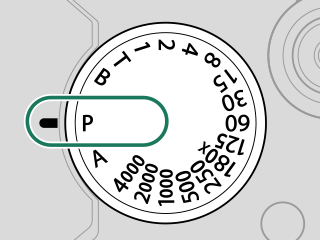
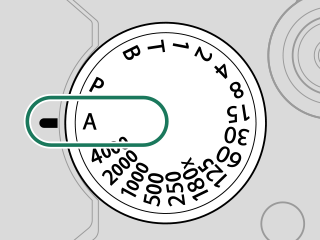
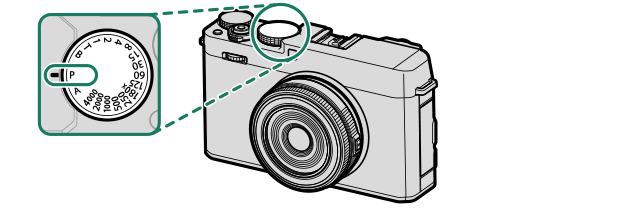
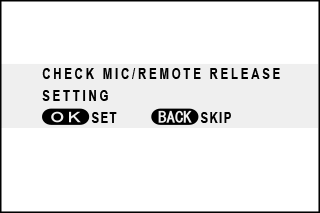
The camera functions in mode P (program AE) when the shutter speed dial is rotated to A or P. Aperture is set as follows.
| Shutter speed dial | Aperture |
|---|---|
|
|
The camera functions in mode P regardless of the option selected for aperture (aTaking Photographs (Mode P)). |
|
|
|
The method for adjusting aperture when using a lens without an aperture ring can be chosen using D BUTTON/DIAL SETTING > APERTURE SETTING (aAPERTURE SETTING).
Front command dial settings can be adjusted using D BUTTON/DIAL SETTING > COMMAND DIAL SETTING (aFront Command Dial Roles by Mode, COMMAND DIAL SETTING).
Shutter Speed Dial: P
| Setting | |
|---|---|
| Shutter speed | P (program) |
Confirm that P appears in the display.

Shutter Speed Dial: A
| Setting | ||
|---|---|---|
| A | Shutter speed | A (auto) |
| B | Aperture | A (auto) |
Confirm that P appears in the display.
If the subject is outside the metering range of the camera, the shutter speed and aperture display will show “– – –”.
Program Shift
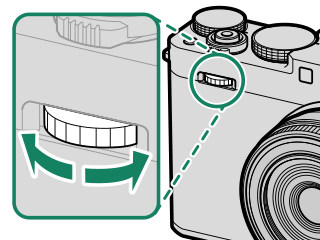
Rotate the front command dial to choose the desired combination of shutter speed and aperture (program shift).
Shutter speed
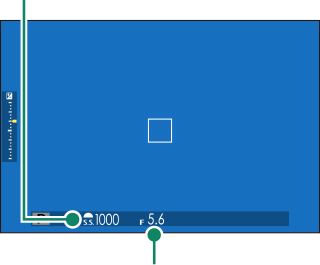
Aperture
Program shift is not available in any of the following circumstances:
- With flash units that support TTL auto
- When an auto option is selected for HIMAGE QUALITY SETTING > DYNAMIC RANGE
- In movie mode
To cancel program shift, turn the camera off.
Front command dial settings can be adjusted using D BUTTON/DIAL SETTING > COMMAND DIAL SETTING (aFront Command Dial Roles by Mode, COMMAND DIAL SETTING).
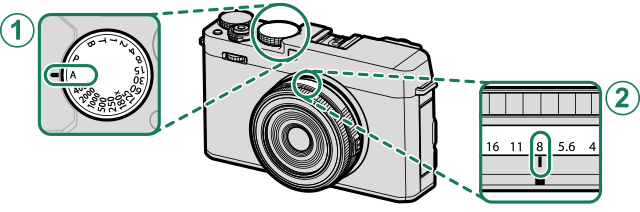
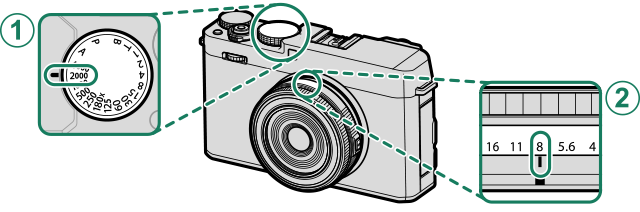
Mode S: Shutter-Priority AE
Choose a shutter speed and let the camera adjust aperture for optimal exposure.

| Setting | ||
|---|---|---|
| A | Shutter speed | User-selected |
| B | Aperture | A (auto) |
Confirm that S appears in the display.

If the correct exposure cannot be achieved at the selected shutter speed, aperture will be displayed in red.
If the subject is outside the metering range of the camera, the aperture display will show “– – –”.
Shutter speed can also be adjusted in increments of 1/3 EV by rotating the front command dial.
For faster shutter speeds, enable the electronic shutter, set the shutter speed dial to 4000 or T, and rotate the front command dial.
If you are using a lens with an aperture ring, rotate the ring to A (auto). If you are using a lens without an aperture ring, first select AUTO or AUTO + MANUAL for D BUTTON/DIAL SETTING > APERTURE SETTING, then press the center of the front command dial to cycle to APERTURE and rotate the dial until the aperture value is displayed in white.
Front command dial settings can be adjusted using D BUTTON/DIAL SETTING > COMMAND DIAL SETTING (aFront Command Dial Roles by Mode, COMMAND DIAL SETTING).
Shutter speed can be adjusted while the shutter button is pressed halfway.
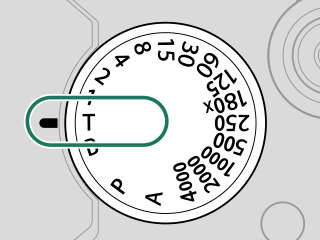
Time (T)
Choose a shutter speed of T (time) for long time-exposures. Use of a tripod is recommended to prevent the camera moving during the exposure.
-
Set shutter speed to T.
-
Rotate the front command dial to choose a shutter speed.
-
Press the shutter button all the way down to take a picture at the selected shutter speed. At speeds of 1 s or slower, a count-down timer will be displayed while the exposure is in progress.
To reduce “noise” (mottling) in long time-exposures, select ON for HIMAGE QUALITY SETTING > LONG EXPOSURE NR. Note that this may increase the time needed to record images after shooting.
Front command dial settings can be adjusted using D BUTTON/DIAL SETTING > COMMAND DIAL SETTING (aFront Command Dial Roles by Mode, COMMAND DIAL SETTING).
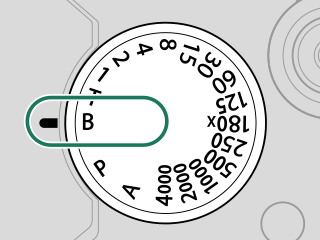
Bulb (B)
Choose a shutter speed of B (bulb) for long time-exposures in which you open and close the shutter manually. Use of a tripod is recommended to prevent the camera moving during the exposure.
-
Set shutter speed to B.
-
Press the shutter button all the way down. The shutter will remain open for up to 60 minutes while the shutter button is pressed; the display shows the time elapsed since the exposure started.
Selecting an aperture of A fixes shutter speed at 30 s.
To reduce “noise” (mottling) in long time-exposures, select ON for H IMAGE QUALITY SETTING > LONG EXPOSURE NR. Note that this may increase the time needed to record images after shooting.
Using a Remote Release
A remote release can be used for long time-exposures. When using an optional RR‑100 remote release or an electronic release from third-party suppliers, connect it to the camera’s microphone/remote release connector via a third-party adapter that converts the female three-pin, φ2.5 mm connector to a male three-pin, φ3.5 mm connector.
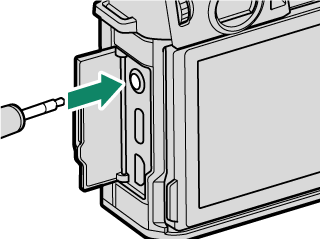
A confirmation dialog will be displayed when a remote release is connected; press MENU/OK and select nREMOTE for MIC/REMOTE RELEASE.
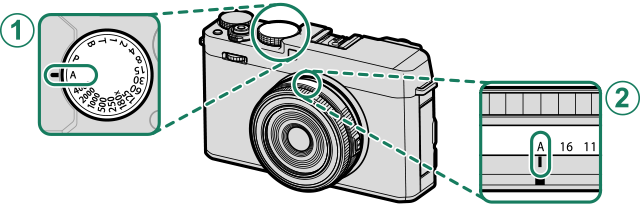
Mode A: Aperture-Priority AE
Choose an aperture and let the camera adjust shutter speed for optimal exposure.
| Setting | ||
|---|---|---|
| A | Shutter speed | A (auto) |
| B | Aperture | User-selected |
Confirm that A appears in the display.

If the correct exposure cannot be achieved at the selected aperture, shutter speed will be displayed in red.
If the subject is outside the metering range of the camera, the shutter speed display will show “– – –”.
If the lens is equipped with a aperture ring, aperture can be adjusted by rotating the ring. If you are using a lens without an aperture ring, press the center of the front command dial to cycle to APERTURE and then rotate the dial to choose a value.
Front command dial settings can be adjusted using D BUTTON/DIAL SETTING > COMMAND DIAL SETTING (aFront Command Dial Roles by Mode, COMMAND DIAL SETTING).
Aperture can be adjusted even while the shutter button is pressed halfway.
Lenses Without Aperture Rings
Users of lenses with no aperture ring can rotate the command dial past minimum aperture to select A (auto), then press the center of the dial to cycle to S.S. (PROGRAM SHIFT) and use program shift to choose other combinations of shutter speed and aperture that will produce the same exposure.
Previewing Depth of Field
When PREVIEW DEPTH OF FIELD is assigned to a function button, pressing the button displays a L icon and stops aperture down to the selected setting, allowing depth of field to be previewed in the display (aFunction Controls).

Mode M: Manual Exposure
In manual mode, the user controls both shutter speed and aperture. Shots can be deliberately overexposed (brighter) or underexposed (darker), opening the door for a variety of individual creative expression. The amount the picture would be under- or over-exposed at current settings is shown by the exposure indicator; adjust shutter speed and aperture until the desired exposure is reached.
| Setting | ||
|---|---|---|
| A | Shutter speed | User-selected |
| B | Aperture | User-selected |
Confirm that M appears in the display.

If the lens is equipped with a aperture ring, aperture can be adjusted by rotating the ring. If you are using a lens without an aperture ring, press the center of the front command dial to cycle to APERTURE and then rotate the dial to choose a value.
When set to S.S. (PROGRAM SHIFT), the front command dial can be rotated to adjust shutter speed in increments of 1/3 EV.
Front command dial settings can be adjusted using D BUTTON/DIAL SETTING > COMMAND DIAL SETTING (aFront Command Dial Roles by Mode, COMMAND DIAL SETTING).
Exposure Preview
To preview exposure in the LCD monitor, select PREVIEW EXP./WB for D SCREEN SET-UP > PREVIEW EXP./WB IN MANUAL MODE.
PREVIEW EXP./WB
OFF
PREVIEW EXP./WB
OFF
Select an option other than PREVIEW EXP./WB when using the flash or on other occasions on which exposure may change when the picture is taken.
Front Command Dial Roles by Mode
The roles that can be performed by the front command dial in each mode are listed below.
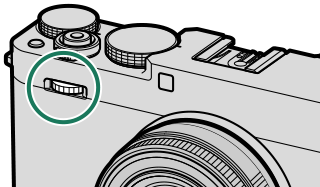
The roles assigned to the front command dial during shooting can be chosen using D BUTTON/DIAL SETTING > COMMAND DIAL SETTING (aCOMMAND DIAL SETTING). At default settings, the dial can be used in the following three roles:
- FRONT COMMAND DIAL 1: S.S. (PROGRAM SHIFT) (
 )
) - FRONT COMMAND DIAL 2: APERTURE (
 )
) - FRONT COMMAND DIAL 3: EXPOSURE COMPENSATION (
 )
)
Press the center of the front command dial to cycle through roles 1, 2, and 3.
| Role assigned to front command dial: |
|
|---|---|
| P (PROGRAM AE) |
Program shift |
| S (SHUTTER PRIORITY AE) |
Shutter speed |
| A (APERTURE PRIORITY AE) |
None |
| M (MANUAL) |
Shutter speed |
| Role assigned to front command dial: |
|
|---|---|
| P (PROGRAM AE) |
Program shift 1 Aperture 2, 3 |
| S (SHUTTER PRIORITY AE) |
Aperture 3 |
| A (APERTURE PRIORITY AE) |
None |
| M (MANUAL) |
Aperture 3 |
1 Shutter speed dial set to P.
2 Shutter speed dial set to A.
3 Lens with no aperture ring, or lens equipped with an aperture ring set to A (auto) with COMMAND selected for D BUTTON/DIAL SETTING > APERTURE RING SETTING (A). Aperture adjustment via front command dial not otherwise available.
| Role assigned to front command dial: |
|
|---|---|
| P (PROGRAM AE) |
Exposure compensation * |
| S (SHUTTER PRIORITY AE) |
|
| A (APERTURE PRIORITY AE) |
|
| M (MANUAL) |
None |
* Exposure compensation dial rotated to C.
To adjust sensitivity using the front command dial, assign ISO to any of the front command dial roles 1 through 3 using D BUTTON/DIAL SETTING > COMMAND DIAL SETTING (aCOMMAND DIAL SETTING).


