
 .
.Recording Movies
Record movies with sound.
Recording Movies
Movies can be recorded by pressing the shutter button when F (movie) is selected in the drive-mode menu or by pressing the function button to which MOVIE RECORDING RELEASE is assigned.
The Drive-Mode Menu (F Movie)
Selecting F (movie) in the drive-mode menu and recording movies using the shutter button gives you control over a variety of camera settings.
-
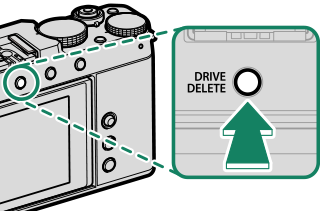
Press the DRIVE/DELETE button and select MOVIE in the drive-mode menu.
-
Press the shutter button all the way down.
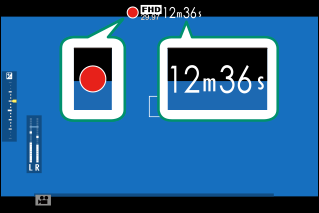
Recording will start.
- A recording indicator (V) is displayed while recording is in progress.
- The display shows the elapsed recording time.
-
Press the shutter button again to end recording.
Recording ends automatically when the movie reaches 29 minutes 59 seconds or the memory card is full.
Using a Function Button (MOVIE RECORDING RELEASE)
Use the function button to which MOVIE RECORDING RELEASE is assigned to quickly and easily record movies while in still photography mode.
The camera automatically enables autoexposure and selects CONTINUOUS AF for focus mode.
-
Assign MOVIE RECORDING RELEASE to a function button (aFunction Controls).
-
Press the selected button to start recording.
- A recording indicator (V) is displayed while recording is in progress.
- The display shows the elapsed recording time.
-
Press the button again to end recording.
Recording ends automatically when the movie reaches 29 minutes 59 seconds or the memory card is full.
The movie recording release option is intended for point-and-shoot movie recording; camera settings cannot be adjusted.
Temperature Warnings
The camera automatically turns off to protect itself when its temperature or the temperature of the battery rises. If a temperature warning is displayed, image noise may increase. Turn the camera off and wait for it to cool before turning it on again (aWarning Messages and Displays).
Use a memory card with a UHS speed class of 3 or better when recording movies.
Sound is recorded via the built-in microphone or an optional external microphone. Do not cover the microphone during recording.
Note that the microphone may pick up lens noise and other sounds made by the camera during recording.
Vertical or horizontal streaks may appear in movies containing very bright subjects. This is normal and does not indicate a malfunction.
The temperature of the camera may rise depending on ambient temperature and length of use. The back of the camera and the area around the back of the LCD monitor in particular may become hot when the monitor is tilted; precaution is advised.
The indicator lamp lights while recording is in progress.
In the case of zoom lenses, zoom can be adjusted during recording using the zoom ring (if available).
Exposure compensation can be adjusted during recording, but only by a maximum of ±2 EV.
Recording may be unavailable at some settings, while in other cases settings may not apply during recording.
Headphones connected via USB can be used to monitor audio during movie recording. Use the supplied headphone adapter to convert the USB connector to a plug for a headphone jack.
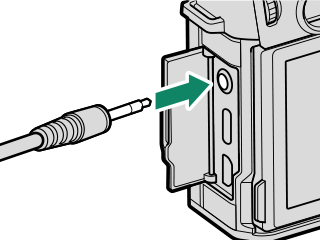
Using an External Microphone
Sound can be recorded with external microphones that connect using jacks 3.5 mm in diameter; microphones that require plug-in power cannot be used. See the microphone manual for details.
Adjusting Movie Settings
Movie settings can be adjusted from the movie menus or using the B MOVIE SETTING item in the photo menus (aUsing the Menus).
- A simplified menu of movie settings can be accessed via the B MOVIE SETTING item in the photo menus (aMOVIE SETTING (Still Photography)).
- The movie menus contain options for use when recording movies via the shutter button with MOVIE selected in the drive-mode menu (aMOVIE SETTING (Movie Recording)).
Changes made using the B MOVIE SETTING item in the photo menus also apply to the movie menus. Changes made in one set of menus automatically apply in the other.
Depth of Field
To soften backgrounds, set aperture as wide as possible. Aperture can be adjusted directly in modes A (aperture-priority AE) and M (manual).


