
 .
.SHOOTING SETTING (Still Photography)
Adjust shooting options for still photography.
To display shooting settings, press MENU/OK in the photo shooting display and select the A (SHOOTING SETTING) tab.
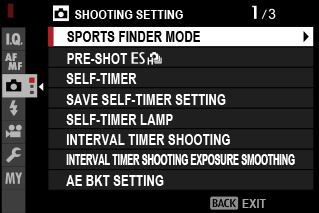
SPORTS FINDER MODE
Take pictures using the crop in the center of the display. Choose this option for pictures of athletes, birds, and other moving subjects.

| Option | Description |
|---|---|
| ON | Pictures are taken using a 1.25× crop, reducing the picture angle by an amount equivalent to increasing lens focal length by 1.25×; the crop is shown by a frame in the display. |
| OFF | The 1.25× crop is disabled. |
The HIMAGE QUALITY SETTING > IMAGE SIZE item in the shooting menu is fixed at P.
The sports finder is not available in modes that offer an electronic shutter.
PRE-SHOTsJ
To reduce the lag between your pressing the shutter button all the way down and the resulting picture being recorded to the memory card, the camera starts shooting with the electronic shutter when the shutter button is pressed halfway and saves a series shots starting just before the shutter button is pressed the rest of the way down.
| Options | |
|---|---|
| ON | OFF |
Pre-shot photography is available only when s ELECTRONIC SHUTTER is selected in CH (high speed burst) drive mode (aSHUTTER TYPE).
SELF-TIMER
Choose a shutter release delay.
| Option | Description |
|---|---|
| R2 SEC | The shutter is released two seconds after the shutter button is pressed. Use to reduce blur caused by the camera moving when the shutter button is pressed. The self-timer lamp blinks as the timer counts down. |
| S10 SEC | The shutter is released ten seconds after the shutter button is pressed. Use for photographs in which you wish to appear yourself. The self-timer lamp blinks immediately before the picture is taken. |
| OFF | Self-timer off. |
If an option other than OFF is selected, the timer will start when the shutter button is pressed all the way down. The display shows the number of seconds remaining until the shutter is released. To stop the timer before the picture is taken, press DISP/BACK.

Stand behind the camera when using the shutter button. Standing in front of the lens can interfere with focus and exposure.
The self-timer turns off automatically when the camera is turned off.
SAVE SELF-TIMER SETTING
If ON is selected, the chosen self-timer setting will remain in effect after a picture is taken or the camera is turned off.
| Options | |
|---|---|
| ON | OFF |
SELF-TIMER LAMP
If ON is selected, the self-timer lamp will light during self-timer photography. Select OFF when shooting night scenes or in other situations in which you would prefer that the lamp remain unlit.
| Options | |
|---|---|
| ON | OFF |
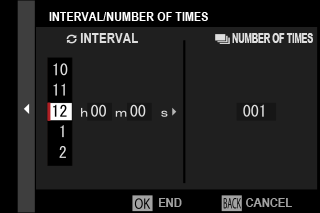
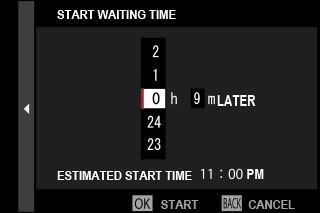
INTERVAL TIMER SHOOTING
Configure the camera to take photos automatically at a preset interval.
-
Select A SHOOTING SETTING in the shooting menu, highlight INTERVAL TIMER SHOOTING, and press MENU/OK.
-
Use the focus stick (focus lever) to choose the interval and number of shots. Press MENU/OK to proceed.
-
Use the focus stick to choose the starting time and then press MENU/OK. Shooting will start automatically.

Interval timer photography cannot be used at a shutter speed of B (bulb) or with multiple exposure photography. In burst mode, only one picture will be taken each time the shutter is released.
Use of a tripod is recommended.
Check the battery level before starting. We recommend using USB power source (aUSB POWER SUPPLY SETTING).
The display turns off between shots and lights a few seconds before the next shot is taken.
The display can be activated at any time by pressing the shutter button.
To continue shooting until the number of shots taken equals the number of exposures remaining at the time interval-timer photography started, set the number of shots to ∞.
INTERVAL TIMER SHOOTING EXPOSURE SMOOTHING
Select ON to automatically adjust exposure during interval-timer photography to prevent it changing dramatically between shots.
| Options | |
|---|---|
| ON | OFF |
Large changes in subject brightness may make exposure appear erratic. We recommend that you choose shorter values for INTERVAL TIMER SHOOTING > INTERVAL with subjects that brighten or dim dramatically during shooting.
In manual mode (mode M), exposure smoothing is only available if an AUTO option is selected for sensitivity.
AE BKT SETTING
Adjust exposure bracketing settings.
| Option | Description |
|---|---|
| FRAMES/STEP SETTING |
Choose the number of shots in the bracketing sequence and the amount exposure is varied with each shot.
|
| 1 FRAME/CONTINUOUS |
|
| SEQUENCE SETTING | Choose the order in which the shots are taken. |
FILM SIMULATION BKT
Choose the three film simulation types used for film simulation bracketing (aFILM SIMULATION).
FOCUS BKT SETTING
Choose from AUTO and MANUAL focus bracketing modes (aZ FOCUS BKT).
MULTIPLE EXPOSURE CTRL
Choose how the camera combines shots to create a multiple exposure (aMultiple Exposures).
PHOTOMETRY
Choose how the camera meters exposure (aMetering).
SHUTTER TYPE
Choose the shutter type. Choose the electronic shutter to mute the shutter sound.
| Option | Description |
|---|---|
| tMECHANICAL SHUTTER | Take pictures with the mechanical shutter. |
| sELECTRONIC SHUTTER | Take pictures with the electronic shutter. |
| uMECHANICAL + ELECTRONIC | The camera chooses the mechanical or electronic shutter according to shooting conditions. |
When using the electronic shutter, note the following:
- For faster shutter speeds, set the shutter speed dial to 4000 or T and rotate the front command dial.
- Distortion may be visible in shots of moving subjects.
- Distortion may also be visible in hand-held shots taken at high shutter speeds; use of a tripod is recommended.
- Banding and fog may occur in shots taken under fluorescent lights or other flickering or erratic illumination.
- When taking pictures with the shutter muted (aSHUTTER VOLUME), respect your subjects' image rights and right to privacy.
The following restrictions apply when the electronic shutter is used:
- “Extended” sensitivity values are not supported
- Long exposure noise reduction has no effect
- The flash cannot be used
FLICKER REDUCTION
Reduce flicker in pictures and the display when shooting under fluorescent lighting and other similar light sources.
| Option | Description |
|---|---|
| ALL FRAMES | Flicker reduction is performed for all frames. Compared to when flicker reduction is performed only on the first frame, the frame advance rate for burst photography will drop. |
| FIRST FRAME | Flicker reduction is performed for the first frame only; in burst photography, the value measured for the first frame in each burst will be used for all subsequent shots. Flicker may be visible during burst photography. |
| OFF | Flicker reduction disabled. |
Flicker reduction increases the time needed to record pictures.
OFF is selected for FLICKER REDUCTION when the electronic shutter is used.
Flicker reduction is not available during movie recording.
IS MODE
Enable or disable image stabilization.
| Option | Description |
|---|---|
| l CONTINUOUS | Image stabilization on. |
| m SHOOTING ONLY | Image stabilization enabled only when the shutter button is pressed halfway (focus mode k) or the shutter is released. |
| OFF | Image stabilization off; x appears in the display. Choose when the camera is mounted on a tripod or otherwise fixed in place. |
Image stabilization is available with compatible lenses only.
The setting selected with the lens image stabilization switch, if any, takes priority over the setting chosen with the IS mode.
Note that vibration or camera sounds may be noticeable as image stabilization takes effect.
ISO
Adjust the camera's sensitivity to light (aSensitivity).
xFWIRELESS COMMUNICATION
Connect to smartphones running the latest version of the FUJIFILM Camera Remote app. The smartphone can then be used to:
- Control the camera and take pictures remotely
- Receive pictures uploaded from the camera
- Browse the pictures on the camera and download selected pictures
- Upload location data to the camera
For downloads and other information, visit:


