.
.Parts of the Camera
The parts of the camera are listed below.

AShutter button
BExposure compensation dial
CQ (quick menu) button
DShutter speed dial
EHot shoe
FMicrophone
GStrap eyelet
HConnector cover
ILens signal contacts
JLens release button
KAF-assist illuminator
Self-timer lamp
Tally light
LFront command dial
MON/OFF switch
NFn button
OBody cap
PMicrophone/remote release connector (φ3.5 mm)
QUSB connector (Type-C)
RHDMI Micro connector (Type D)
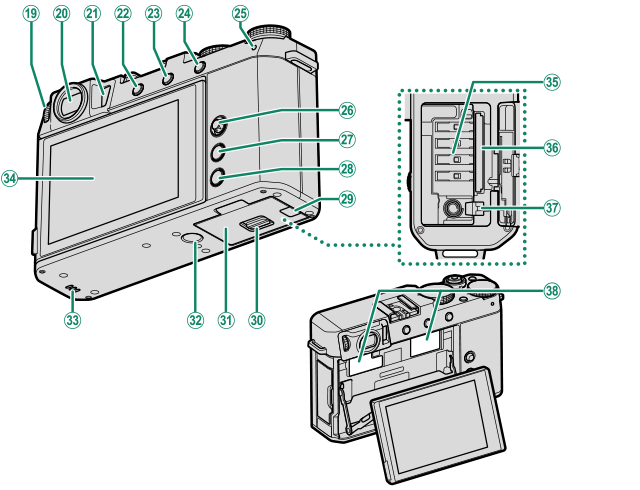
SDiopter adjustment control
TElectronic viewfinder (EVF)
UEye sensor
VDRIVE/DELETE button
WPLAY (playback) button
XAEL (exposure lock)/AFL (focus lock) button
YIndicator lamp
Tally light
ZFocus stick (focus lever)
aMENU/OK button
bDISP (display)/BACK button
cCable channel cover for DC coupler
dBattery-chamber cover latch
eBattery-chamber cover
fTripod mount
gSpeaker
hLCD monitor
Touch screen
iBattery chamber
jMemory card slot
kBattery latch
lSerial number plate
P Use of an optional RR-100 remote release requires a third-party adapter to convert the female three-pin, φ2.5 mm connector to a male three-pin, φ3.5 mm connector.
l Do not remove the serial number plate, which provides the CMIIT ID, serial number, and other important information.
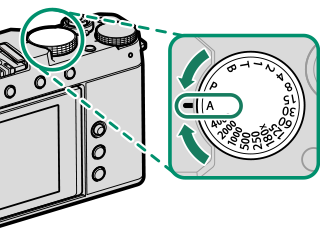
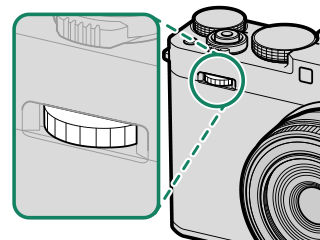
The Shutter Speed Dial
Rotate the shutter speed dial to choose the shutter speed (aP, S, A, and M Modes).
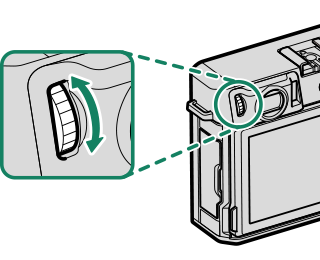
The Exposure Compensation Dial
Rotate the dial to choose an exposure compensation amount (aExposure Compensation).
The Focus Stick (Focus Lever)
Tilt or press the focus stick to select the focus area. The focus stick can also be used to navigate the menus.
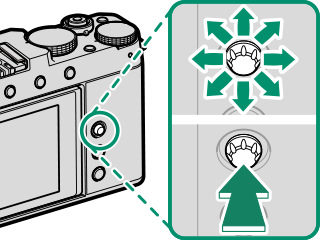
To choose the role played by the focus stick, press and hold the center of the stick or use DBUTTON/DIAL SETTING > FOCUS LEVER SETTING (aFOCUS LEVER SETTING).
The DRIVE/DELETE Button
Pressing the DRIVE/DELETE button displays drive-mode menu, where you can choose from the following the drive modes.
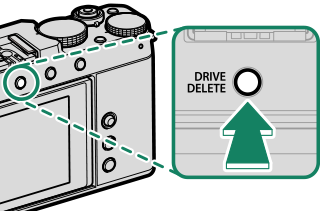
| Mode | |
|---|---|
| B | Single frame (aTaking Photographs (Mode P)) |
| J | High-speed burst (aContinuous Shooting (Burst Mode)) |
| O | Low-speed burst (aContinuous Shooting (Burst Mode)) |
| W | ISO BKT (aW ISO BKT) |
| V | WHITE BALANCE BKT (aV WHITE BALANCE BKT) |
| BKT | Bracketing (as Bracketing) |
| h | HDR (aHDR) |
| Adv. |
Adv. MODE
|
| Y | Filter (aFilters) |
| F | Movie (aRecording Movies) |
The Command Dial
The front command dial is used for the operations below.
Shooting
- Choose the desired combination of shutter speed and aperture (program shift).
- Choose a shutter speed.
- Adjust aperture.
- Adjust exposure compensation.
- Adjust sensitivity.
During shooting, the role of the front command dial changes each time the center of the dial is pressed.
For information on the roles performed by the dials during shooting, see “Front Command Dial Roles by Mode”.
Menus
Rotate the dial to select menu tabs or page through menus.
Q Menu
Rotate the dial to change settings in the quick menu and press the center of the dial to select.
Playback
- View other pictures.
- Zoom in or out during full- or multi-frame playback.
Press the center of the front command dial to switch between the two roles.
The Indicator Lamp
Camera status is shown by the indicator lamp.
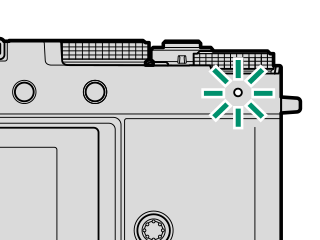
| Indicator lamp | Camera status |
|---|---|
| Glows green | Focus locked. |
| Blinks green | Focus or slow shutter speed warning. Pictures can be taken. |
| Blinks green and orange |
|
| Glows orange | Recording pictures. No additional pictures can be taken at this time. |
| Blinks orange | Flash charging; flash will not fire when picture is taken. |
| Blinks red | Lens or memory error. |
* Displayed only if pictures are selected for upload.
Warnings may also appear in the display.
The indicator lamp remains off while your eye is to the viewfinder.
The B MOVIE SETTING > TALLY LIGHT option can be used to choose the lamp (indicator or AF-assist) that lights during movie recording and whether the lamp blinks or remains steady.
The LCD Monitor
You can adjust the angle of the LCD monitor when framing shots, but be careful not to trap your fingers or other objects.
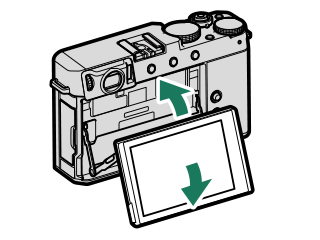
Do not apply excessive force to the hinge when rotating the LCD monitor, as this could damage the hinge.
Be careful that the corners of the monitor do not contact the camera body, as this could leave marks.
The LCD monitor also functions as a touch screen that can be used for:
- Touch photography (aLCD Monitor)
- Focus area selection (aEVF)
- Function selection (aTouch Function)
- Movie optimized controloL (aMOVIE OPTIMIZED CONTROLoL)
- Playback (aPlayback Touch Controls)
Tilting the LCD Monitor
Be sure the LCD monitor doesn’t block the eye sensor during shooting, as this will cause the display to flip.
Eye sensor
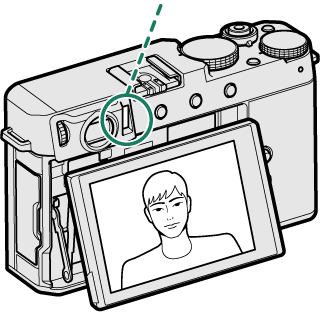
Normal display
Eye sensor
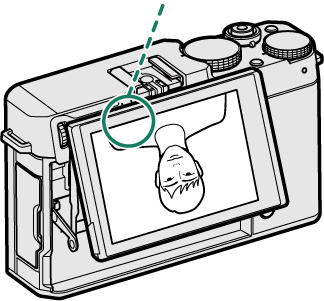
Display flipped
Focusing the Viewfinder
If the indicators displayed in the viewfinder are blurred, put your eye to the viewfinder and rotate the diopter adjustment control until the display is in sharp focus.