.
.Camera Displays
This section lists the indicators that may be displayed during shooting.
For illustrative purposes, displays are shown with all indicators lit.
- The Electronic Viewfinder
- Display Rotation
- The LCD Monitor
- Choosing a Display Mode
- Adjusting Display Brightness
- The DISP/BACK Button
- Customizing Standard Indicators
- The Secondary LCD Monitor
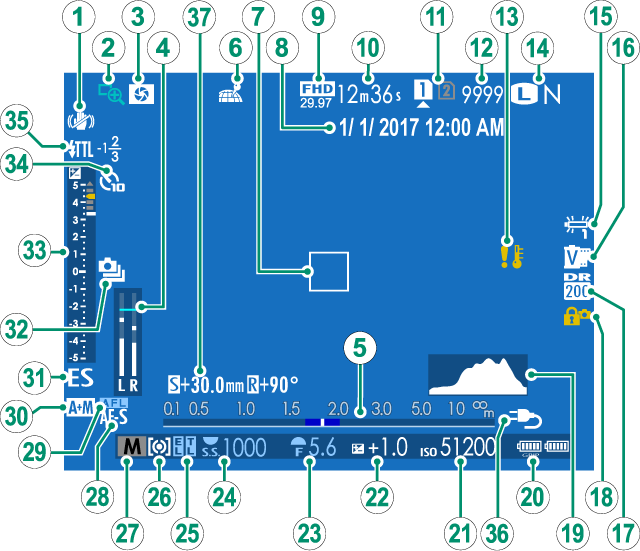
The Electronic Viewfinder
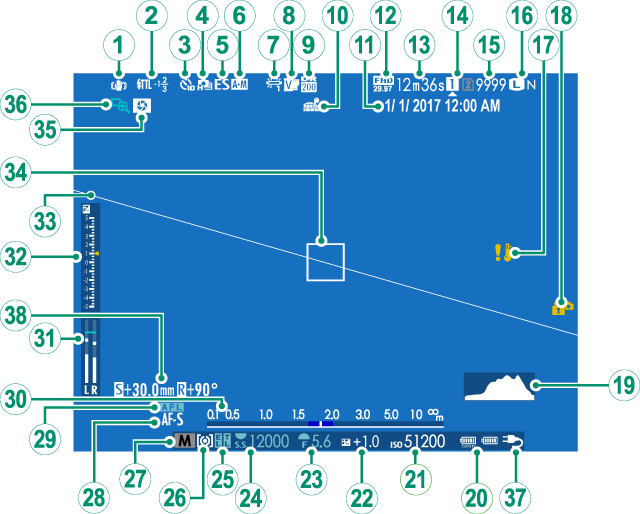
AIS mode
BFlash (TTL) mode
Flash compensation
CSelf-timer indicator
DContinuous mode
EShutter type
FAF+MF indicator
GWhite balance
HFilm simulation
IDynamic range
JLocation data download status
KDate and time
LMovie mode
MTime remaining
NCard slot options
ONumber of available frames 1
PImage quality and size
QTemperature warning
RControl lock
SHistogram
TBattery level
USensitivity
VExposure compensation
WAperture
XShutter speed
YAE lock
TTL lock
ZMetering
aShooting mode
bFocus mode 2
cAF lock
dDistance indicator
eRecording level
fExposure indicator
gVirtual horizon
hFocus frame
iDepth-of-field preview
jFocus check
kExternal power source in use 3
lShift amount/rotate amount
1 Shows “9999” if there is space for over 9999 frames.
2 In-focus ( ) or manual focus (j) indicator may also be displayed.
3 The camera now displays an external power supply icon when drawing power from an optional AC-15V AC power adapter.
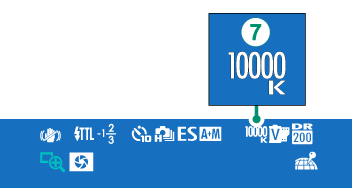
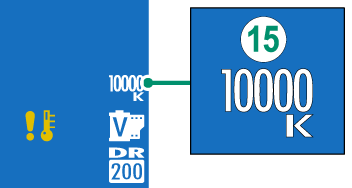
When a color temperature is selected for white balance (G), the chosen value now appears in the display (aColor Temperature).
Control Lock
Pressing a locked control displays a X icon.
Display Rotation
When [ON] is selected for D[SCREEN SETTING] > [AUTOROTATE DISPLAYS], the indicators in the viewfinder and LCD monitor automatically rotate to match camera orientation.
The LCD Monitor
AIS mode
BFocus check
CDepth-of-field preview
DRecording level
EDistance indicator
FLocation data download status
GFocus frame
HDate and time
IMovie mode
JTime remaining
KCard slot options
LNumber of available frames 1
MTemperature warning
NImage quality and size
OWhite balance
PFilm simulation
QDynamic range
RControl lock
SHistogram
TBattery level
USensitivity
VExposure compensation
WAperture
XShutter speed
YAE lock
TTL lock
ZMetering
aShooting mode
bFocus mode 2
cAF lock
dAF+MF indicator
eShutter type
fContinuous mode
gExposure indicator
hSelf-timer indicator
iFlash (TTL) mode
Flash compensation
jExternal power source in use 3
kShift amount/rotate amount
1 Shows “9999” if there is space for over 9999 frames.
2 In-focus () or manual focus (j) indicator may also be displayed.
3 The camera now displays an external power supply icon when drawing power from an optional AC-15V AC power adapter.
When a color temperature is selected for white balance (O), the chosen value now appears in the display (aColor Temperature).
Control Lock
Pressing a locked control displays a X icon.
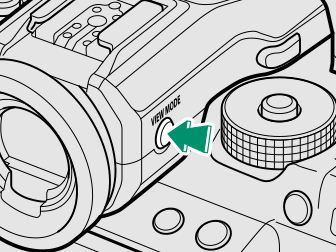
Choosing a Display Mode
Press the [VIEW MODE] button to cycle through the following display modes:
- E [EYE SENSOR]: Putting your eye to the viewfinder turns the viewfinder on and the LCD monitor off; taking your eye away turns the viewfinder off and LCD monitor on.
- [EVF ONLY]: Viewfinder on, LCD monitor off.
- [LCD ONLY]: LCD monitor on, viewfinder off.
- [EVF ONLY] + E: Putting your eye to the viewfinder turns the viewfinder on; taking it away turns the viewfinder off. The LCD monitor remains off.
- E [EYE SENSOR + LCD IMAGE DISP.]: Putting your eye to the viewfinder during shooting turns the viewfinder on, but the LCD monitor is used for the display of images once you remove your eye from the viewfinder after shooting.
The Eye Sensor
The eye sensor may respond to objects other than your eye or to light shining directly on the sensor.
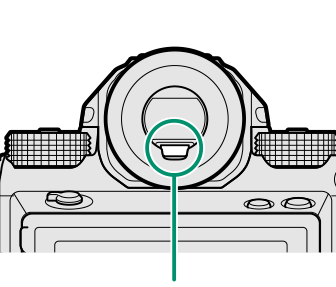
Eye sensor
Adjusting Display Brightness
The brightness and hue of the viewfinder and LCD monitor can be adjusted using the items in the D[SCREEN SETTING] menu. Choose [EVF BRIGHTNESS] or [EVF COLOR] to adjust viewfinder brightness or hue, [LCD BRIGHTNESS] or [LCD COLOR] to do the same for the LCD monitor.
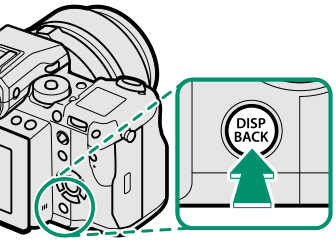
The DISP/BACK Button
The [DISP/BACK] button controls the display of indicators in the viewfinder and LCD monitor.
Viewfinder
| Full screen | Full screen (no indicators) |
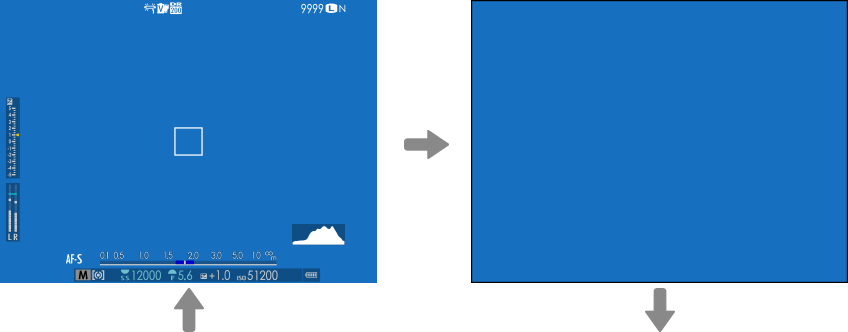
| Dual display (manual focus mode only) | Standard indicators |
Standard (no indicators)

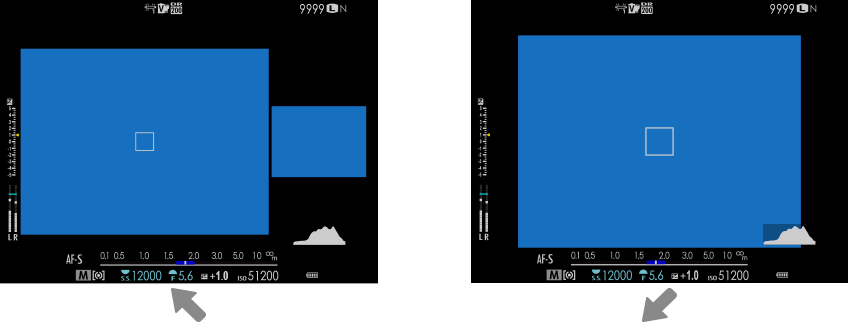
LCD Monitor
| Standard indicators | No indicators |
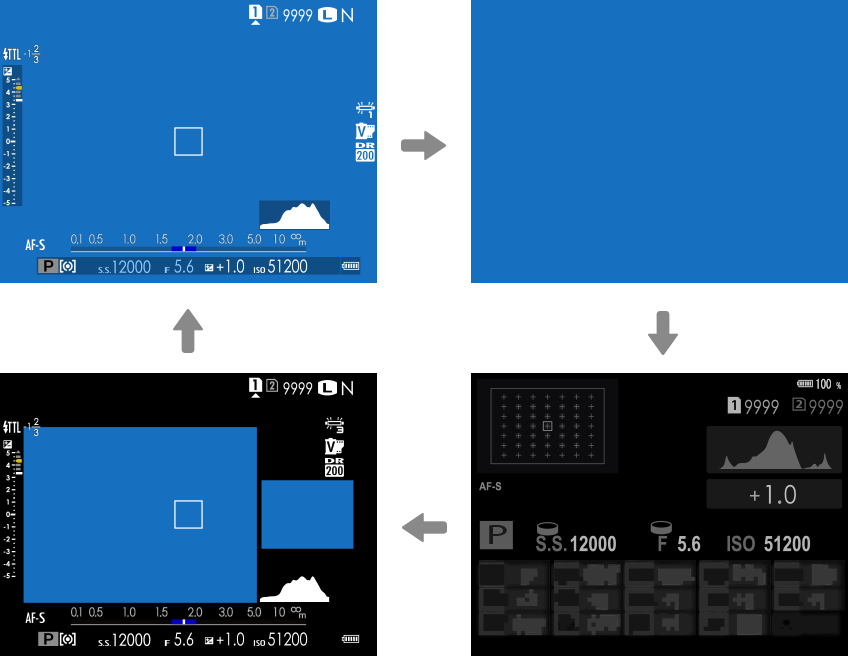
| Dual display (manual focus mode only) | Info display |
The Dual Display
The dual display consists of a large full-frame window and a smaller close-up of the focus area.
Customizing Standard Indicators
To choose the items shown in the standard indicator display:
-
Display standard indicators.
Press the [DISP/BACK] button until standard indicators are displayed.
-
Select [DISP. CUSTOM SETTING].
Select D[SCREEN SETTING] > [DISP. CUSTOM SETTING] in the setup menu.
-
Choose items.
Highlight items and press [MENU/OK] to select or deselect.
- [FRAMING GUIDELINE]
- [ELECTRONIC LEVEL]
- [FOCUS FRAME]
- [AF DISTANCE INDICATOR]
- [MF DISTANCE INDICATOR]
- [HISTOGRAM]
- [LIVE VIEW HIGHLIGHT ALERT]
- [SHOOTING MODE]
- [APERTURE/S-SPEED/ISO]
- [INFORMATION BACKGROUND]
- [Expo. Comp. (Digit)]
- [Expo. Comp. (Scale)]
- [FOCUS MODE]
- [PHOTOMETRY]
- [SHUTTER TYPE]
- [FLASH]
- [CONTINUOUS MODE]
- [DUAL IS MODE]
- [TOUCH SCREEN MODE]
- [WHITE BALANCE]
- [FILM SIMULATION]
- [DYNAMIC RANGE]
- [SHIFT AMOUNT OF T/S LENS]
- [ROTATE AMOUNT OF T/S LENS]
- [FRAMES REMAINING]
- [IMAGE SIZE/QUALITY]
- [MOVIE MODE & REC. TIME]
- [35mm FORMAT MODE]
- [MIC LEVEL ADJUSTMENT]
- [BATTERY LEVEL]
- [FRAMING OUTLINE]
-
Save changes.
Press [DISP/BACK] to save changes.
-
Exit the menus.
Press [DISP/BACK] as needed to exit the menus and return to the shooting display.
Virtual Horizon
Selecting [ELECTRONIC LEVEL] displays a virtual horizon. The camera is level when the two lines overlap. Note that the virtual horizon may not be displayed if the camera lens is pointed up or down. For a 3D display, press the function button to which [ELECTRONIC LEVEL] is assigned (a[FUNCTION (Fn) SETTING], Assigning Roles to the Function Buttons).
Roll
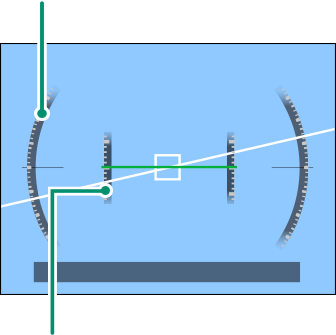
Pitch
Framing Outline
Enable [FRAMING OUTLINE] to make the borders of the frame easier to see against dark backgrounds.
Histograms
Histograms show the distribution of tones in the image. Brightness is shown by the horizontal axis, the number of pixels by the vertical axis.
|
Number of pixels
|
 |
|
Shadows |
Pixel brightness |  Highlights Highlights |


To view separate RGB histograms and a display showing areas of the frame that will be overexposed at current settings superimposed on the view through the lens, press the function button to which [HISTOGRAM] is assigned (a[FUNCTION (Fn) SETTING], Assigning Roles to the Function Buttons).
Overexposed areas blink
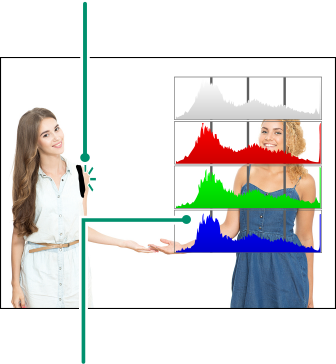
RGB histograms
The Secondary LCD Monitor
The secondary LCD monitor shows eight camera settings, four as text (items A to D) and four as icons (items E to H). Use D[SCREEN SETTING] > [SUB MONITOR SETTING] to choose the items displayed. Items for display when you are taking photographs can be selected separately from those shown in movie mode; in the lists that follow, items not available in movie mode are indicated by asterisks (“*”).
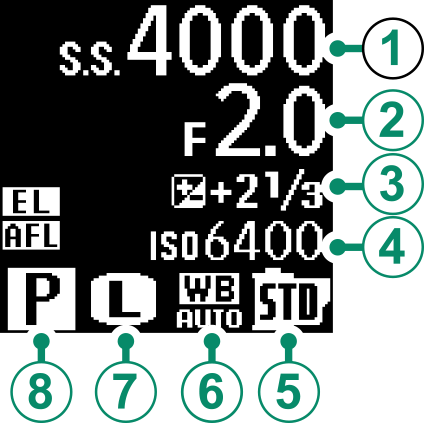
At default settings, the secondary LCD shows the following:
- Text: A[SHUTTER SPEED], B[APERTURE], C[EXPO. COMP.], D[ISO]
- Icons: E[FILM SIMULATION], F[WHITE BALANCE], G[IMAGE SIZE] *, H[SHOOTING MODE]
The following options are also available:
- Text: [MOVIE MODE] (icon only)*, [FRAMES REM.]*, [REC. TIME], [NONE]
- Icons: [PHOTOMETRY], [DRIVE MODE] *, [FOCUS MODE], [IMAGE QUALITY] *, [BATTERY LEVEL], [CARD SLOT OPTIONS], [SHUTTER TYPE] *, [DYNAMIC RANGE] *, [MOVIE MODE] *, [NONE]
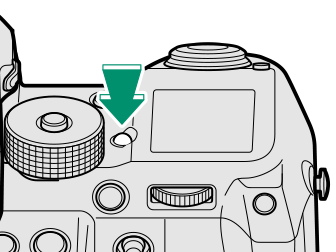
The Secondary Monitor Backlight
To turn on the secondary monitor backlight when you find the secondary LCD monitor too dark to read, press the secondary monitor backlight button. Press the button again to turn the backlight off.