
 .
.CThe Playback Menu
Adjust playback settings.
The playback menu is displayed when you press [MENU]/[OK] in playback mode.
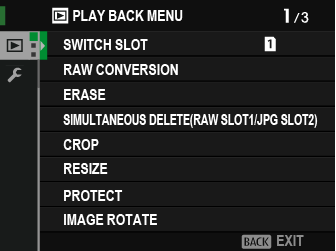
[SWITCH SLOT]
Choose the card from which images will be played back.
If two memory cards are inserted, you can press and hold the a button to choose a card for playback.
[RAW CONVERSION]
Even if you don’t have a computer, you can use the camera to modify RAW pictures and save them in JPEG or TIFF format.
Saving RAW Pictures in Another Format
-
Display a RAW picture.
-
Highlight [RAW CONVERSION] in the playback menu.
-
Press [MENU]/[OK].
A list of settings will be displayed.
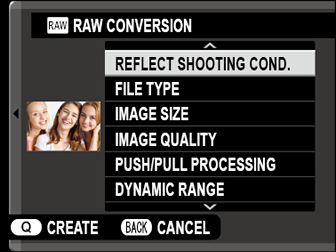
-
Press the focus stick (focus lever) up or down to highlight a setting.
-
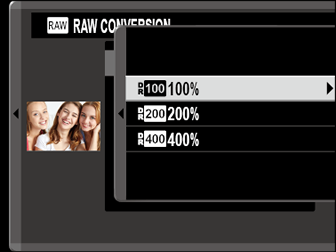
Press the focus stick right to display options.
-
Press the focus stick up or down to highlight the desired option.
-
Press [MENU]/[OK] to select the highlighted option. The settings list shown in Step 3 will be displayed. Repeat Steps 4 to 7 to adjust additional settings.
-
Press the [Q] button.
A preview of the JPEG or TIFF copy will be displayed.
-
Press [MENU]/[OK].
The JPEG or TIFF copy will be saved.
RAW conversion options can also be displayed by pressing the [Q] button when a RAW pictures is displayed during playback.
The settings that can be adjusted when converting pictures from RAW to another format are:
| Setting | Description |
|---|---|
| [REFLECT SHOOTING COND.] | Create a JPEG copy using the settings in effect at the time the photo was taken. |
| [FILE TYPE] | Choose a file format. |
| [IMAGE SIZE] | Choose an image size. |
| [IMAGE QUALITY] | Adjust image quality. |
| [PUSH/PULL PROCESSING] | Adjust exposure. |
| [DYNAMIC RANGE] | Enhance details in highlights for natural contrast. |
| [D RANGE PRIORITY] | Reduce loss of detail in highlights and shadows for natural-looking results when photographing high-contrast scenes. |
| [FILM SIMULATION] | Simulate the effects of different types of film. |
| [B & W ADJ.ab (Warm/Cool)] | Add a warm or cool cast to monochrome pictures. |
| [GRAIN EFFECT] | Add a film grain effect. |
| [COLOR CHROME EFFECT] | Deepen colors in shadows. |
| [COLOR CHROME FX BLUE] | Increase the range of tones available for rendering blues. |
| [SMOOTH SKIN EFFECT] | Smooth complexions. |
| [WHITE BALANCE] | Adjust white balance. |
| [WB SHIFT] | Fine-tune white balance. |
| [HIGHLIGHT TONE] | Adjust highlights. |
| [SHADOW TONE] | Adjust shadows. |
| [COLOR] | Adjust color density. |
| [SHARPNESS] | Sharpen or soften outlines. |
| [NOISE REDUCTION] | Process the copy to reduce mottling. |
| [LENS MODULATION OPTIMIZER] | Improve definition by adjusting for diffraction and the slight loss of focus at the periphery of the lens. |
| [COLOR SPACE] | Choose the color space used for color reproduction. |
[ERASE]
Delete individual pictures, multiple selected pictures, or all pictures.
Deleted pictures cannot be recovered. Protect important pictures or copy them to a computer or other storage device before proceeding.
| Option | Description |
|---|---|
| [FRAME] | Delete pictures one at a time. |
| [SELECTED FRAMES] | Delete multiple selected pictures. |
| [ALL FRAMES] | Delete all unprotected pictures. |
[FRAME]
-
Select [FRAME] for [ERASE] in the playback menu.
-
Press the focus stick (focus lever) left or right to scroll through pictures and press [MENU]/[OK] to delete.
A confirmation dialog is not displayed before pictures are deleted; be sure the correct picture is selected before pressing [MENU]/[OK].
Additional pictures can be deleted by pressing [MENU]/[OK]. Press the focus stick left or right to scroll through pictures and press [MENU]/[OK] to delete.
[SELECTED FRAMES]
-
Select [SELECTED FRAMES] for [ERASE] in the playback menu.
-
Highlight pictures and press [MENU]/[OK] to select.
- Selected pictures are indicated by check marks (R).
- To deselect a highlighted picture, press [MENU]/[OK] again.
-
When the operation is complete, press [DISP/BACK] to display a confirmation dialog.
-
Highlight [OK] and press [MENU]/[OK] to delete the selected pictures.
Pictures in photobooks or printer orders are shown by S.
[ALL FRAMES]
-
Select [ALL FRAMES] for [ERASE] in the playback menu.
-
A confirmation dialog will be displayed; highlight [OK] and press [MENU]/[OK] to delete all unprotected pictures.
Pressing [DISP/BACK] cancels deletion; note that any pictures deleted before the button was pressed cannot be recovered.
If a message appears stating that the selected images are part of a DPOF print order, press [MENU]/[OK] to delete the pictures.
[SIMULTANEOUS DELETE(RAW SLOT1/JPG SLOT2)]
Taking photos with [RAW/JPEG] selected for D[SAVE DATA SET-UP] > [CARD SLOT SETTING (STILL IMAGE)] creates two copies. Choose whether deleting the RAW image will also delete the JPEG copy.
| Option | Description |
|---|---|
| [ON] | Deleting the RAW image from the card in Slot 1 also deletes the JPEG copy from the card in Slot 2. |
| [OFF] | Deleting the RAW image from the card in Slot 1 does not delete the JPEG copy from the card in Slot 2. |
[CROP]
Create a cropped copy of the current picture.
-
Display the desired picture.
-
Select [CROP] in the playback menu.
-
Use the rear command dial to zoom in and out and press the focus stick (focus lever) up, down, left, or right to scroll the picture until the desired portion is displayed.
-
Press [MENU]/[OK] to display a confirmation dialog.
-
Press [MENU]/[OK] again to save the cropped copy to a separate file.
The higher the zoom ratio, the smaller the number of pixels in the cropped copy.
If the size of the final copy will be a, [YES] will be displayed in yellow.
All copies have an aspect ratio of 4:3.
[RESIZE]
Create a small copy of the current picture.
-
Display the desired picture.
-
Select [RESIZE] in the playback menu.
-
Highlight a size and press [MENU]/[OK] to display a confirmation dialog.
-
Press [MENU]/[OK] again to save the resized copy to a separate file.
The sizes available vary with the size of the original image.
[PROTECT]
Protect pictures from accidental deletion. Highlight one of the following options and press [MENU]/[OK].
| Option | Description |
|---|---|
| [FRAME] | Protect selected pictures. Press the focus stick (focus lever) left or right to view pictures and press [MENU]/[OK] to select or deselect. Press [DISP/BACK] when the operation is complete. |
| [SET ALL] | Protect all pictures. |
| [RESET ALL] | Remove protection from all pictures. |
Protected pictures will be deleted when the memory card is formatted.
Protecting images currently selected for upload to paired smartphones or tablets removes upload marking.
[IMAGE ROTATE]
Rotate pictures.
-
Display the desired picture.
-
Select [IMAGE ROTATE] in the playback menu.
-
Press the focus stick (focus lever) down to rotate the picture 90° clockwise, up to rotate it 90° counterclockwise.
-
Press [MENU]/[OK]. The picture will automatically be displayed in the selected orientation whenever it is played back on the camera.
Protected pictures cannot be rotated. Remove protection before rotating pictures.
The camera may not be able to rotate pictures created with other devices. Pictures rotated on the camera will not be rotated when viewed on a computer or on other cameras.
Pictures taken with D[SCREEN SET-UP] > [AUTOROTATE PB] are automatically displayed in the correct orientation during playback.
[RED EYE REMOVAL]
Remove red-eye from portraits. The camera will analyze the image; if red-eye is detected, the image will be processed to create a copy with reduced red-eye.
-
Display the desired picture.
-
Select [RED EYE REMOVAL] in the playback menu.
-
Press [MENU]/[OK].
Results vary depending on the scene and the camera’s success in detecting faces.
The amount of time needed to process the image varies with the number of faces detected.
Red eye cannot be removed from pictures that have already been processed using red-eye removal, which are indicated by a e icon during playback.
Red eye removal cannot be performed on RAW images.
[VOICE MEMO SETTING]
Add a voice memo to the current photograph.
-
Select [ON] for [VOICE MEMO SETTING] in the playback menu.
-
Display a photo to which you wish to add a voice memo.
-
Press and hold the center of the front command dial to record the memo. Recording ends after 30 s or when you release the dial.
The new memo will be recorded over any existing memos.
Voice memos cannot be added to protected pictures.
Deleting the picture also deletes the memo.
Playing Voice Memos
Pictures with voice memos are indicated by q icons during playback.
- To play a memo, select the picture and press the center of the front command dial.
- A progress bar will be displayed while the memo plays back.
- Volume can be adjusted by pressing [MENU]/[OK] to pause playback and then pressing the focus stick (focus lever) up or down to adjust the volume. Press [MENU]/[OK] again to resume playback. Volume can also be adjusted using D[SOUND SET-UP] > [PLAYBACK VOLUME].
[RATING]
Rate pictures using stars.
-
Select [RATING] in the playback menu.
-
Rotate the front command dial to choose a picture and the rear command dial to choose a rating of from 0 to 5 stars (“I”).
The focus stick (focus lever) can be used in place of the front command dial to choose a picture.
The rating dialog can also be displayed by pressing the [AE-L] button (vertical grip [AE-L] button) in single-frame, nine-frame, or hundred-frame playback.
Use touch controls to zoom in or out.
[COPY]
Copy pictures between the cards in the first and second slots.
-
Select [COPY] in the playback menu.
-
Highlight one of the following options.
Option Description [SLOT1]y[SLOT2] Copy pictures from the card in the first slot to the card in the second slot. [SLOT2]y[SLOT1] Copy pictures from the card in the second slot to the card in the first slot. -
Press the focus stick (focus lever) right.
-
Highlight one of the following options and press [MENU]/[OK].
Option Description [FRAME] Copy selected pictures. Press the focus stick left or right to view pictures and press [MENU]/[OK] to copy the current picture. [ALL FRAMES] Copy all pictures.
Copying ends when the destination is full.
If you attempt to copy a file over 4 GB in size to a memory card with a capacity of 32 GB or less, copying will end and the file will not be copied.
[IMAGE TRANSFER ORDER]
Select photos for upload to a paired smartphone or tablet.
-
Select [IMAGE TRANSFER ORDER] > [SELECT FRAMES] in the playback menu.
-
Highlight photos and press [MENU]/[OK] to select or deselect. Repeat until all the desired photos have been selected.
-
Press [DISP/BACK] to exit to playback.
If [ON] is selected for both D[CONNECTION SETTING] > [Bluetooth SETTINGS] > [Bluetooth ON/OFF] and [AUTO IMAGE TRANSFER], upload will begin shortly after you exit to playback or turn the camera off.
Image transfer orders can contain a maximum of 999 pictures.
The following cannot be selected for upload:
- Protected pictures
- Movies
- RAW images
- “Gift” pictures (pictures taken with other cameras)
If [PAIRING/TRANSFER ORDER] is selected for D[CONNECTION SETTING] > [GENERAL SETTINGS] > r[BUTTON SETTING], photos can also be marked for upload using the [Fn1] button.
To remove upload marking from all pictures in the current order, select [IMAGE TRANSFER ORDER] > [RESET ORDER].
If [ON] is selected for D[CONNECTION SETTING] > [Bluetooth SETTINGS] > [AUTO IMAGE TRANSFER], photos will automatically be marked for upload as they are taken.
[WIRELESS COMMUNICATION]
Connect to smartphones running the latest version of the FUJIFILM Camera Remote app. The smartphone can then be used to:
- Control the camera and take pictures remotely
- Receive pictures uploaded from the camera
- Browse the pictures on the camera and download selected pictures
- Upload location data to the camera
For downloads and other information, visit:
[PHOTOBOOK ASSIST]
Create books from your favorite photos.
Creating a Photobook
-
Select [NEW BOOK] for C[PLAY BACK MENU] > [PHOTOBOOK ASSIST].
-
Scroll through the images and press the focus stick (focus lever) up to select or deselect. Press [MENU]/[OK] to exit when the book is complete.
Neither photographs a or smaller nor movies can be selected for photobooks.
The first picture selected becomes the cover image. Press the focus stick down to select the current image for the cover instead.
-
Highlight [COMPLETE PHOTOBOOK] and press [MENU]/[OK] (to select all photos for the book, choose [SELECT ALL]). The new book will be added to the list in the photobook assist menu.
Books can contain up to 300 pictures.
Books that contain no photos are automatically deleted.
Photobooks
Photobooks can be copied to a computer using [MyFinePix Studio] software.
Viewing Photobooks
Highlight a book in the photobook assist menu and press [MENU]/[OK] to display the book, then press the focus stick (focus lever) left or right to scroll through the pictures.
Editing and Deleting Photobooks
Display the photobook and press [MENU]/[OK]. The following options will be displayed; select the desired option and follow the on-screen instructions.
- [EDIT]: Edit the book as described in “Creating a Photobook”.
- [ERASE]: Delete the book.
[PRINT ORDER (DPOF)]
Create a digital “print order” for DPOF-compatible printers.
-
Select C[PLAY BACK MENU] > [PRINT ORDER (DPOF)].
-
Select [WITH DATE]s to print the date of recording on pictures, [WITHOUT DATE] to print pictures without dates, or [RESET ALL] to remove all pictures from the print order before proceeding.
-
Display a picture you wish to include in or remove from the print order.
-
Press the focus stick (focus lever) up or down to choose the number of copies (up to 99).
To remove a picture from the order, press the focus stick down until the number of copies is 0.
Total number of prints
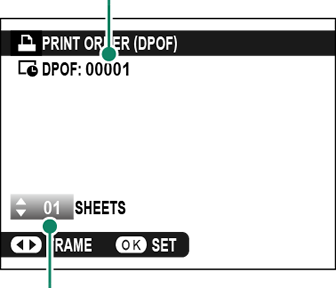
Number of copies
Repeat steps 3–4 to complete the print order.
-
The total number of prints is displayed in the monitor. Press [MENU]/[OK] to exit.
The pictures in the current print order are indicated by a u icon during playback.
Print orders can contain a maximum of 999 pictures from a single memory card.
If a memory card is inserted containing a print order created by another camera, you will need to delete the order before creating as described above.
[instax PRINTER PRINT]
To print pictures to optional [Fujifilm instax SHARE] printers, first select D[CONNECTION SETTING] > [instax PRINTER CONNECTION SETTING] and enter the [instax SHARE] printer name (SSID) and password, then follow the steps below.
-
Turn the printer on.
-
Select C[PLAY BACK MENU] > [instax PRINTER PRINT]. The camera will connect to the printer.
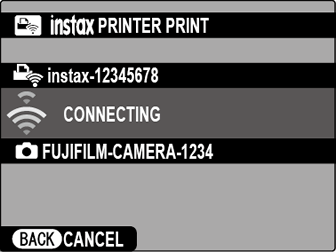
-
Use the focus stick (focus lever) to display the picture you want to print, then press [MENU]/[OK]. The picture will be sent to the printer and printing will start.
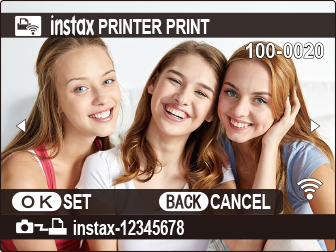
Pictures taken with other cameras cannot be printed.
The area printed is smaller than the area visible in the LCD monitor.
The displays may vary depending on the printer connected.
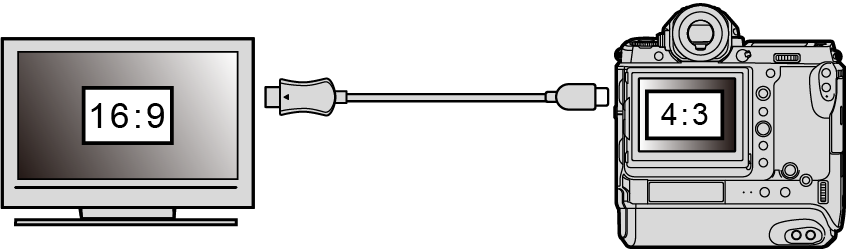
[DISP ASPECT]
Choose how High Definition (HD) devices display pictures with an aspect ratio of 4∶3 (this option is available only when an HDMI cable is connected).
| Option | ||
|---|---|---|
| [16:9] | [4:3] | |
| Display |  |
 |
Select 16∶9 to display the image so that it fills the screen with its top and bottom cropped out, 4∶3 to display the entire image with black bands at either side.


