
 .
.Parts of the Camera
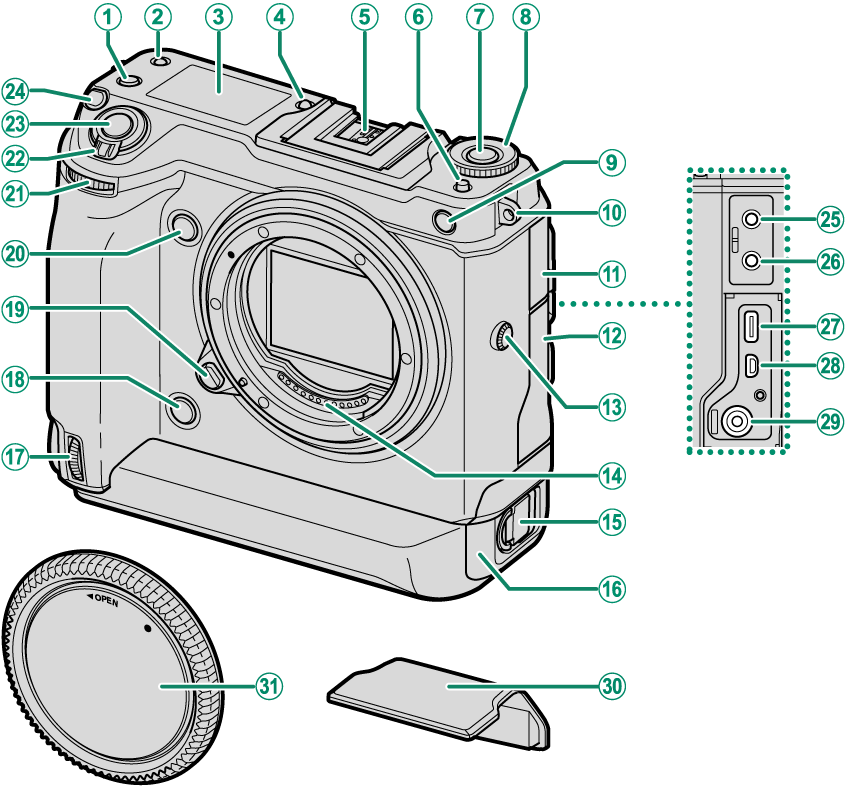
A[Fn2] button
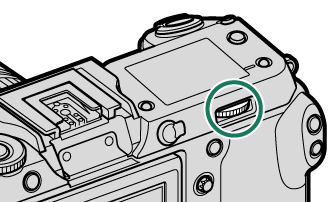
BSecondary LCD monitor mode button
CSecondary LCD monitor
DSecondary monitor backlight button
EHot shoe
F[DRIVE] mode dial release button
G[DRIVE] button
H[DRIVE] mode dial
IAF-assist illuminator
Self-timer lamp
JStrap eyelet
KConnector cover 1
LConnector cover 2
MSync terminal
NLens signal contacts
OBattery tray latch
PBattery tray
QVertical grip front command dial
RVertical grip [Fn3] button
SLens release button
T[Fn3] button
UFront command dial
V[ON]/[OFF] switch
WShutter button
X[Fn1] button
d (exposure compensation) button
YMicrophone jack
ZHeadphone jack
aUSB connector (Type-C)
bHDMI Micro connector (Type D)
c15 V DC-IN connector
dHot shoe cover
eBody cap

fb (delete) button
g[AE-L] (exposure lock) button
hFocus stick (focus lever)
iFocus mode selector
j[AF-ON] button
kRear command dial
l[Fn4] button
m[Q] (quick menu) button
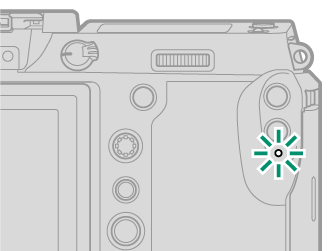
nIndicator lamp 1
oMemory card slot cover
pMemory card slot cover latch
qRemote release connector cover
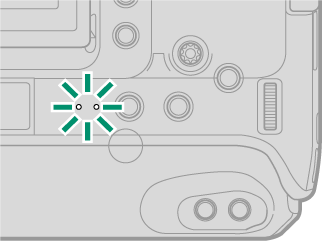
rIndicator lamp 2
sRear secondary monitor
tLCD monitor (LCD)
Touch screen
ua (playback) button
v[DISP] (display)/[BACK] button
w[MENU]/[OK] button
xMemory card slot 1
yMemory card slot 2
zRemote release connector
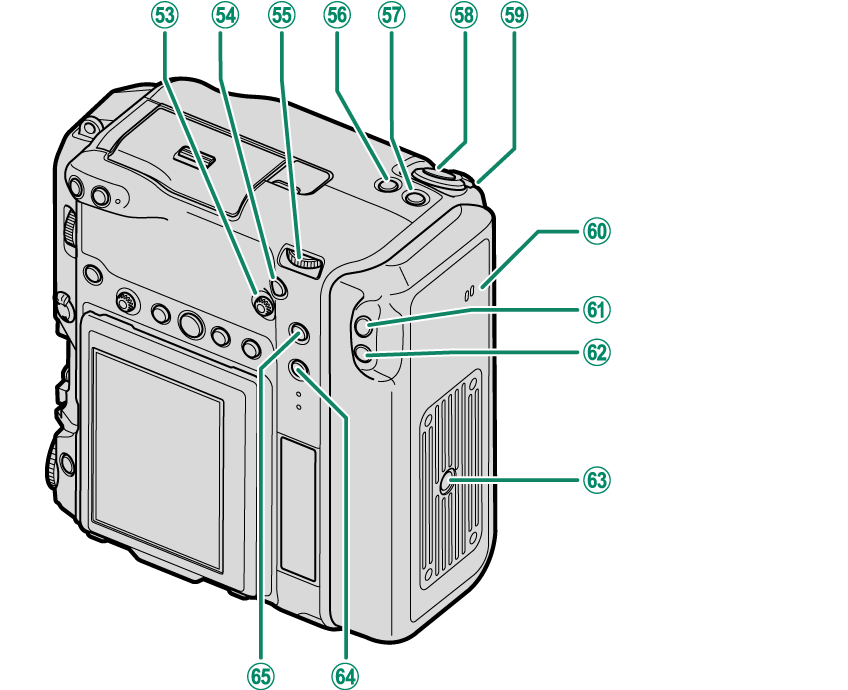
0Vertical grip focus stick (focus lever)
1Vertical grip [AF-ON] button
2Vertical grip rear command dial
3Vertical grip [Fn2] button
4Vertical grip [Fn1] button
d (exposure compensation) button
5Vertical grip shutter button
6Vertical grip control lock
7Speaker
8Vertical grip [Fn4] button
9Vertical grip [Q] (quick menu) button
-Tripod mount
^[Fn5] button
\Vertical grip [AE-L] (exposure lock) button
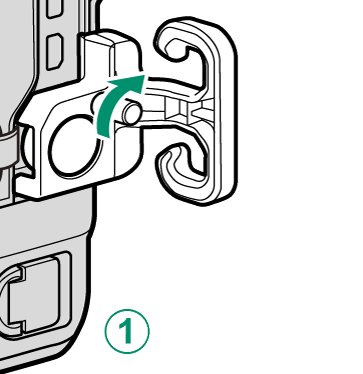
The Cable Protector
AThe cable protector prevents accidental disconnection of the USB cable or AC adapter. Attach the protector as shown and tighten the lock screw.
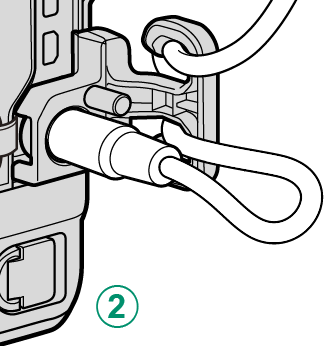
BConnect the cable and pass it through the protector as shown.
- The Serial Number Plate
- The Focus Stick (Focus Lever)
- The [DRIVE] mode dial
- The [DRIVE] Button
- The Command Dials
- The Indicator Lamp
- The LCD Monitor
The Serial Number Plate
Do not remove the serial number plate, which provides the FCC ID, KC mark, CMIIT ID, serial number, and other important information.

| Serial number plate |
The Focus Stick (Focus Lever)
Tilt or press the focus stick to select the focus area. The focus stick can also be used to navigate the menus.

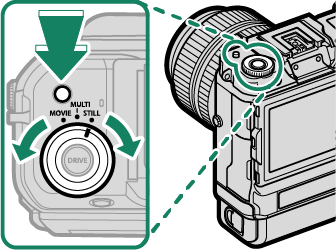
The [DRIVE] mode dial
The [DRIVE] mode dial is used to select the drive mode. Hold the [DRIVE] mode dial release button while rotating the dial to select the desired mode.
| Option | Description |
|---|---|
| [STILL] | Take pictures one at a time or in bursts (aTaking Photographs (Mode P), Continuous Shooting (Burst Mode)). |
| [MULTI] | Record a multiple exposures or take a series of photographs using bracketing (aBracketing, Multiple Exposures, PIXEL SHIFT MULTI SHOT). |
| [MOVIE] | Shoot movies (aRecording Movies). |
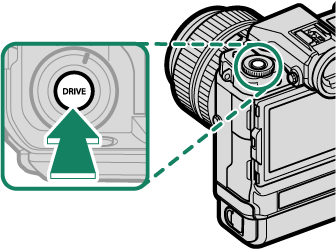
The [DRIVE] Button
Pressing the [DRIVE] button when [STILL] or [MULTI] is selected with the [DRIVE] mode dial displays drive mode options. Pressing the button when [MOVIE] is selected displays movie mode options (aMOVIE MODE).
| Drive mode options ([STILL]) | Drive mode options ([MULTI]) |
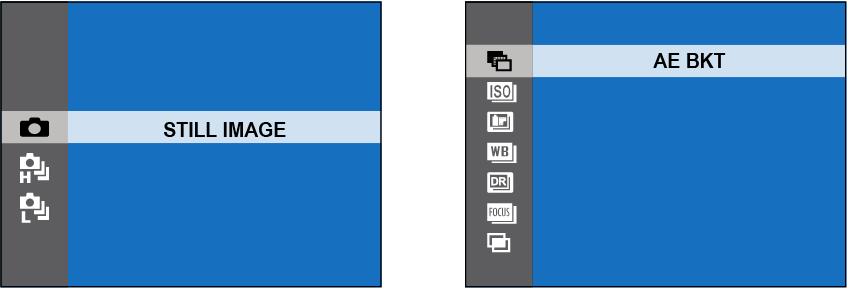

Drive mode options ([MOVIE])
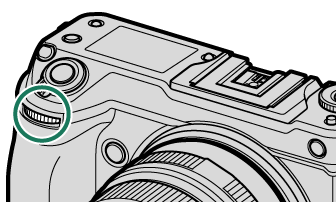
The Command Dials
Rotate or press the command dials to:
|
Rotate |
Select menu tabs or page through menus Choose the desired combination of shutter speed and aperture (program shift) Adjust aperture 1, 2 View other pictures during playback |
|---|---|
|
Press |
Switch between aperture and ISO sensitivity 2 Press and hold to choose the option selected for D [BUTTON/DIAL SETTING] > [COMMAND DIAL SETTING] in the D (setup) menu |


1 Can be changed using D [BUTTON/DIAL SETTING] > [COMMAND DIAL SETTING].
2 If the lens is equipped with an aperture ring with a “[C]” position, the camera command dials can be used to adjust aperture when the aperture ring is rotated to [C].
3 Available only if [FOCUS CHECK] is assigned to a function button.
4 Only if a value other than auto is selected for shutter speed.
|
Rotate |
Highlight menu items Choose the desired combination of shutter speed and aperture (program shift) Choose a shutter speed 1, 4 Adjust exposure compensation by pressing the d button and rotating the dial 1 Adjust settings in the quick menu Choose the size of the focus frame Zoom in or out in full frame playback Zoom in or out in multi-frame playback |
|---|---|
|
Press |
Zoom in on the active focus point 3 Press and hold to choose the manual focus mode focus display 3 Zoom in on the active focus point during playback |
1 Can be changed using D [BUTTON/DIAL SETTING] > [COMMAND DIAL SETTING].
2 If the lens is equipped with an aperture ring with a “[C]” position, the camera command dials can be used to adjust aperture when the aperture ring is rotated to [C].
3 Available only if [FOCUS CHECK] is assigned to a function button.
4 Only if a value other than auto is selected for shutter speed.
The Indicator Lamp
Camera status is shown by the indicator lamp 1.
| Indicator lamp 1 | Camera status |
|---|---|
| Glows green | Focus locked. |
| Blinks green | Focus or slow shutter speed warning. Pictures can be taken. |
| Blinks green and orange | Camera on: Recording pictures. Additional pictures can be taken. Camera off: Uploading pictures to a smartphone or tablet. * |
| Glows orange | Recording pictures. No additional pictures can be taken at this time. |
| Blinks red | Lens or memory error. |
* Displayed only if pictures are selected for upload.
Warnings may also appear in the display.
The indicator lamp remains off while your eye is to the viewfinder.
If the camera is off, the two lamps designated as “indicator lamp 2” light green while the batteries are charging. The lamp on the right shows the status of the battery in the right battery chamber, that on the left the status of the battery in the left battery chamber (aCharging via AC Adapter).
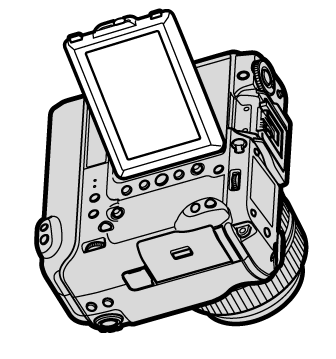
The LCD Monitor
The LCD monitor can be tilted for easier viewing, but be careful not to touch the wires or trap fingers or other objects behind the monitor. Touching the wires could cause camera malfunction.

The LCD monitor also functions as a touch screen that can be used for:
“Tall” (Portrait) Orientation
The display can also be tilted to take pictures from high or low angles when the camera is rotated to take pictures in “Tall” (portrait) orientation.
Press the tilt lock release and tilt the display as shown in Figure 1.
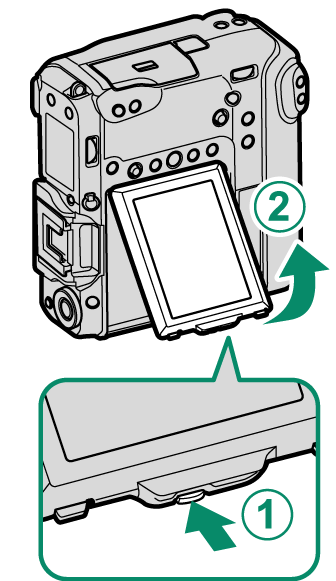
| Figure 1 |
To take high-angle shots, hold the camera in the orientation shown in Figure 2.
| Figure 2 |


