
 .
.SHOOTING MENU 2 (B)
Adjust shooting settings.
The shooting menu is displayed when you press MENU/OK in shooting mode. Choose from tabs A, B, or C.
The options available vary with the shooting mode selected.
- SELF-TIMER
- INTERVAL TIMER SHOOTING
- TIME-LAPSE MOVIE MODE
- WHITE BALANCE
- FLASH SET-UP
- MOVIE SET-UP
- IS MODE
B SELF-TIMER
Use the timer for group- or self-portraits, to prevent blur caused by camera shake, or to release the shutter automatically when selected conditions are met (a Using the Self Timer).
o INTERVAL TIMER SHOOTING
Configure the camera to take photos automatically at a preset interval. If desired, frames shot using interval timer shooting can be joined to form a time-lapse movie.
-
Highlight o INTERVAL TIMER SHOOTINGin the shooting menu and press MENU/OK.
-
Use the selector to choose the interval and number of shots. Press MENU/OK to proceed.
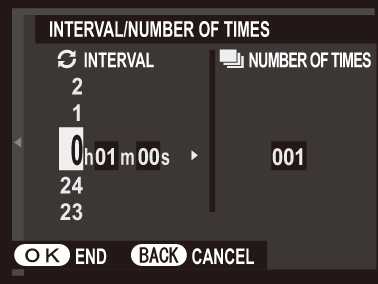
-
Highlight one of the following recording types and press MENU/OK.
- STILL: Each photo is recorded separately.
- STILL + TIME-LAPSE MOVIE: Each photo is recorded separately; in addition, the entire sequence is recorded as a time-lapse movie.
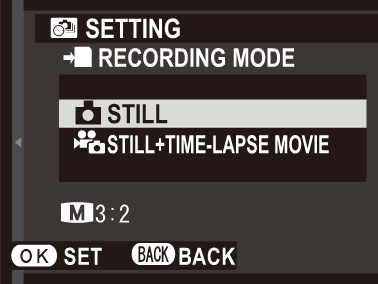
The frame size and rate for the time-lapse movie can be selected using P TIME-LAPSE MOVIE MODE before shooting begins.
-
Use the selector to choose the starting time and then press MENU/OK.
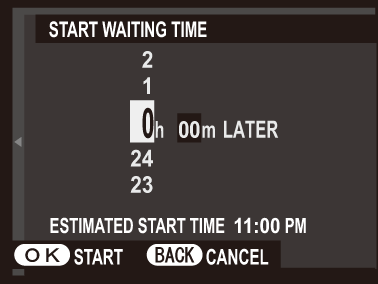
-
Shooting will start automatically.

Interval timer photography cannot be used during burst, 4K burst, HDR, panorama, or multiple exposure photography.
Use of a tripod is recommended.
The display sometimes turns off between shots and lights a few seconds before the next shot is taken.
The display can be activated at any time by pressing the shutter button.
Viewing Pictures Taken Using Interval Timer Shooting
Only the first frame of each series will be displayed. Press the selector down to view the other pictures in the series.
Pictures taken during interval timer shooting have file names that start with “S”.
e.g. S0010001.JPG
P TIME-LAPSE MOVIE MODE
Choose the frame size and rate for time-lapse movies.
| Option | Frame size | Rate |
|---|---|---|
|
V2160/15P* |
3840×2160 (4K) |
15 fps |
|
i1080/59.94P i1080/50P i1080/24P i1080/23.98P |
1920×1080 (Full HD) |
59.94 fps, 50 fps, 24 fps, 23.98 fps |
|
h720/59.94P h720/50P h720/24P h720/23.98P |
1280×720 (HD) |
* Use a memory card with a UHS speed class of 3 or better when recording time-lapse movies that will be viewed on the camera.
D WHITE BALANCE
For natural colors, choose a white balance option that matches the light source (a White Balance).
p FLASH SET-UP
Adjust flash settings.
FLASH MODE
Choose a flash mode (a Using the Flash).
FLASH COMPENSATION
Adjust flash brightness. Choose from values between +2 EV and -2 EV. Note that the desired results may not be achieved depending on shooting conditions and the distance to the subject.
| Options | ||||||||||||
|---|---|---|---|---|---|---|---|---|---|---|---|---|
| +2 | +1 2/3 | +1 1/3 | +1 | +2/3 | +1/3 | ±0 | -1/3 | -2/3 | -1 | -1 1/3 | -1 2/3 | -2 |
RED EYE REMOVAL
Choose ON to remove red-eye effects caused by the flash.
| Options | |
|---|---|
| ON | OFF |
Red-eye reduction is performed only when a face is detected.
W MOVIE SET-UP
Adjust movie-recording options.
MOVIE MODE
Choose a frame size and rate for movie recording.
| Option | Frame size | Rate |
|---|---|---|
|
V2160/15P 1, 2 |
3840×2160 (4K) |
15 fps |
|
i1080/59.94P 1 |
1920×1080 (Full HD) |
59.94 fps |
i1080/50P |
50 fps |
|
i1080/24P |
24 fps |
|
i1080/23.98P |
23.98 fps |
|
|
n1080 SQUARE 59.94P |
1080×1080 (Full HD) |
59.94 fps |
n1080 SQUARE 50P |
50 fps |
|
n1080 SQUARE 24P |
24 fps |
|
n1080 SQUARE 23.98P |
23.98 fps |
|
|
h720/59.94P |
1280×720 (HD) |
59.94 fps |
h720/50P |
50 fps |
|
h720/24P |
24 fps |
|
h720/23.98P |
23.98 fps |
|
|
m720 SQUARE 59.94P |
720×720 (HD) |
59.94 fps |
m720 SQUARE 50P |
50 fps |
|
m720 SQUARE 24P |
24 fps |
|
m720 SQUARE 23.98P |
23.98 fps |
1 Electronic vibration reduction is not performed.
2 Use a memory card with a UHS speed class of 3 or better when recording time-lapse movies that will be viewed on the camera.
The default setting for movies recorded to internal memory is V 2160/15P.
HD HIGH SPEED VIDEO
Record high-frame-rate HD movies that play back in slow motion, giving you time to view fast-moving subjects or details too fleeting for the naked eye: a batter’s swing, darting insects, or swiftly-flowing waters.
| Option | Description |
|---|---|
| 1.6×a59.94P F100P |
Record HD (1280×720) movies at 1.6×, 2×, 3.3×, or 4× speed and a frame rate of 100 fps. The movies play back at 1/1.6, 1/2, 1/3.3, or 1/4 speed, respectively. |
|
2×a50P F100P |
|
|
3.3×a29.97P F100P |
|
|
4×a25P F100P |
|
| OFF | High-speed recording off. |
High-speed movies are recorded at a reduced frame size with no sound. Focus, exposure, and white balance are fixed at the values in effect at the start of recording. Movies shot under low light may be underexposed due to the high recording speeds; we recommend shooting outdoors in daylight or in other brightly-lit locations. If desired, high-speed movies can also be viewed in slow-motion on a computer.
FOCUS MODE
Choose the focus mode for movie recording.
| Option | Description |
|---|---|
| CONTINUOUS AF | The camera focuses using continuous AF. |
| SINGLE AF | The camera focuses using single AF. |
WIND FILTER
Choose whether to enable wind noise reduction during movie recording.
| Options | |
|---|---|
| ON | OFF |
L IS MODE
Choose from the following image stabilization options:
| Option | Description |
|---|---|
| L CONTINUOUS +MOTION | Image stabilization on. If +MOTION is selected, the camera will adjust shutter speed to reduce motion blur when moving objects are detected. |
| l CONTINUOUS | |
| M SHOOTING +MOTION | As above, except that image stabilization is performed only when the shutter is released. If +MOTION is selected, the camera will adjust shutter speed to reduce motion blur when moving objects are detected. |
| m SHOOTING ONLY | |
| OFF | Image stabilization off. Choose this option when using a tripod. |
+MOTION has no effect when sensitivity is set to a fixed value, and may also be unavailable at some other combinations of settings. The effect may vary with lighting conditions and the speed at which the object is moving.


