
 .
.Charging the Battery
The battery is not charged at shipment. Before use, charge the battery in the supplied battery charger.
An NP-W126S rechargeable battery is supplied with the camera. Charging takes about 150 minutes.
-
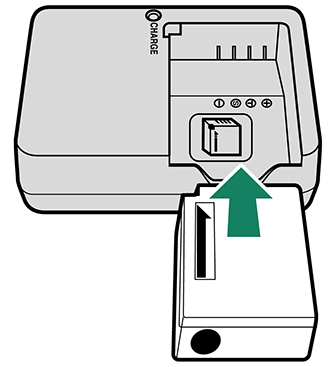
Place the battery in the charger.
Place the battery in the supplied battery charger as shown.
-
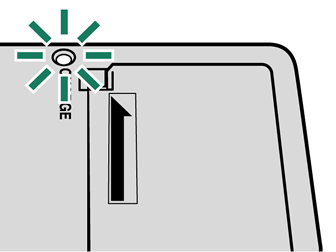
Plug the charger in.
Plug the charger into an indoor power outlet. The charging indicator will light.
-
Charge the battery.
Remove the battery when charging is complete.
The Charging Indicator
The charging indicator shows battery charge status as follows:
| Charging indicator | Battery status | Action |
|---|---|---|
| Off | Battery not inserted. | Insert the battery. |
| Battery fully charged. | Remove the battery. | |
| On | Battery charging. | — |
| Blinks | Battery fault. | Unplug the charger and remove the battery. |
The supplied AC cord is for use exclusively with the supplied battery charger. Do not use the supplied charger with other cords or the supplied cord with other devices.
Do not affix labels or other objects to the battery. Failure to observe this precaution could make it impossible to remove the battery from the camera.
Do not short the battery terminals. The battery could overheat.
Read the cautions in “The Battery and Power Supply”.
Use only battery chargers designated for use with the battery. Failure to observe this precaution could result in product malfunction.
Do not remove the labels from the battery or attempt to split or peel the outer casing.
The battery gradually loses its charge when not in use. Charge the battery one or two days before use. If the battery fails to hold a charge, it has reached the end of its charging life and must be replaced.
Unplug the charger when it is not in use.
Remove dirt from the battery terminals with a clean, dry cloth. Failure to observe this precaution could prevent the battery from charging.
Note that charging times increase at low or high temperatures.
Charging via Computer
The battery also charges if the camera is connected to a computer. Turn the camera off, insert the battery, and connect a USB cable as shown, making sure the connectors are fully inserted. The charging time is not affected by the type of cable used.
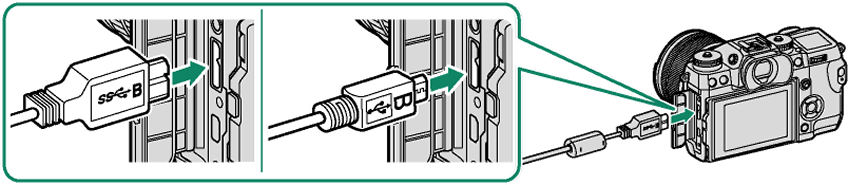
| Micro USB (Micro-B) USB 3.0 | Micro USB (Micro-B) USB 2.0 |
Battery status is shown by the indicator lamp.
| Indicator lamp | Battery status |
|---|---|
| On | Battery charging |
| Off | Charging complete |
| Blinks | Battery fault |
Connect the camera directly to the computer; do not use a USB hub or keyboard. Charging stops if the computer enters sleep mode; to resume charging, activate the computer and disconnect and reconnect the USB cable. Charging may not be supported depending on the model of computer, computer settings, and the computer’s current state.


