
 .
.Camera Displays
This section lists the indicators that may be displayed during shooting.
For illustrative purposes, displays are shown with all indicators lit.
- The Electronic Viewfinder
- The LCD Monitor
- Choosing a Display Mode
- Adjusting Display Brightness
- The DISP/BACK Button
- The Dual Display
- Customizing the Standard Display
- The Secondary LCD Monitor
- The Rear Secondary Monitor
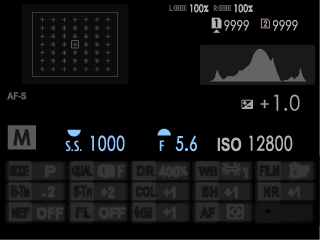
The Electronic Viewfinder
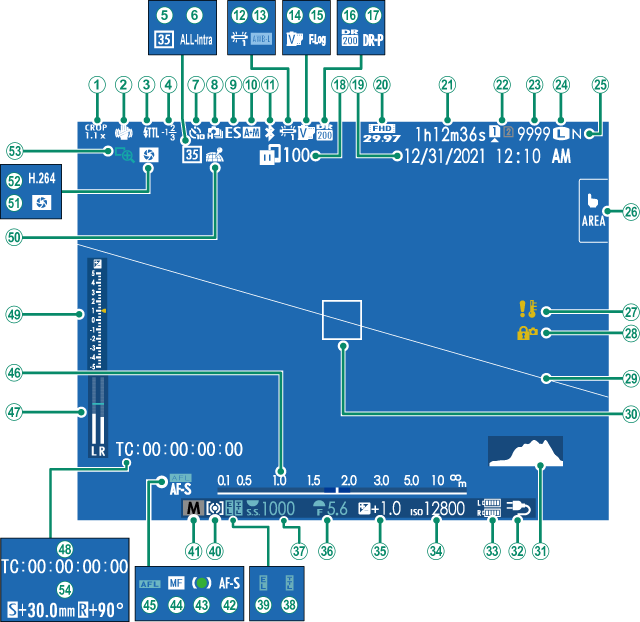
ACrop factor
BIS mode 2
CFlash (TTL) mode
DFlash compensation
E35mm format mode
FMovie compression
GSelf-timer indicator
HContinuous mode
IShutter type
JAF+MF indicator 2
KBluetooth ON/OFF
LWhite balance
MAWB lock
NFilm simulation
OF-Log/HLG/RAW recording
PDynamic range
QD-range priority
RImage transfer status
SDate and time
TMovie mode
URecording time available/
elapsed recording time
VCard slot options
WNumber of available frames 1
XImage size
YImage quality
ZTouch screen mode
aTemperature warning
bControl lock 3
cVirtual horizon
dFocus frame
eHistogram
fPower supply
gBattery level
hSensitivity
iExposure compensation
jAperture
kShutter speed
lTTL lock
mAE lock
nMetering
oShooting mode
pFocus mode 2
qFocus indicator 2
rManual focus indicator 2
sAF lock
tDistance indicator 2
uRecording level 2
vTime code
wExposure indicator
xLocation data download status
yDepth-of-field preview
zH.265(HEVC)/H.264
0Focus check
1Shift amount/rotate amount
1 Shows “9999” if there is space for over 9999 frames.
2 Not displayed when ON is selected for DSCREEN SET-UP > LARGE INDICATORS MODE(EVF).
3 Displayed when controls have been locked by pressing and holding the MENU/OK button. Control lock can be ended by pressing and holding the MENU/OK button again.
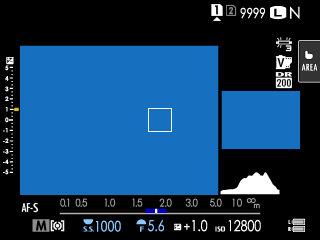
The LCD Monitor
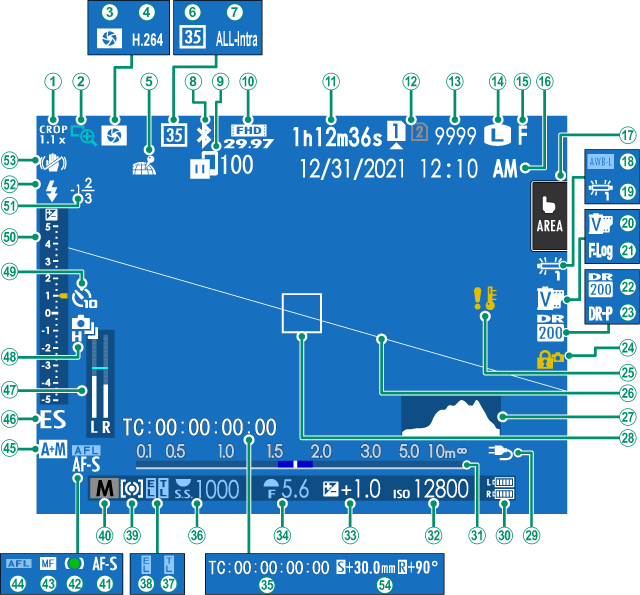
ACrop factor
BFocus check
CDepth-of-field preview
DH.265(HEVC)/H.264
ELocation data download status
F35mm format mode
GMovie compression
HBluetooth ON/OFF
IImage transfer status
JMovie mode
KRecording time available/
elapsed recording time
LCard slot options
MNumber of available frames 1
NImage size
OImage quality
PDate and time
QTouch screen mode 3
RAWB lock
SWhite balance
TFilm simulation
UF-Log/HLG/RAW recording
VDynamic range
WD-range priority
XControl lock 4
YTemperature warning
ZVirtual horizon
aHistogram
bFocus frame
cPower supply
dBattery level
eDistance indicator 2
fSensitivity
gExposure compensation
hAperture
iTime code
jShutter speed
kTTL lock
lAE lock
mMetering
nShooting mode
oFocus mode 2
pFocus indicator 2
qManual focus indicator 2
rAF lock
sAF+MF indicator 2
tShutter type
uRecording level 2
vContinuous mode
wSelf-timer indicator
xExposure indicator
yFlash compensation
zFlash (TTL) mode
0IS mode 2
1Shift amount/rotate amount
1 Shows “9999” if there is space for over 9999 frames.
2 Not displayed when ON is selected for DSCREEN SET-UP > LARGE INDICATORS MODE(LCD).
3 Camera functions can also be accessed via touch controls.
4 Displayed when controls have been locked by pressing and holding the MENU/OK button. Control lock can be ended by pressing and holding the MENU/OK button again.
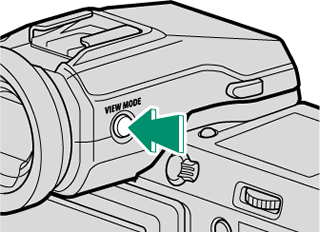
Choosing a Display Mode
Press the VIEW MODE button to cycle through the following display modes.
| Option | Description |
|---|---|
| E EYE SENSOR | Putting your eye to the viewfinder turns the viewfinder on and the LCD monitor off; taking your eye away turns the viewfinder off and LCD monitor on. |
| EVF ONLY | Viewfinder on, LCD monitor off. |
| LCD ONLY | LCD monitor on, viewfinder off. |
| EVF ONLY + E | Putting your eye to the viewfinder turns the viewfinder on; taking it away turns the viewfinder off. The LCD monitor remains off. |
| E EYE SENSOR + LCD IMAGE DISP. | Putting your eye to the viewfinder during shooting turns the viewfinder on, but the LCD monitor is used for the display of images once you remove your eye from the viewfinder after shooting. The options selected for DSCREEN SET-UP >IMAGE DISP. apply to display in the LCD monitor. |
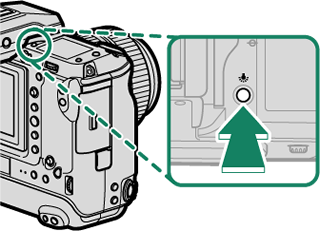
The Eye Sensor
- The eye sensor may respond to objects other than your eye or to light shining directly on the sensor.
- The eye sensor is disabled while the LCD monitor is tilted.
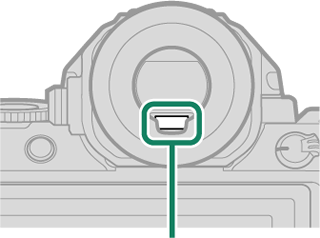
Eye sensor
Adjusting Display Brightness
The brightness and saturation of the viewfinder and LCD monitor can be adjusted using the items in the DSCREEN SET-UP menu. Choose EVF BRIGHTNESS or EVF COLOR to adjust viewfinder brightness or saturation, LCD BRIGHTNESS or LCD COLOR to do the same for the LCD monitor.
The DISP/BACK Button
The DISP/BACK button controls the display of indicators in the viewfinder and LCD monitor.
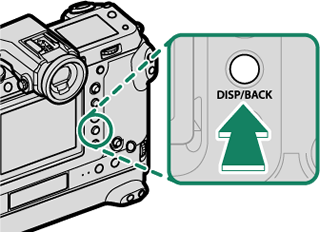
Indicators for the EVF and LCD must be selected separately. To choose the EVF display, place your eye to the viewfinder while using the DISP/BACK button.
Viewfinder (EVF)
Full screen

Full screen (no indicators)

Standard indicators
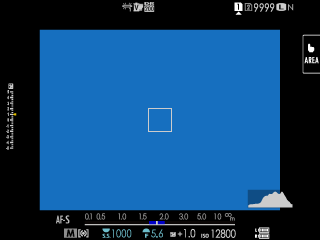
Standard (no indicators)

Dual display (manual focus mode only)
LCD Monitor
Standard indicators
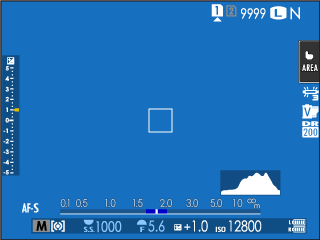
No indicators

Info display
Dual display (manual focus mode only)
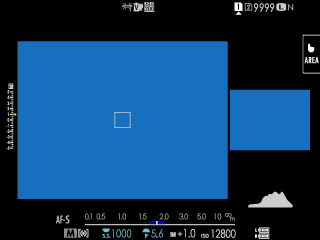
The Dual Display
The dual display consists of a large full-frame window and a smaller close-up of the focus area.
Customizing the Standard Display
To choose the items shown in the standard indicator display:
-
Display standard indicators.
Use the DISP/BACK button to display standard indicators.
-
Select DISP. CUSTOM SETTING.
Select DSCREEN SET-UP > DISP. CUSTOM SETTING in the setup menu.
-
Choose items.
Highlight items and press MENU/OK to select or deselect.
Item Default STILL MOVIE FRAMING GUIDELINE R R ELECTRONIC LEVEL R R FOCUS FRAME R R AF DISTANCE INDICATOR R R MF DISTANCE INDICATOR R R HISTOGRAM R R LIVE VIEW HIGHLIGHT ALERT R R SHOOTING MODE R R APERTURE/S-SPEED/ISO R R INFORMATION BACKGROUND R R Expo. Comp. (Digit) R R Expo. Comp. (Scale) R R FOCUS MODE R R PHOTOMETRY R R SHUTTER TYPE R — FLASH R — CONTINUOUS MODE R — DUAL IS MODE R R TOUCH SCREEN MODE R R WHITE BALANCE R R FILM SIMULATION R R DYNAMIC RANGE R R BOOST MODE R R SHIFT AMOUNT OF T/S LENS R R ROTATE AMOUNT OF T/S LENS R R FRAMES REMAINING R — IMAGE SIZE/QUALITY R — MOVIE MODE & REC. TIME — R 35mm FORMAT MODE R — IMAGE TRANSFER ORDER R R MIC LEVEL — R GUIDANCE MESSAGE R R BATTERY LEVEL R R FRAMING OUTLINE R R -
Press DISP/BACK to save changes.
-
Press DISP/BACK as needed to exit the menus and return to the shooting display.
Virtual Horizon
Selecting ELECTRONIC LEVEL displays a virtual horizon. The camera is level when the two lines overlap. Note that the virtual horizon may not be displayed if the camera lens is pointed up or down. For a 3D display (shown), press the function button to which ELECTRONIC LEVEL is assigned(aFUNCTION (Fn) SETTING, Function Controls).
Roll
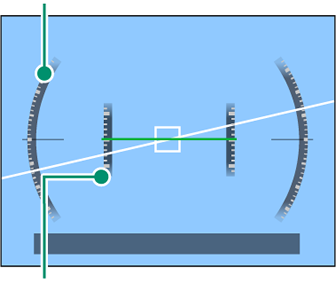
Pitch
Framing Outline
Enable FRAMING OUTLINE to make the borders of the frame easier to see against dark backgrounds.
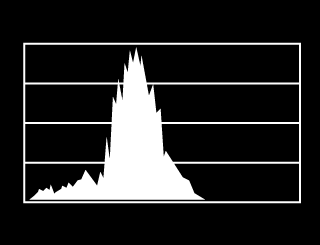
Histograms
Histograms show the distribution of tones in the image. Brightness is shown by the horizontal axis, the number of pixels by the vertical axis.
|
Number of pixels
|
 |
|
Shadows |
Pixel brightness |  Highlights Highlights |


-
Optimal exposure: Pixels are distributed in an even curve throughout the tone range.
-
Overexposed: Pixels are clustered on the right side of the graph.

-
Underexposed: Pixels are clustered on the left side of the graph.

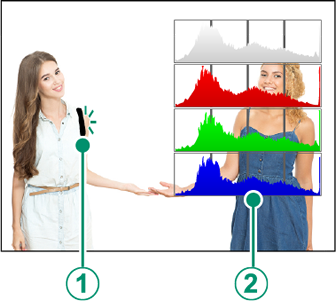
To view separate RGB histograms and a display showing areas of the frame that will be overexposed at current settings superimposed on the view through the lens, press the function button to which HISTOGRAM is assigned(aFUNCTION (Fn) SETTING, Function Controls).
AOverexposed areas blink
BRGB histograms
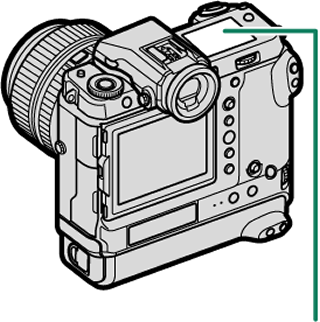
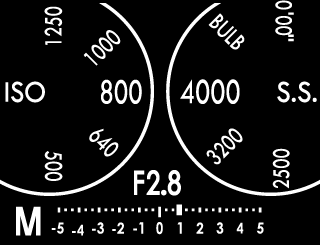
The Secondary LCD Monitor
Among the settings that can be viewed in the secondary LCD monitor are shutter speed, aperture, and ISO sensitivity.
| Secondary LCD monitor |
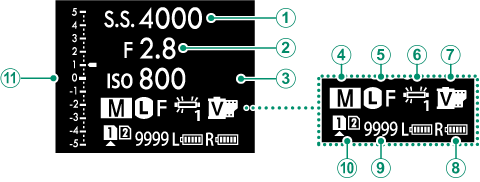
| Default | |
|---|---|
ASHUTTER SPEED |
GFILM SIMULATION |
BAPERTURE |
HBATTERY LEVEL |
CISO |
IFRAMES REM. |
DSHOOTING MODE |
JCARD SLOT OPTIONS |
EIMAGE SIZE/QUALITY |
Kd Scale |
FWHITE BALANCE |
|
The settings displayed can be selected using D SCREEN SET-UP > SUB MONITOR SETTING.
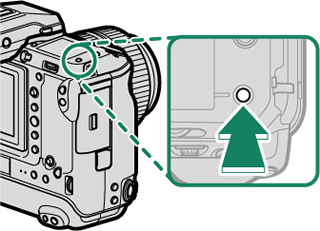
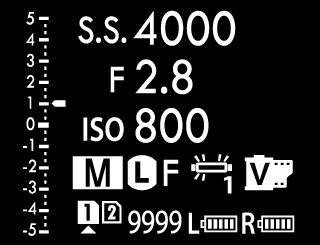
Cycling Through Indicators in the Secondary LCD Monitor
The indicators displayed in the secondary LCD monitor change each time the secondary LCD monitor mode button is pressed.
INFORMATION
DIALS
HISTOGRAM
The secondary monitor backlight button
To turn on the secondary LCD monitor backlight when you find the secondary LCD monitor too dark to read, press the secondary monitor backlight button. Press the button again to turn the backlight off.
Background Color
The background color (black or white) for the secondary LCD monitor can be selected using the D SCREEN SET-UP > SUB MONITOR BACKGROUND COLOR option in the D (setup) menu. Note that the background is displayed in white whenever the secondary LCD monitor backlight is on.
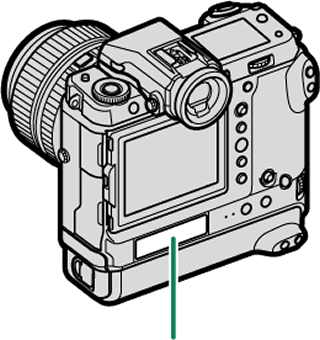
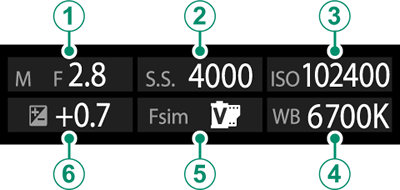
The Rear Secondary Monitor
Among the indicators that can be viewed in the rear secondary monitor are histograms and the exposure compensation indicator.
| Rear secondary monitor |
| Default | |
|---|---|
AAPERTURE |
DWHITE BALANCE |
BSHUTTER SPEED |
EFILM SIMULATION |
CISO |
FEXPO. COMP. |
Use D SCREEN SET-UP > REAR SUB MONITOR SETTING to choose the indicators displayed or turn the rear secondary monitor off.
Putting your eye to the viewfinder when the eye sensor is enabled turns off the rear secondary monitor.


