
Use the timer for group- or self-portraits, to prevent blur caused by camera shake, or to release the shutter automatically when selected conditions are met.
Press MENU/OK to display the shooting menu.
Highlight BSELF-TIMER in the shooting menu and press MENU/OK.
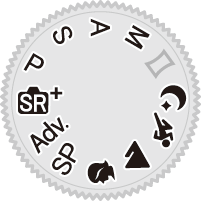
Highlight one of the following options and press MENU/OK.
| Option |
|---|
| R2 SEC |
| S10 SEC |
| mFACE AUTO SHUTTER |
| oSMILE |
| Option |
|---|
| aBUDDY |
| gGROUP |
| OFF |
Stand behind the camera when using the shutter button. Standing in front of the lens can interfere with focus and exposure.
The self-timer turns off automatically when the camera is turned off.
To stop the timer before the picture is taken, press DISP/BACK.
Selecting mFACE AUTO SHUTTER, oSMILE, aBUDDY, or gGROUP sets FAF/MF SETTING > FACE/EYE DETECTION SETTING to FACE ON/EYE OFF. The original setting is restored when the self timer is turned off.
The shutter is released 2 or 10 seconds after the shutter button is pressed.
Highlight either of the following options in the self-timer menu and press MENU/OK.
| Option | Description |
|---|---|
| R2 SEC | The shutter is released two seconds after the shutter button is pressed. Use to reduce blur caused by the camera moving when the shutter button is pressed. The self-timer lamp blinks as the timer counts down. |
| S10 SEC | The shutter is released ten seconds after the shutter button is pressed. Use for photographs in which you wish to appear yourself. The self-timer lamp blinks immediately before the picture is taken. |
Press the shutter button all the way down to start the timer. A count-down timer will appear in the display; the picture will be taken when the timer expires.
The picture will be taken when the camera detects a portrait subject facing the lens.
Highlight m (FACE AUTO SHUTTER) in the self-timer menu and press MENU/OK.
Frame a portrait subject in the display. The camera will initiate face detection and release the shutter when the subject is facing the lens.
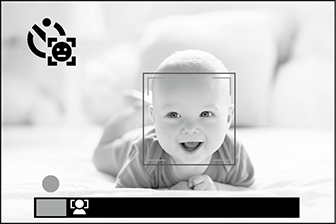
The camera may fail to detect subjects who are not facing the camera or whose eyes are hidden.
The camera releases the shutter when the subject smiles.
Highlight o (SMILE) in the self-timer menu and press MENU/OK.
Frame portrait subjects in the display. The camera will initiate face detection and release the shutter when any of the subjects smiles.
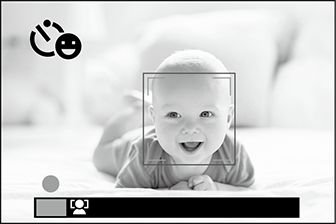
The camera may fail to detect subjects who are not facing the camera or whose eyes are obscured by hair or other objects.
The camera takes a picture when it detects two subjects close together.
Highlight a (BUDDY) in the self-timer menu and press MENU/OK.
When prompted to choose how close the subjects must be together before the timer starts, highlight the desired option and press MENU/OK (the required degree of closeness is shown by heart icons in the shooting display: the more hearts, the closer together the subjects must be).
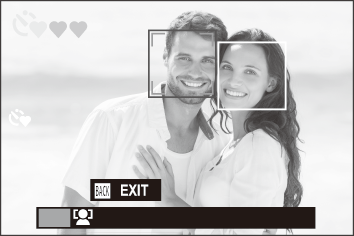
The timer starts only when the subjects are sufficiently close together; the shutter is released one second later.
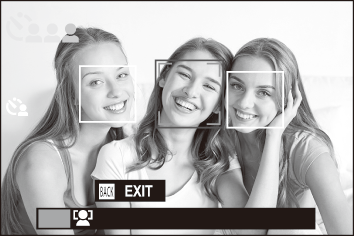
The camera takes a picture when it detects the selected number of portrait subjects.
Highlight g (GROUP) in the self-timer menu and press MENU/OK.
Highlight the desired number of subjects (1 to 4) and press MENU/OK (the number of subjects is indicated by h icons in the shooting display). The timer starts only when the selected number of subjects is in the frame; the shutter is released two seconds later.
 .
.

