
 .
.Recording Movies
Record movies with sound.
Recording Movies
Movies can be recorded by pressing the shutter button when the STILL/MOVIE mode dial is rotated to MOVIE or by pressing a function button to which MOVIE RECORDING RELEASE is assigned.
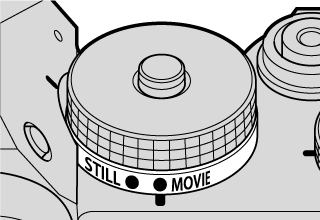
The STILL/MOVIE Mode Dial (MOVIE)
For access to a full range of camera settings when filming movies, rotate the STILL/MOVIE mode dial to MOVIE and record movies by pressing the shutter button.
-
Rotate the STILL/MOVIE mode dial to MOVIE.
-
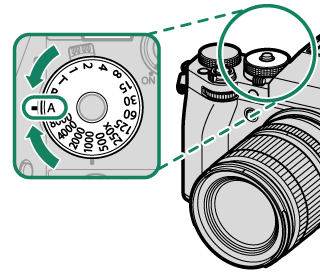
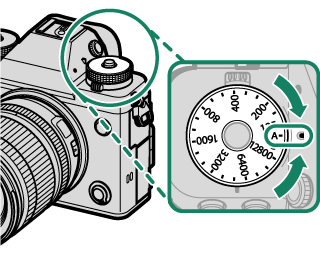
Slide the lens aperture mode switch to A.

-
Rotate the shutter speed dial to A.

AUTO will appear in the display.

-
Rotate the sensitivity dial to A.
-
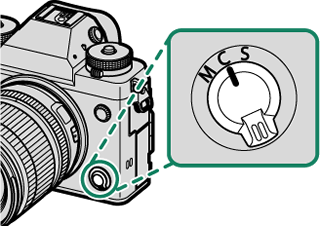
Rotate the focus mode selector to C.
To use the shutter speed and sensitivity dials, press the dial lock release and rotate the dial to the desired setting.
These settings can also be adjusted using touch controls (aMOVIE OPTIMIZED CONTROLoL).
-
Press the shutter button all the way down.
Recording will start.
- A recording indicator (V) is displayed while recording is in progress.
- The borders of the display turn red during movie recording, green during high-speed recording.
- The time remaining is shown by a countdown display, while another display counts up to show the recording time.
Time remaining
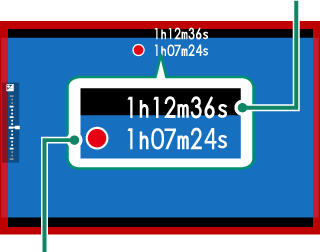
Recording time
-
Press the button again to end recording. Recording ends automatically when the maximum length is reached or the memory card is full.
Using a Function Button (MOVIE RECORDING RELEASE)
Use the function button to which MOVIE RECORDING RELEASE is assigned to quickly and easily record movies while in still photography mode.
The camera automatically selects focus mode C (AF‑C); exposure is adjusted automatically.
-
Assign MOVIE RECORDING RELEASE to a function button (aThe Function Buttons).
-
Press the selected button to start recording.
- A recording indicator (V) is displayed while recording is in progress.
- The borders of the display turn red during movie recording, green during high-speed recording.
- The time remaining is shown by a countdown display, while another display counts up to show the recording time.
Time remaining
Recording time
-
Press the button again to end recording. Recording ends automatically when the maximum length is reached or the memory card is full.
Sound is recorded via the built-in microphone or an optional external microphone. Do not cover the microphone during recording.
Note that the microphone may pick up lens noise and other sounds made by the camera during recording.
Vertical or horizontal streaks may appear in movies containing very bright subjects. This is normal and does not indicate a malfunction.
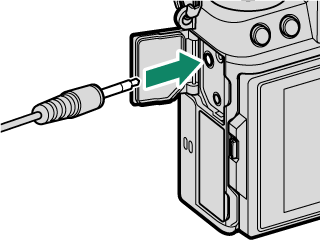
To monitor audio with headphones during recording, you will need to convert the USB connector to an audio jack using the supplied headphone adapter.
The indicator lamp lights while recording is in progress (the BMOVIE SETTING > TALLY LIGHT option can be used to choose the lamp—indicator or AF-assist—that lights during movie recording and whether the lamp blinks or remains steady). During recording, you can change exposure compensation by up to ±2 EV and adjust zoom using the zoom ring on the lens (if available).
To prevent the borders of the display changing color during movie recording, select OFF for BMOVIE SETTING > FREC FRAME INDICATOR.
While recording is in progress, you can:
- Adjust sensitivity
-
Refocus using any of the following methods:
- Press the shutter button halfway
- Press a function button to which AF-ON is assigned
- Use touch screen controls
- Display a histogram or artificial horizon by pressing the button to which HISTOGRAM or ELECTRONIC LEVEL SWITCH has been assigned
Recording may be unavailable at some settings, while in other cases settings may not apply during recording.
To choose the focus area for movie recording, select GAF/MF SETTING > FOCUS AREA and use the focus stick (focus lever) and rear command dial (aFocus-Point Selection).
Temperature Warnings
The camera automatically turns off to protect itself when its temperature or the temperature of the battery rises. If a temperature warning is displayed, image noise may increase. Turn the camera off and wait for it to cool before turning it on again.
Using an External Microphone
Sound can be recorded with external microphones that connect using jacks 3.5 mm in diameter; microphones that require plug-in power cannot be used. See the microphone manual for details.
XLR Microphone Adapters
The camera can be used with TEAC TASCAM CA-XLR2d-F XLR microphone adapters. For more information, visit the TASCAM website.
Adjusting Movie Settings
Movie settings can be adjusted from the movie menus or using the BMOVIE SETTING item in the photo menus (aUsing the Menus).
- Use the BMOVIE SETTING item in the photo menus to quickly adjust settings when recording movies via a button to which MOVIE RECORDING RELEASE has been assigned (aMOVIE SETTING (Still Photography)).
- The movie menus contain options for use when recording movies via the shutter button with the STILL/MOVIE mode dial rotated to MOVIE (aMOVIE SETTINGF (Movie Recording)).
- Settings such as frame rate and frame size can be adjusted using MOVIE MODE.
- Use MEDIA REC SETTING for such tasks as choosing the file type, bit rate, and the destination card slot.
- Focus mode is selected using the focus mode selector. Regardless of the option selected, the camera will automatically switch to C when FACE DETECTION ON or SUBJECT DETECTION ON is chosen for GAF/MF SETTING > gFACE/EYE DETECTION SETTING or SUBJECT DETECTION SETTING. Note, however, that choosing M when FACE DETECTION ON or SUBJECT DETECTION ON is selected disables face and subject detection.
Changes made using the BMOVIE SETTING item in the photo menus also apply to the movie menus. Changes made in one set of menus automatically apply in the other.
The type of memory card supported varies with the option select for BMOVIE SETTING > MEDIA REC SETTING.
- Movies with a bit rate of 360 Mbps can be recorded to cards with a Video Speed Class of V60 or better.
- Movies with a bit rate of 100 or 200 Mbps can be recorded to cards with a UHS Speed Class of 3 or better.
Depth of Field
To soften backgrounds, set aperture as wide as possible. Aperture can be adjusted manually at settings other than A.


