.
.Camera Functions
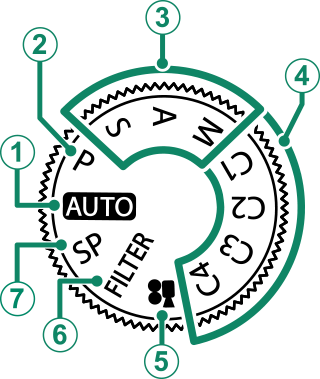
The Mode Dial
To select a shooting mode, rotate the dial until the icon for the desired mode aligns with the index.
| Mode | Description |
|---|---|
|
AAUTO (AUTO) |
The camera automatically optimizes settings to the scene.(aTaking Photographs) |
|
BP (Program AE) |
Aperture and shutter speed can be adjusted using program shift.(aP (Program AE)) |
|
CS (SHUTTER PRIORITY AE) |
Select for full control over camera settings, including aperture (M and A) and/or shutter speed (M and S).(aShutter-Priority AE (S),Aperture-Priority AE (A),Manual Exposure (M)) |
|
DC1/C2/C3/C4 |
Take pictures using previously-stored settings.(aCustom Modes) |
|
EF (MOVIE) |
Record movies.(aRecording Movies) |
|
FFILTER (FILTER) |
Take photos with filter effects.(aFILTER (FILTER)) |
|
GSP (SCENE POSITION) |
Choose a scene suited to the subject or shooting conditions and let the camera do the rest.(aSP (SCENE POSITION)) |
The Focus Stick (Focus Lever)
Tilt or press the focus stick to select the focus area. The focus stick can also be used to navigate the menus.
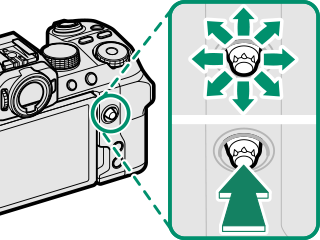
Use DBUTTON/DIAL SETTING > FOCUS LEVER SETTING to choose the role played by the focus stick (aFOCUS LEVER SETTING).
I (Drive) Button
Pressing the I (drive) button displays drive-mode menu, where you can choose from the following the drive modes.
| Mode | |
|---|---|
| B | Single frame |
| J | High-speed burst |
| O | Low-speed burst |
| W | ISO BKT |
| V | WHITE BALANCE BKT |
| BKT | Bracketing |
| h | HDR |
| u | Panorama |
| j | Multiple Exposure |
The Command Dials
The rear and front command dials are used for the operations below.

| Shooting |
|
|---|---|
| Menus | Select menu tabs or page through menus. |
| Q Menu | Select items in the quick menu. |
| Playback | View other pictures. |
| Shooting |
|
|---|---|
| Menus | Highlight menu items. |
| Q Menu | Adjust settings in the quick menu. |
| Playback |
|
For information on the roles performed by the dials during shooting, see “The Command and Function Dials”.
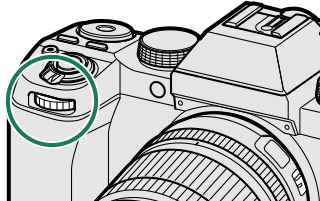
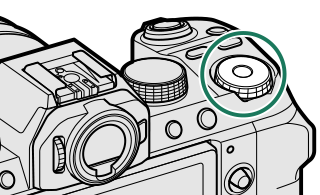
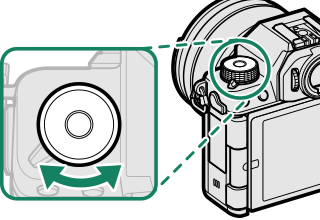
The Fn (Function) Dial
Rotate the function dial to quickly adjust settings for the assigned function during shooting.
At shipment, the dial is assigned the DEFAULT role. At this setting, the function performed by the dial varies with the position of the mode dial.
| Mode | Description |
|---|---|
| FILTER (FILTER) | Filter selection |
|
P (PROGRAM AE) S (SHUTTER PRIORITY AE) A (APERTURE PRIORITY AE) M (MANUAL) AUTO (AUTO) SP (SCENE POSITION) F (MOVIE) C1/C2/C3/C4 (CUSTOM) |
Film simulation |
The role performed by the function dial can be chosen using DBUTTON/DIAL SETTING > FUNCTION (Fn) SETTING (a The Function Dial).
The Indicator Lamp
Camera status is shown by the indicator lamp.
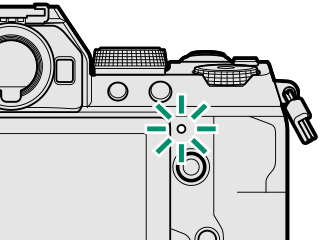
| Indicator lamp | Camera status |
|---|---|
| Glows green | Focus locked. |
| Blinks green | Focus or slow shutter speed warning. Pictures can be taken. |
| Blinks green and orange |
|
| Glows orange | Recording pictures. No additional pictures can be taken at this time. |
| Blinks orange | Flash charging; flash will not fire when picture is taken. |
| Blinks red | Lens or memory error. |
* Displayed only if pictures are selected for upload.
Warnings may also appear in the display.
The indicator lamp remains off while your eye is to the viewfinder.
The B MOVIE SETTING > TALLY LIGHT option can be used to choose the lamp (indicator or AF-assist) that lights during movie recording and whether the lamp blinks or remains steady.
The LCD Monitor
You can adjust the angle of the LCD monitor when framing shots, but be careful not to trap your fingers or other objects.
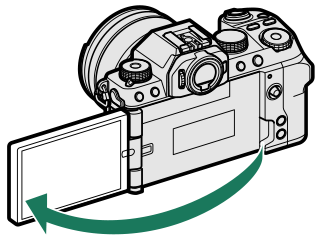
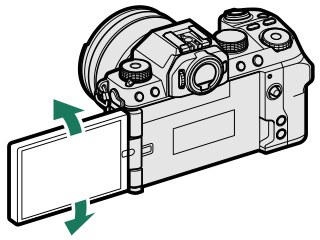
Do not apply excessive force to the hinge when rotating the LCD monitor, as this could damage the hinge.
Be careful that the corners of the monitor do not contact the camera body, as this could leave marks.
The LCD monitor also functions as a touch screen that can be used for:
Focusing the Viewfinder
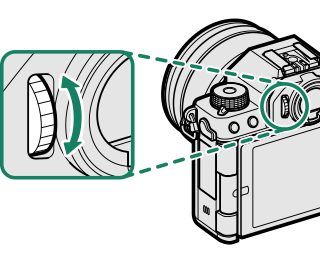
If the indicators displayed in the viewfinder are blurred, put your eye to the viewfinder and rotate the diopter adjustment control until the display is in sharp focus.