
 .
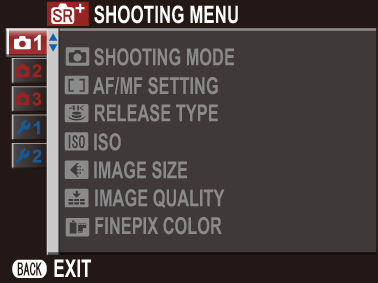
.[SHOOTING MENU] 1 (A)
Adjust shooting settings.
The shooting menu is displayed when you press [MENU/OK] in shooting mode. Choose from tabs A, B, or C.
The options available vary with the shooting mode selected.
A [SHOOTING MODE]
Choose a shooting mode according to the type of subject (a Choosing a Shooting Mode).
F [AF/MF SETTING]
Adjust focus settings.
[Focus Mode]
Choose how the camera focuses (a Focus Mode).
[FACE/EYE DETECTION SETTING]
Intelligent Face Detection sets focus and exposure for human faces anywhere in the frame, preventing the camera from focusing on the background in group portraits. Choose for shots that emphasize portrait subjects. You can also choose whether the camera detects and focuses on eyes when Intelligent Face Detection is on. Choose from the following options:

| Option | Description |
|---|---|
| [FACE ON/ EYE OFF] |
Intelligent Face Detection only. |
| [FACE ON/ EYE AUTO] |
The camera automatically chooses which eye to focus on when a face is detected. |
| [FACE ON/ RIGHT EYE PRIORITY] |
The camera focuses on the right eye of subjects detected using Intelligent Face Detection. |
| [FACE ON/ LEFT EYE PRIORITY] |
The camera focuses on the left eye of subjects detected using Intelligent Face Detection. |
| [FACE OFF/ EYE OFF] |
Intelligent Face Detection and eye priority off. |
If the subject moves as the shutter button is pressed, the face may not be in the area indicated by the green border when the picture is taken.
In some modes, the camera may set exposure for the frame as a whole rather than the portrait subject.
The face selected by the camera is indicated by a green border.
If there is more than one face in the frame, the camera will select the face closest to the center; other faces are indicated by white borders. In S [ADVANCED SR AUTO] mode (but not in other modes), you can select a different face by pressing the selector left.
Faces can be detected with the camera in vertical or horizontal orientation.
If the camera is unable to detect the subject’s eyes because they are hidden by hair, glasses, or other objects, the camera will instead focus on faces.
[AF ILLUMINATOR]
If [ON] is selected, the AF-assist illuminator will light to assist autofocus.
| Options | |
|---|---|
| [ON] | [OFF] |
The AF-assist illuminator turns off automatically when [OFF] is selected for o [SOUND & FLASH] in the setup menu.
The camera may be unable to focus using the AF-assist illuminator in some cases.
If the camera is unable to focus, try increasing the distance to the subject.
Avoid shining the AF-assist illuminator directly into your subject’s eyes.
R [RELEASE TYPE]
Choose how the shutter button functions when f [4K BURST] is selected as the burst mode.
| Option | Description |
|---|---|
| [WHEN PRESSING] | Pictures are taken while the shutter button is pressed. |
| [ON/OFF SWITCH] | Shooting starts when the shutter button is pressed and ends when the button is pressed a second time. |
N [ISO]
Adjust the camera’s sensitivity to light.
| Option | Description |
|---|---|
| [AUTO] [AUTO(1600)] [AUTO(800)] [AUTO(400)] |
Sensitivity is adjusted automatically in response to shooting conditions, but will not be raised above the value in parentheses. [AUTO] is only displayed if [AUTO(1600)], [AUTO(800)], and [AUTO(400)] are unavailable. |
| 12800 - 100 | Adjust sensitivity manually. Selected value is shown in display. |
Sensitivity is not reset when the camera is turned off.
Adjusting Sensitivity
High values can be used to reduce blur when lighting is poor, while lower values allow slower shutter speeds or wider apertures in bright light; note, however, that mottling may appear in pictures taken at high sensitivities.
O [IMAGE SIZE]
Choose the size and aspect ratio at which still pictures are recorded.
| Options | |||
|---|---|---|---|
| O4:3 (4608×3456) |
O3:2 (4608×3072) |
O16:9 (4608×2592) |
O1:1 (3456×3456) |
| P4:3 (3264×2448) |
P3:2 (3264×2176) |
P16:9 (3264×1840) |
P1:1 (2432×2432) |
| Q4:3 (2048×1536) |
Q3:2 (2304×1536) |
Q16:9 (1920×1080) |
Q1:1 (1728×1728) |
When pictures are recorded to internal memory, the default value is set toQ4:3.
[IMAGE SIZE] is not reset when the camera is turned off or another shooting mode is selected.
Aspect Ratio
The aspect ratio determines the dimensions of the frame. Choose an option suited to your goals.
| Option | Description |
|---|---|
| 4:3 | Pictures have the same proportions as the camera display. |
| 3:2 | Pictures have the same proportions as a frame of 35 mm film. |
| 16:9 | Suited for display on High Definition (HD) devices. |
| 1:1 | Pictures are square. |
Selecting 1 : 1
To switch to an aspect ratio of 1 : 1 before taking pictures, simply press the control to which [SQUARE MODE(1:1)] is assigned (a Assigning a Role to the Function Buttons). Press the control again to restore the previously-selected aspect ratio.
| Current image size | Image size selected using control to which [SQUARE MODE(1:1)] is assigned |
|---|---|
| O4:3, O3:2, O16:9 | O1:1 |
| P4:3, P3:2, P16:9 | P1:1 |
| Q4:3, Q3:2, Q16:9 | Q1:1 |
T [IMAGE QUALITY]
Choose a file format and compression ratio.
| Option | Description |
|---|---|
| [FINE] | Lower compression ratios are used for higher-quality images. |
| [NORMAL] | Higher compression ratios are used to increase the number of images that can be stored. |
P [FINEPIX COLOR]
Enhance contrast and color saturation or take pictures in black and white.
| Option | Description |
|---|---|
| c [STANDARD] | Standard contrast and saturation. Recommended in most situations. |
| a [CHROME] | Vivid contrast and color. Choose for vivid shots of flowers or enhanced greens and blues in landscapes. |
| b [B&W] | Take pictures in black and white. |
| f [SEPIA] | Take pictures in sepia. |
Settings other than c [STANDARD] are shown by an icon in the LCD monitor.
Depending on the subject, the effects of a[CHROME] may not be visible in the LCD monitor.


