.
.Camera Displays
This section lists the indicators that may be displayed during shooting.
For illustrative purposes, displays are shown with all indicators lit.
- The LCD Monitor
- Adjusting Display Brightness
- The [DISP/BACK] Button
- Customizing the Standard Display
The LCD Monitor
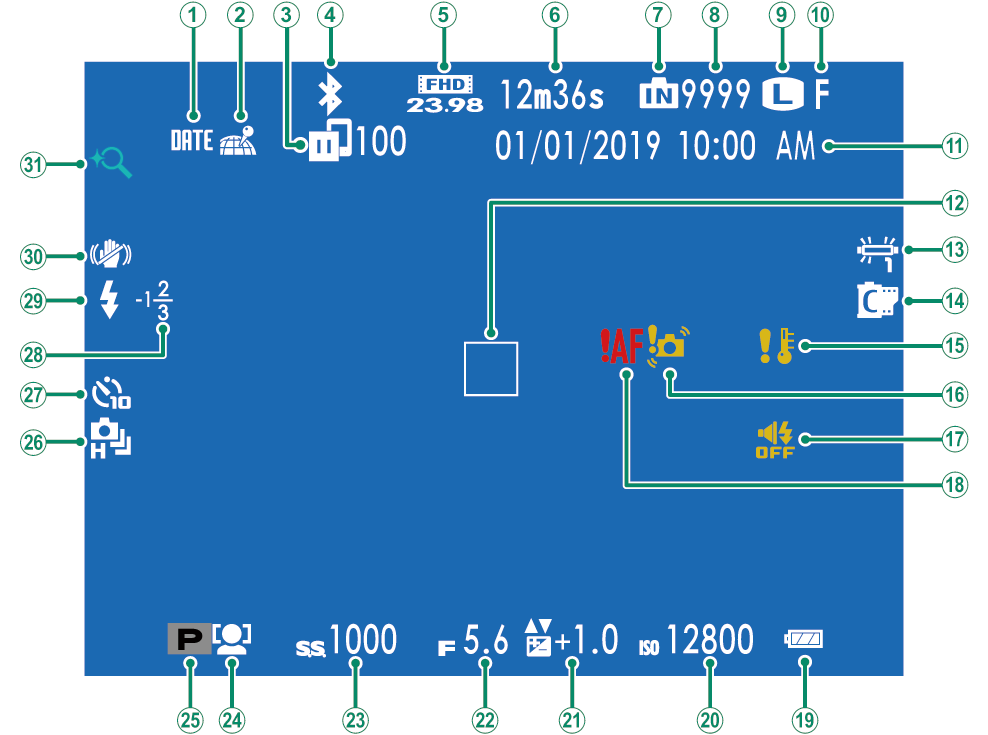
 Date stamp
 Location data download status
 Image transfer status
 Bluetooth ON/OFF
 Movie mode
 Movie recording time remaining
 Internal memory indicator 1
 Number of available frames 2
 Image size
 Image quality
 Date and time
 Focus frame
 White balance
 FINEPIX color
 Temperature warning
 Blur warning
 Sound and flash indicator
 Focus warning
 Battery level
 Sensitivity
 Exposure compensation
 Aperture
 Shutter speed
 Face/eye detection setting
 Shooting mode
 Continuous mode
 Self-timer indicator (Interval shooting / Time-lapse movie)
 Flash compensation
 Flash mode
 IS mode
 Intelligent digital zoom
1 a: indicates that no memory card is inserted and that pictures will be stored in the camera’s internal memory; flashes yellow while images are recorded. If a memory card is inserted, a yellow b icon will flash in the display while images are recorded.
2 Shows “9999” if there is space for over 9999 frames.
Adjusting Display Brightness
Use the items in the A [SCREEN SET-UP] menu to adjust the brightness and hue of the LCD monitor when changes in ambient brightness make the display difficult to read. Choose [LCD BRIGHTNESS] to adjust brightness or [LCD COLOR] to adjust hue.
The [DISP/BACK] Button
Press [DISP/BACK] to cycle through display modes as follows.
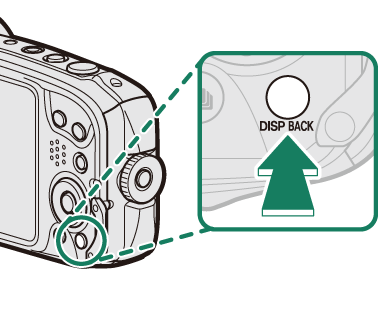
| Standard | Information off |

Customizing the Standard Display
To choose the items shown in the standard display:
-
Display standard indicators.
Use the [DISP/BACK] button to display standard indicators.
-
Select [DISP. CUSTOM SETTING].
Select A [SCREEN SET-UP] > [DISP. CUSTOM SETTING] in the setup menu.
-
Choose items.
Highlight items and press [MENU/OK] to select or deselect.
Item Default [FRAMING GUIDELINE] R [ELECTRONIC LEVEL] R [FOCUS FRAME] R [SHOOTING MODE] R [APERTURE/S-SPEED/ISO] R [INFORMATION BACKGROUND] R [Expo. Comp.(Digit)] R [FLASH] R [CONTINUOUS MODE] R [DUAL IS MODE] R [WHITE BALANCE] R [FINEPIX COLOR] R [FRAMES REMAINING] R [IMAGE SIZE/QUALITY] R [MOVIE MODE & REC. TIME] R [INTELLIGENT DIGITAL ZOOM] R [AUTO IMAGE TRANSFER] R [BATTERY LEVEL] R -
Save changes.
Press [DISP/BACK] to save changes.
-
Exit the menus.
Press [DISP/BACK] as needed to exit the menus and return to the shooting display.
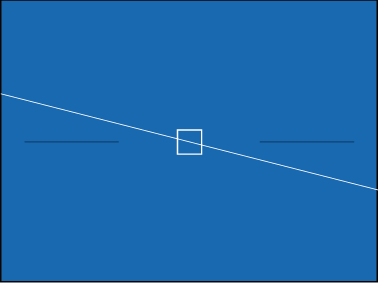
Virtual Horizon
Selecting [ELECTRONIC LEVEL] displays a virtual horizon. The camera is level when the two lines overlap. Note that the virtual horizon may not be displayed if the camera lens is pointed up or down.