[MOVIE SETTING] (Movie Recording)
Adjust movie-recording options.
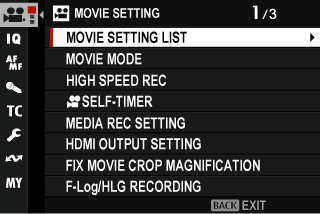
To display options for movie recording, press [MENU/OK] in the movie shooting display and select the B ([MOVIE SETTING]) tab.

[MOVIE SETTING LIST]
View current movie recording settings.
These options can also be viewed by pressing the [DISP/BACK] button while the movie quick menu is displayed.
[MOVIE MODE]
Before shooting movies, choose the frame rate and the frame size and aspect ratio.

-
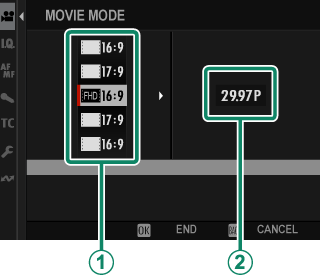
In the shooting menu, select B[MOVIE SETTING], then highlight [MOVIE MODE] and press [MENU/OK].
-
Press the focus stick (focus lever) up or down to highlight the desired frame size and aspect ratio (A) and press the stick right.
- Choose J[16:9] for 6.2 K movies with an aspect ratio of 16 : 9.
- Choose T[16:9] or W[17:9] for high-quality 4 K movies with aspect ratios of 16 or 17 to 9.
- Choose V[16:9] or 1[17:9] for 4K movies with aspect ratios of 16 or 17 to 9.
- Choose W[16:9] or W[17:9] for Full HD movies with aspect ratios of 16 or 17 to 9.
-
Press the focus stick (focus lever) up or down to highlight a frame rate (B) and press [MENU/OK].
Options [23.98P] [24P] [25P] [29.97P] [50P] [59.94P]
The choice of frame rates varies with the movie mode.
[HIGH SPEED REC]
Record high-frame-rate movies. High-frame-rate movies can be played back in slow motion, giving you time to view fast-moving subjects or details too fleeting for the naked eye. Select [ON] to choose the recording and playback rates separately.
Choose [ON HDMI ONLY] to record footage only to external recorders connected via HDMI. In this case, a recording frame-rate of [200P] or [240P] cannot be selected. Also note that the playback frame-rate cannot be set.
Frame Size
| Options | |
|---|---|
| W[16:9] | W[17:9] |
Recording
| Options | |||
|---|---|---|---|
| [100P] | [120P] | [200P] | [240P] |
Playback
| Options | |||||
|---|---|---|---|---|---|
| [23.98P] | [24P] | [25P] | [29.97P] | [50P] | [59.94P] |
High-speed movies are recorded with no sound.
The footage recorded to the memory card is compressed with the goal of maintaining the selected bit rate.
The options available for playback rate vary with the option selected for rate of recording.
F[SELF-TIMER]
Choose the delay between the shutter button being pressed all the way down and the start of recording.
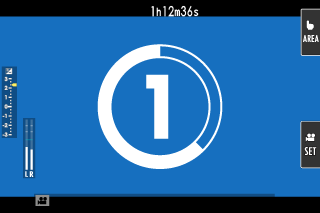
- The display shows the number of seconds remaining before recording begins.
- To stop the timer before recording begins, press [DISP/BACK].

| Options | |||
|---|---|---|---|
| [3 SEC] | [5 SEC] | [10 SEC] | [OFF] |
[MEDIA REC SETTING]
Choose movie file settings, including destination, file type, compression, and bit rate.
[MEDIA REC SETTING]
Choose movie file settings, including destination, file type, and compression.
Destination
Choose save options and save and output destinations for movies.
| Option | Description |
|---|---|
| Z | Movies are saved solely to the memory card. |
| U | Movies are recorded only to devices connected via HDMI. |
File Type and Compression
Choose the movie file type and compression.
| Option | Description |
|---|---|
| [H.264 420 MOV] | A highly-portable compressed format. Footage is recorded at a depth of 8 bits using Long GOP interframe compression and 4 : 2 : 0 chroma sub-sampling. |
| [H.264 420 MP4] | A format suitable for movies that will be uploaded to the web. |
| [H.265 420 MOV] | A format with a higher compression ratio than H.264. Footage is recorded at a depth of 10 bits using Long GOP interframe compression and 4 : 2 : 0 chroma sub-sampling. |
| [H.265 422 MOV] | A format with a higher compression ratio than H.264. Footage is recorded at a depth of 10 bits using Long GOP interframe compression and 4 : 2 : 2 chroma sub-sampling. |
4:2:2 chroma sub-sampling is used for footage output to external devices connected via HDMI; H.264 footage is output at a bit depth of 8 bits and footage in other formats at a depth of 10 bits.
[Long GOP] balances good image quality with high compression. Files are smaller, making it a good choice for longer movies.
The options available for file type and compression vary with the options selected for [MOVIE MODE], [HIGH SPEED REC], and [F-Log/HLG RECORDING].
Bit Rate
Choose the movie bit rate.
| Options | ||
|---|---|---|
| [50Mbps] | [100Mbps] | [200Mbps] |
The options available for bit rate vary with the settings chosen for high-speed movie recording and compression. The actual bit rate may be slower than the selected value depending on the subject.
[HDMI OUTPUT SETTING]
Adjust settings for use when the shooting display is output to an HDMI device.
[HDMI OUTPUT INFO DISPLAY]
If [ON] is selected, HDMI devices to which the camera is connected will mirror the information in the camera display.
| Options | |
|---|---|
| [ON] | [OFF] |
[HDMI REC CONTROL]
Choose whether the camera sends movie start and stop signals to the HDMI device when the shutter button is pressed to start and stop movie recording.
| Options | |
|---|---|
| [ON] | [OFF] |
[FIX MOVIE CROP MAGNIFICATION]
Fix the movie crop ratio at 1.25∶1. This makes it easier to match crops after changing movie settings.
| Options | |
|---|---|
| [ON] | [OFF] |
[F-Log/HLG RECORDING]
Choose the destination for F‐Log and HLG (Hybrid Log-Gamma) movies shot while the camera is connected to an HDMI device.
| Option | Description |
|---|---|
| t | The footage is processed using film simulation and both saved to the memory card and output to the HDMI device. |
| u | The footage is recorded to the memory card and output to the HDMI device in F-Log format. |
| v | The footage is recorded to the memory card and output to the HDMI device in F-Log2 format. |
| w | The footage is recorded to the memory card and output to the HDMI device in HLG format. |
[F-Log] and [FLog2] offer gentle gamma curves with wide gamuts suitable for further processing post-production. Sensitivity is restricted to values between ISO 500 and ISO 12800 ([F-Log] or between ISO 1000 and ISO 12800 ([FLog2]).
The [HLG] (Hybrid Log-Gamma) recording format conforms to the international ITU-R BT2100 standard. When viewed on HLG-compatible displays, high-quality HLG footage faithfully captures high-contrast scenes and vivid colors. Sensitivity is restricted to values between ISO 800 and ISO 12800.
Film simulation (P) footage is recorded using the option selected for H[IMAGE QUALITY SETTING] > F[FILM SIMULATION] in the shooting menu.
[DATA LEVEL SETTING]
Choose a signal range for movie recording.
| Option | Description |
|---|---|
| [VIDEO RANGE] | The signal range for 8-bit movies is limited to 16–235 and that for 10-bit movies to 64–940. |
| [FULL RANGE] | The signal ranges for 8-bit and 10-bit movies are respectively 0–255 and 0–1023. |
F[PHOTOMETRY]
Options are the same as those for still photography, but settings must be adjusted separately (aMetering).
F[FLICKERLESS S.S. SETTING]
Options are the same as those for still photography, but settings must be adjusted separately (a[FLICKERLESS S.S. SETTING] (Still Photography)).
| Options | |
|---|---|
| [ON] | [OFF] |
F[IS MODE]
Choose the image stabilization mode.
| Option | Description |
|---|---|
| [IBIS] | Enable in-body image stabilization (IBIS). |
| [IBIS + DIS] | Enable in-body (IBIS) and digital (DIS) image stabilization. The crop is adjusted according to the option selected for [MOVIE MODE]. This setting can compensate for more severe camera shake. |
| [OFF] | Image stabilization off; x appears in the display. |
Note that vibration or camera sounds may be noticeable as image stabilization takes effect.
F[IS MODE BOOST]
Choose the image stabilization level.
| Option | Description |
|---|---|
| [ON] | Suitable for shots with no panning. |
| [OFF] | Suitable for shots with panning. |
Assigning [IS MODE BOOST] to a function button allows the image stabilization level to be changed while recording is in progress (aFunction Controls).
[ZEBRA SETTING]
Highlights that may be overexposed are shown by zebra stripes in the movie mode display.
| Option | Description |
|---|---|
| [ZEBRA RIGHT] |  Right-slanting stripes. Right-slanting stripes. |
| [ZEBRA LEFT] |  Left-slanting stripes. Left-slanting stripes. |
| [OFF] | Stripes off. |
[ZEBRA LEVEL]
Choose the brightness threshold for the zebra stripe display.
| Options | ||||||||||
|---|---|---|---|---|---|---|---|---|---|---|
| [50] | [55] | [60] | [65] | [70] | [75] | [80] | [85] | [90] | [95] | [100] |
[MOVIE OPTIMIZED CONTROL]oL
Select [ON] to allow movie settings to be adjusted using only the command dials and touch-screen controls. You may find this helpful in preventing the sounds of camera controls being recorded with movies (a[MOVIE OPTIMIZED CONTROL]oL).
| Options | |
|---|---|
| [ON] | [OFF] |
F[REC FRAME INDICATOR]
If [ON] is selected, the borders of the display will turn red during movie recording.
| Options | |
|---|---|
| [ON] | [OFF] |
The borders are displayed in green during high-speed movie recording.
[TALLY LIGHT]
Choose the lamp (indicator or AF-assist) that lights during movie recording and whether the lamp blinks or remains steady.
Indicator lamp

AF-assist illuminator

| Option | Description |
|---|---|
| [FRONT OFF] [REAR]z |
The indicator lamp lights during movie recording. |
| [FRONT OFF] [REAR]y |
The indicator lamp blinks during movie recording. |
| [FRONT]z [REAR]z |
The indicator and AF-assist lamps light during movie recording. |
| [FRONT]z [REAR OFF] |
The AF-assist lamp lights during movie recording. |
| [FRONT]y [REAR]y |
The indicator and AF-assist lamps blink during movie recording. |
| [FRONT]y [REAR OFF] |
The AF-assist lamp blinks during movie recording. |
| [FRONT OFF] [REAR OFF] |
The indicator and AF-assist lamps remain off during movie recording. |
F[SELECT CUSTOM SETTING]
Options are the same as those for still photography, but settings must be adjusted separately (ax[SELECT CUSTOM SETTING]).
F[EDIT/SAVE CUSTOM SETTING]
Options are the same as those for still photography, but settings must be adjusted separately (ax[EDIT/SAVE CUSTOM SETTING]).
F[AUTO UPDATE CUSTOM SETTING]
This item is also found in the photo menus (a[AUTO UPDATE CUSTOM SETTING] (Still Photography)).
xF[CONVERSION LENS]
This item is also found in the photo menus (axF[CONVERSION LENS] (Still Photography)).
xF[ND FILTER]
This item is also found in the photo menus (axF[ND FILTER] (Still Photography)).
xF[WIRELESS COMMUNICATION]
This item is also found in the photo menus (axF[WIRELESS COMMUNICATION] (Still Photography)).

 .
.


