.
.Camera Displays
This section lists the indicators that may be displayed during shooting.
For illustrative purposes, displays are shown with all indicators lit.
- The Electronic Viewfinder
- The LCD Monitor
- Adjusting Display Brightness
- Display Rotation
- Choosing a Display Mode
- The DISP/BACK Button
- Customizing the Standard Display
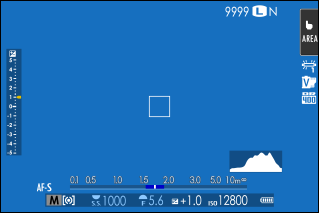
The Electronic Viewfinder
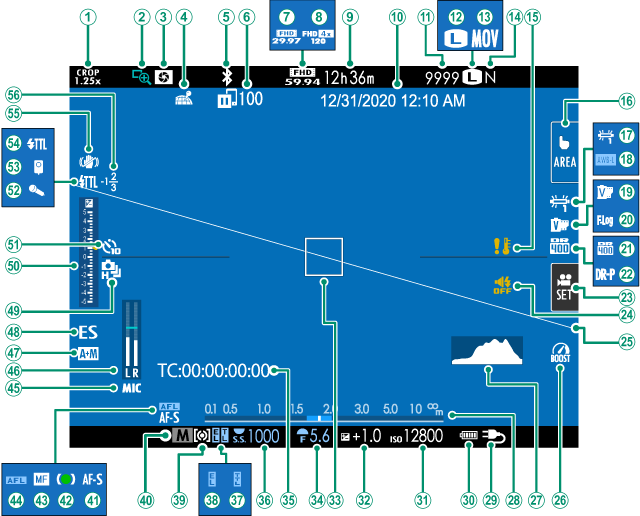
ACrop factor
BFocus check
CDepth-of-field preview
DLocation data download status
EBluetooth ON/OFF
FImage transfer status
GMovie mode
HFull HD high-speed recording
IRecording time available/elapsed recording time
JDate and time
KNumber of available frames 1
LImage size
MFile format
NImage quality
OTemperature warning
PTouch screen mode
QWhite balance
RAWB lock
SFilm simulation
TF-Log recording
UDynamic range
VD-range priority
WMovie optimized control
XSound and flash indicator
YVirtual horizon
ZBoost mode
aHistogram
bDistance indicator 2
cPower supply
dBattery level
eSensitivity
fExposure compensation
gFocus frame
hAperture
iTime code
jShutter speed
kTTL lock
lAE lock
mMetering
nShooting mode
oFocus mode 2
pFocus indicator 2
qManual focus indicator 2
rAF lock
sMic jack setting
tRecording level 2
uAF+MF indicator 2
vShutter type
wContinuous mode
xExposure indicator
ySelf-timer indicator
zMicrophone
0Remote release
1Flash (TTL) mode
2IS mode 2
3Flash compensation
1 Shows “9999” if there is space for over 9999 frames.
2 Not displayed when ON is selected for DSCREEN SET-UP > LARGE INDICATORS MODE(EVF).
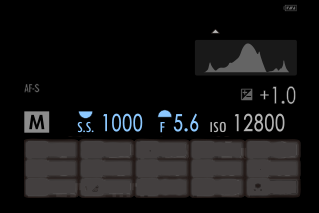
The LCD Monitor
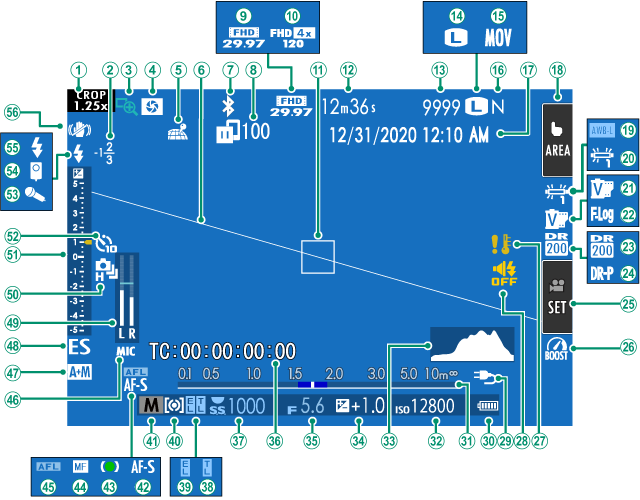
ACrop factor
BFlash compensation
CFocus check
DDepth-of-field preview
ELocation data download status
FVirtual horizon
GBluetooth ON/OFF
HImage transfer status
IMovie mode
JFull HD high-speed recording
KFocus frame
LRecording time available/elapsed recording time
MNumber of available frames 1
NImage size
OFile format
PImage quality
QDate and time
RTouch screen mode 3
SAWB lock
TWhite balance
UFilm simulation
VF-Log recording
WDynamic range
XD-range priority
YMovie optimized control
ZBoost mode
aTemperature warning
bSound and flash indicator
cPower supply
dBattery level
eDistance indicator 2
fSensitivity
gHistogram
hExposure compensation
iAperture
jTime code
kShutter speed
lTTL lock
mAE lock
nMetering
oShooting mode
pFocus mode 2
qFocus indicator 2
rManual focus indicator 2
sAF lock
tMic jack setting
uAF+MF indicator 2
vShutter type
wRecording level 2
xContinuous mode
yExposure indicator
zSelf-timer indicator
0Microphone
1Remote release
2Flash (TTL) mode
3IS mode 2
1 Shows “9999” if there is space for over 9999 frames.
2 Not displayed when ON is selected for DSCREEN SET-UP > LARGE INDICATORS MODE(LCD).
3 Camera functions can also be accessed via touch controls.
Adjusting Display Brightness
The brightness and saturation of the viewfinder and LCD monitor can be adjusted using the items in the DSCREEN SET-UP menu. Choose EVF BRIGHTNESS or EVF COLOR to adjust viewfinder brightness or saturation, LCD BRIGHTNESS or LCD COLOR to do the same for the LCD monitor.
Display Rotation
When ON is selected for DSCREEN SET-UP > AUTOROTATE DISPLAYS, the indicators in the viewfinder and LCD monitor automatically rotate to match camera orientation.
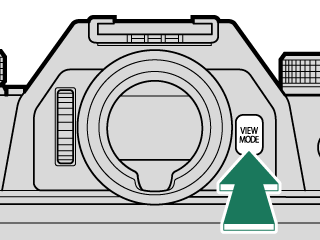
Choosing a Display Mode
Press the VIEW MODE button to cycle through the following display modes. You can choose separate display modes for shooting and playback.
SHOOTING
| Option | Description |
|---|---|
| EEYE SENSOR | Putting your eye to the viewfinder turns the viewfinder on and the LCD monitor off; taking your eye away turns the viewfinder off and LCD monitor on. |
| LCD ONLY | LCD monitor on, viewfinder off. |
| EVF ONLY | Viewfinder on, LCD monitor off. |
| EVF ONLY + E | Putting your eye to the viewfinder turns the viewfinder on; taking it away turns the viewfinder off. The LCD monitor remains off. |
| EEYE SENSOR + LCD IMAGE DISP. | Putting your eye to the viewfinder during shooting turns the viewfinder on, but the LCD monitor is used for the display of images once you remove your eye from the viewfinder after shooting. The options selected forDSCREEN SET-UP > IMAGE DISP. apply to display in the LCD monitor. |
PLAYBACK
| Option | Description |
|---|---|
| EEYE SENSOR | Putting your eye to the viewfinder turns the viewfinder on and the LCD monitor off; taking your eye away turns the viewfinder off and LCD monitor on. |
| LCD ONLY | LCD monitor on, viewfinder off. |
| EVF ONLY | Viewfinder on, LCD monitor off. |
Displays modes for the EVF and LCD monitor can also be selected using DSCREEN SET-UP > VIEW MODE SETTING in the setup menu (aVIEW MODE SETTING).
The Eye Sensor
The eye sensor may respond to objects other than your eye or to light shining directly on the sensor.
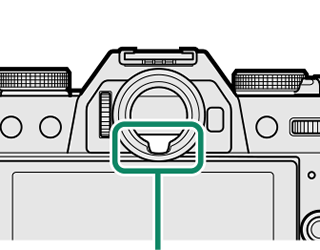
Eye sensor
The DISP/BACK Button
The DISP/BACK button controls the display of indicators in the viewfinder and LCD monitor.
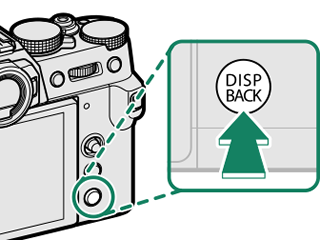
Indicators for the EVF and LCD must be selected separately. To choose the EVF display, place your eye to the viewfinder while using the DISP/BACK button.
Viewfinder (EVF)
Standard indicators

Full screen (no indicators)

LCD Monitor
Standard indicators
No indicators

Info display (still photography only)
Customizing the Standard Display
To choose the items shown in the standard indicator display:
-
Display standard indicators.
Use the DISP/BACK button to display standard indicators.
-
Select DISP. CUSTOM SETTING.
Select DSCREEN SET-UP > DISP. CUSTOM SETTING in the setup menu.
-
Choose items.
Highlight items and press MENU/OK to select or deselect.
Item Default FRAMING GUIDELINE R ELECTRONIC LEVEL R FOCUS FRAME R AF DISTANCE INDICATOR R MF DISTANCE INDICATOR R HISTOGRAM R LIVE VIEW HIGHLIGHT ALERT R SHOOTING MODE R APERTURE/S-SPEED/ISO R INFORMATION BACKGROUND R Expo. Comp. (Digit) R Expo. Comp. (Scale) R FOCUS MODE R PHOTOMETRY R SHUTTER TYPE R FLASH R CONTINUOUS MODE R DUAL IS MODE R TOUCH SCREEN MODE R WHITE BALANCE R FILM SIMULATION R DYNAMIC RANGE R BOOST MODE R FRAMES REMAINING R IMAGE SIZE/QUALITY R MOVIE MODE & REC. TIME R IMAGE TRANSFER ORDER R MIC LEVEL R GUIDANCE MESSAGE R BATTERY LEVEL R FRAMING OUTLINE R -
Press DISP/BACK to save changes.
-
Press DISP/BACK as needed to exit the menus and return to the shooting display.
Virtual Horizon
Selecting ELECTRONIC LEVEL displays a virtual horizon. The camera is level when the two lines overlap. Note that the virtual horizon may not be displayed if the camera lens is pointed up or down. For a 3D display (shown), press the function button to which ELECTRONIC LEVEL is assigned(aFunction Controls).
Roll
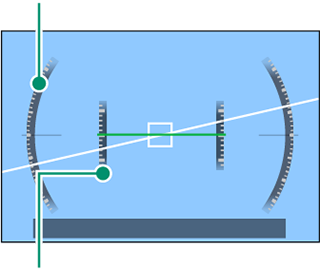
Pitch
Framing Outline
Enable FRAMING OUTLINE to make the borders of the frame easier to see against dark backgrounds.
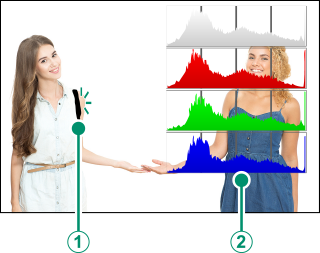
Histograms
Histograms show the distribution of tones in the image. Brightness is shown by the horizontal axis, the number of pixels by the vertical axis.
|
Number of pixels
|
 |
|
Shadows |
Pixel brightness |  Highlights Highlights |


-
Optimal exposure: Pixels are distributed in an even curve throughout the tone range.
-
Overexposed: Pixels are clustered on the right side of the graph.

-
Underexposed: Pixels are clustered on the left side of the graph.

To view separate RGB histograms and a display showing areas of the frame that will be overexposed at current settings superimposed on the view through the lens, press the function button to which HISTOGRAM is assigned(aFunction Controls).
AOverexposed areas blink
BRGB histograms