
 .
.Vertical Battery Grips
The VG‑GFX100II vertical battery grip can be used to supplement the camera battery or when holding the camera rotated to take pictures in portrait (“tall”) orientation.
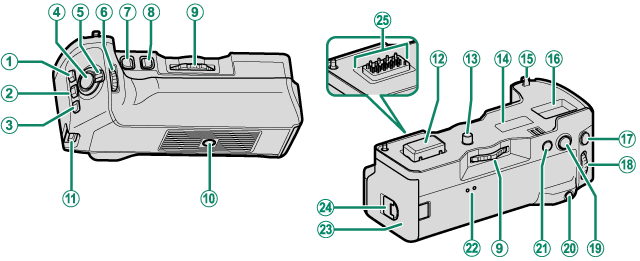
AFn1 button
BFn2 button
CFn3 button
DShutter button
EControl lock
FFront command dial
GFn5 button
HFn6 button
ILock screw knob
JTripod socket
KEyelet for camera strap
LConnector cover
MLock screw
NSerial number plate
OHanging hook
PCompartment for connector cover supplied with camera
QAFON button
RRear command dial
SFocus stick (focus lever)
TQ (quick menu) button
UAEL (exposure lock) button
VIndicator lamps
WBattery tray
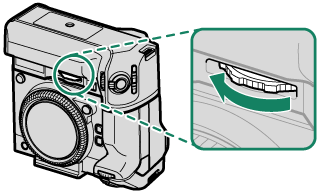
XBattery-chamber cover latch
YConnector
All controls perform the same function as the matching controls on the camera.
Attaching the Vertical Battery Grip
Check that the camera is off before attaching or removing the vertical battery grip.
-
Remove the connector cover.
Remove the vertical battery grip connector cover from the camera (A) and the connector cover from the vertical battery grip (B).
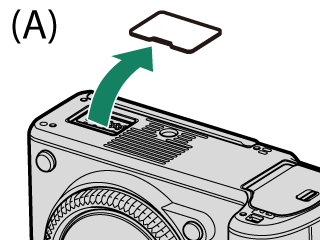
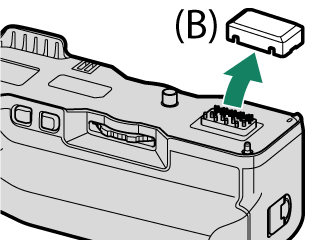
The vertical battery grip connector cover of the camera (A) can be placed in the compartment for the connector cover. Store the connector cover of the vertical battery grip (B) so that is not lost after removal.
-
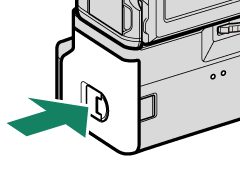
Attach the vertical battery grip to the camera.
While hooking the hanging hook in the hole to hook vertical battery grip on the camera (A), attach the vertical battery grip to the camera (B).
Hanging hook
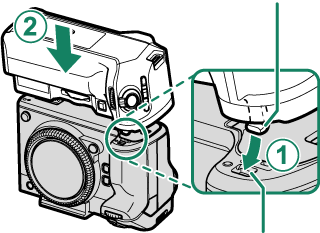
Hole to hook Vertical Battery Grip
-
Rotate the lock screw knob to secure the vertical battery grip.
Fully tighten the lock screw knob after attaching the grip.
Do not touch the contacts.
After removing the grip, replace the vertical battery grip connector cover (A) and connector cover (B).
The grip is not waterproof, and caution is required to prevent the entry of dirt, dust, water, noxious gases, salt, and other foreign matter. Do not place the grip on wet surfaces. Before use, be sure that the battery tray and battery-chamber cover are fully closed.
Inserting and Removing Batteries
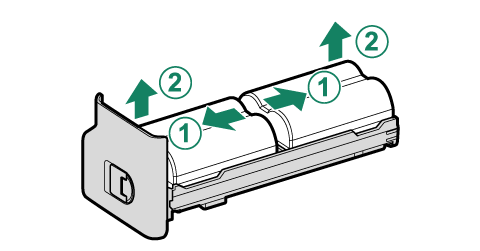
Insert the batteries as shown.
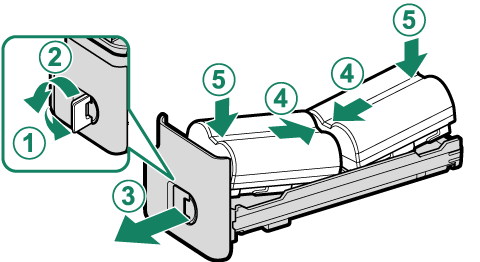
The batteries can be removed as shown.
Be sure the camera is off before exchanging batteries.
Use only NP-W235 batteries.
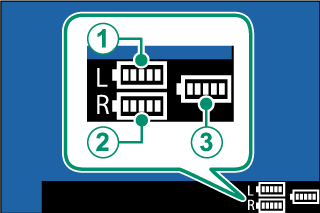
Battery Level
When a vertical battery grip is connected, the camera battery level display shows the camera battery level and the level of the batteries inserted in the VG‑GFX100II.
The display shows the level of inserted batteries only.
When a full complement of batteries are inserted in the camera and the VG‑GFX100II, the batteries will be used in the following order:
AThe left grip battery (L)
BThe right grip battery (R)
CThe camera battery
Charging the Batteries
The batteries in the vertical battery grip will charge when the grip is attached to a camera that is connected to an AC‑5VJ AC adapter via a USB cable.
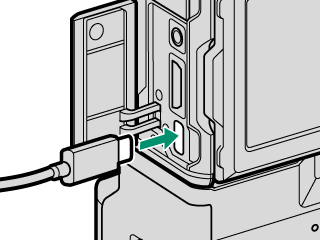
The indicator lamps will light green while the battery charges; the lamp on the left shows the status of the left battery, the lamp on the right the status of the right battery.
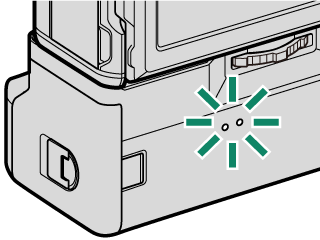
| Indicator lamp | Battery status |
|---|---|
| On | Battery charging |
| Off | Charging complete |
| Blinks | Battery fault |
All three batteries charge simultaneously; charging takes about 330 minutes.
Using a device that supplies power with an outputs of 45 W or above reduces charging times to as little as 180 minutes.
The batteries will not charge while the camera is on.
For more information, see “Charging the Battery” and“For Your Safety”.


