
 .
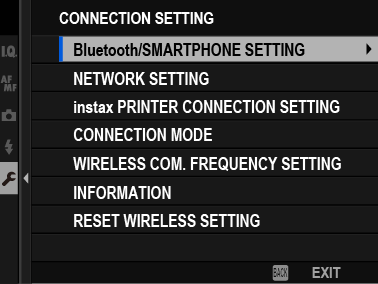
.[CONNECTION SETTING]
Adjust settings for connection to other devices.
To access connection settings, press [MENU/OK], select the D ([SET UP]) tab, and choose [CONNECTION SETTING].
For more information on wireless connections, visit:
[Bluetooth/SMARTPHONE SETTING]
Adjust Bluetooth settings.
[PAIRING REGISTRATION]
Pair the camera with a smartphone or tablet to which the smartphone app has been installed.
[SELECT PAIRING DESTINATION]
Choose a connection from a list of devices with which the camera has been paired using [PAIRING REGISTRATION]. Select [NO CONNECTION] to exit without connecting.
[DELETE PAIRING REG.]
Delete pairing information for selected devices. Choose the device in the device list. The selected device will also be removed from the devices listed in [SELECT PAIRING DESTINATION].
[Bluetooth ON/OFF]
| Option | Description |
|---|---|
| [ON] | The camera automatically establishes a Bluetooth connection with paired devices when turned on. |
| [OFF] | The camera does not connect via Bluetooth. |
[AUTO IMAGE TRANSFER ORDER]
Choose whether pictures are automatically marked for upload as they are taken.
| Options | |
|---|---|
| [ON] | [OFF] |
[SMARTPHONE LOCATION SYNC.]
Choose whether to synchronize the camera to the location provided by a paired smartphone.
| Options | |
|---|---|
| [ON] | [OFF] |
[NAME]
Choose a name ([NAME]) to identify the camera on the wireless network (the camera is assigned a unique name by default).
[IMAGE TRANSFER WHILE POWER OFF]
Choose whether the camera uploads pictures to paired smartphones while off.
| Options | |
|---|---|
| [ON] | [OFF] |
[RESIZE IMAGE FOR SMARTPHONE] H
Choose whether to resize images for upload to smartphones. Resizing applies only to the copy uploaded to the smartphone; the original is not affected.
| Option | Description |
|---|---|
| [ON] | Larger images are resized to H for upload. |
| [OFF] | Images are uploaded at their original size. |
Be sure your smartphone is running the latest version of the applicable smartphone app. Different operating systems use different apps; for more information, visit:
aUsing Your Camera with Smartphones, Tablets, and Computers
Pictures will be uploaded during shooting and playback and while the camera is off if [ON] is selected for both [Bluetooth ON/OFF] and [AUTO IMAGE TRANSFER ORDER] or if images are currently selected for upload using the [IMAGE TRANSFER ORDER] option in the playback menu.
The camera clock will automatically be set to the time reported by paired smartphones whenever the app is launched.
[NETWORK SETTING]
Adjust settings for connection to wireless networks.
[WIRELESS ACCESS POINT SETTING]
| Option | Description |
|---|---|
| [SIMPLE SETUP] | Connect to an access point using simple settings. |
| [MANUAL SETUP] | Manually adjust settings for connection to a wireless network. Choose the network from a list ([SELECT FROM NETWORK LIST]) or enter the name manually ([ENTER SSID]). |
[WIRELESS IP ADDRESS SETTING]
| Option | Description |
|---|---|
| [AUTO] | The IP address is assigned automatically. |
| [MANUAL] | Assign an IP address manually. Manually choose the IP address ([IP ADDRESS]), network mask ([NETMASK]), and gateway address ([GATEWAY ADDRESS]). |
[instax PRINTER CONNECTION SETTING]
Adjust settings for connection to optional Fujifilm instax SHARE printers.
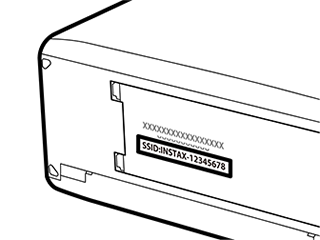
The Printer Name (SSID) and Password
The printer name (SSID) can be found on the bottom of the printer; the default password is “1111”. If you have already chosen a different password to print from a smartphone, enter that password instead.
[CONNECTION MODE] ( )
)
Adjust settings for connection to external devices.
| Option | Description |
|---|---|
| [USB CARD READER] | Connecting the camera to a computer via USB automatically enables data transfer mode, allowing data to be copied to the computer. The camera functions normally when not connected. |
| [USB TETHER SHOOTING AUTO] |
The camera can be controlled from computers, gimbals, drones, or other devices connected via USB. The camera automatically enters “tethered shooting” (i.e., remote-control) mode when the external device is turned on and returns to normal operation when the external device turned off or disconnected.
|
| [USB TETHER SHOOTING FIXED] | As for [USB TETHER SHOOTING AUTO], except that the camera remains in “tethered shooting” (remote-control) mode when the external device is off or not connected, allowing the device to resume control when the connection is re-established after an accidental disconnection or other disruption. At default settings, pictures are not recorded to the memory card. |
| [WIRELESS TETHER SHOOTING FIXED] | Choose this option for wireless remote photography. Select a network using D[CONNECTION SETTING] > [NETWORK SETTING]. |
| [USB RAW CONV./BACKUP RESTORE] |
Connecting the camera to a computer via USB automatically enables USB RAW conversion/backup restore mode. The camera functions normally when not connected.
|
D[POWER MANAGEMENT] > [AUTO POWER OFF] settings also apply during tethered shooting. To prevent the camera turning off automatically, select [OFF] for [AUTO POWER OFF].
For information on compatible computer software, see “Software for Use with Your Camera”.
[SMARTPHONE WIRELESS COM. FREQUENCY SETTING]
Choose a wireless band for use with Camera Remote.
| Options | |
|---|---|
| [2.4GHz (IEEE802.11 b/g/n)] | [5GHz (IEEE802.11 a/n/ac)] |
Some countries and regions prohibit outdoor use of certain channels in the 5 GHz band. Check whether use of the 5.2 GHz (W52) band is permitted before selecting the 5 GHz option.
The options available vary with the country or region of sale.
[INFORMATION] ()
.View the camera's MAC, Bluetooth, and wireless network IP address.
[RESET WIRELESS SETTING]
Restore wireless settings to their default values.


