
 .
.Parts of the Camera
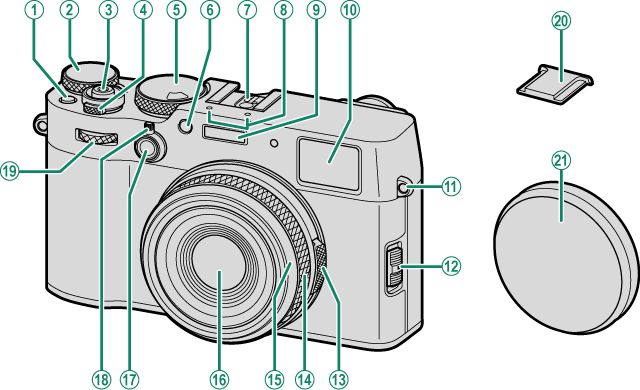
AFn1 button
BExposure compensation dial
CShutter button
DON/OFF switch
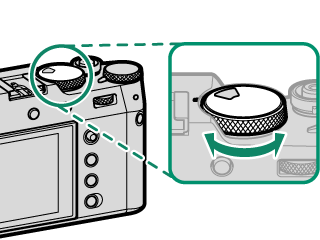
EShutter speed dial/Sensitivity dial
FAF-assist illuminator/Self-timer lamp
GHot shoe
HMicrophone
IFlash
JViewfinder window
KStrap eyelet
LFocus mode selector
MAperture ring
NControl ring
Focus ring
OFront ring (detachable)
PLens
QFn2 button
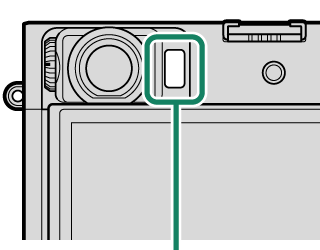
RViewfinder selector
SFront command dial
THot shoe cover
ULens cap
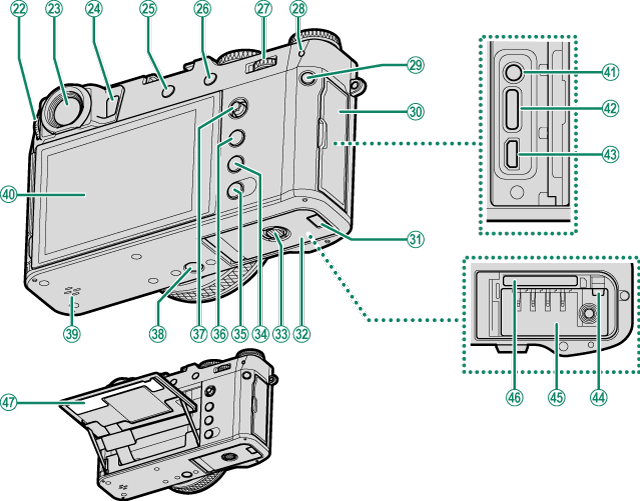
VDiopter adjustment control
WViewfinder window
XEye sensor
YDRIVE/DELETE button
ZAEL (exposure lock)/AFL (focus lock) button
aRear command dial
bIndicator lamp
cQ (quick menu) button
dConnector cover
eCable channel cover for DC coupler
fBattery-chamber cover
gBattery-chamber cover latch
hPLAY (playback) button
iDISP (display)/BACK button
x (Bluetooth) button
jMENU/OK button
kFocus stick (focus lever)
lTripod mount
mSpeaker
nLCD monitor
Touch screen
oMicrophone/remote release connector (Φ2.5mm)
pUSB connector (Type-C)
qHDMI Micro connector (Type D)
rBattery latch
sBattery chamber
tMemory card slot
uSerial number plate
- The Viewfinder Window
- The LCD Monitor
- The Focus Stick (Focus Lever)
- The Shutter Speed Dial/Sensitivity Dial
- The Exposure Compensation Dial
- Focusing the Viewfinder
- The DRIVE/DELETE Button
- The Command Dials
- The Indicator Lamp
- The Control Ring
- The Serial Number Plate
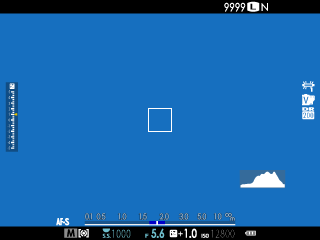
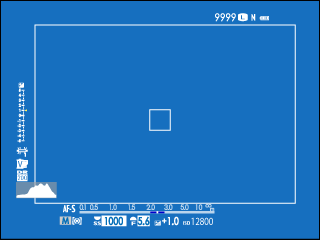
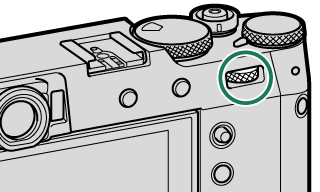
The Viewfinder Window
Use the viewfinder selector to switch between the electronic viewfinder (EVF) and the optical viewfinder (OVF). In addition, a small electronic rangefinder (ERF) window can be displayed in the OVF.
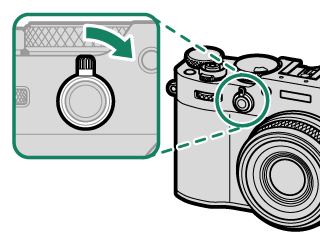
Switching Between the EVF and OVF
To switch between the EVF and OVF, pull the viewfinder selector as shown.

EVF
OVF
The camera automatically switches from the OVF to the EVF during movie recording.
Turning the ERF On and Off
To turn the ERF on or off, pull the viewfinder selector as shown while the OVF is displayed.
ERF off
ERF on
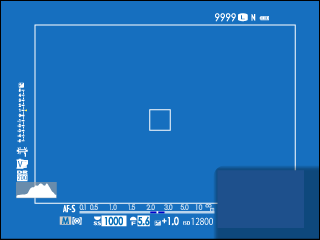
The ERF is available only when rSINGLE POINT is selected for AF mode.
The Hybrid (EVF/OVF/ERF) Viewfinder
The features of the different displays are described below.
| Display | Description |
|---|---|
| OVF |
|
| EVF |
|
| ERF | As for the optical viewfinder but with a focus preview window. |
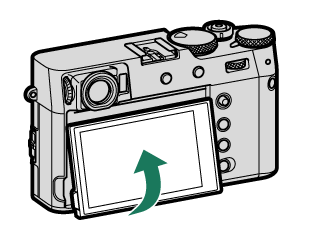
The LCD Monitor
The LCD monitor can be tilted for easier viewing, but be careful not to touch the wires or trap fingers or other objects behind the monitor. Touching the wires could cause camera malfunction.
The LCD monitor also functions as a touch screen that can be used for:
- Touch photography (aLCD Monitor)
- Focus area selection (aEVF)
- Function selection (aTouch Function)
- Movie optimized control oL(aMOVIE OPTIMIZED CONTROLoL)
- Playback (aPlayback Touch Controls)
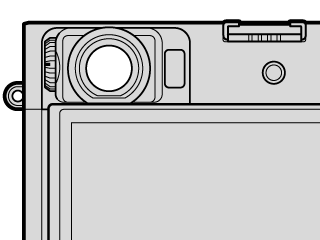
The Eye Sensor
- The eye sensor may respond to objects other than your eye or to light shining directly on the sensor.
- The eye sensor is not available when the LCD monitor is tilted.
- The eye sensor can be disabled using DSCREEN SET-UP > VIEW MODE SETTING.
Eye sensor
The Focus Stick (Focus Lever)
Tilt or press the focus stick to select the focus area. The focus stick can also be used to navigate the menus.
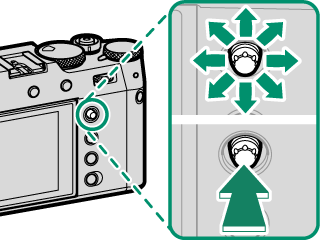
To choose the role played by the focus stick, press and hold the center of the stick or use DBUTTON/DIAL SETTING > FOCUS LEVER SETTING.
Use GAF/MF SETTING > xFWRAP FOCUS POINT to choose whether focus-area selection is bounded by the borders of the display or “wraps around” from one edge of the display to another.
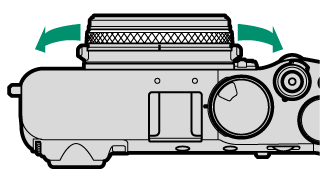
The Shutter Speed Dial/Sensitivity Dial
Shutter speed can be adjusted by rotating the shutter speed dial/sensitivity dial. Lift and rotate the dial to adjust sensitivity.
Shutter speed

Sensitivity
Sensitivity
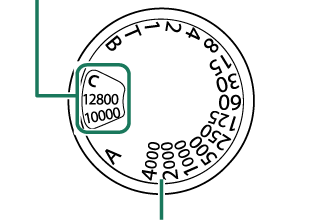
Shutter speed
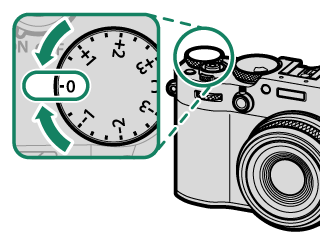
The Exposure Compensation Dial
Rotate the dial to choose an exposure compensation amount.
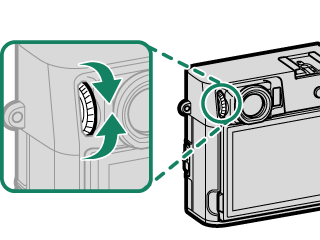
Focusing the Viewfinder
Viewfinder focus can be adjusted by rotating the diopter adjustment control.
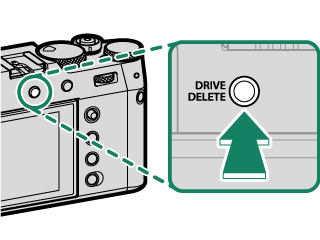
The DRIVE/DELETE Button
Pressing the DRIVE/DELETE button displays the drive-mode menu.
| Mode | |
|---|---|
| B | STILL IMAGE (aTaking Photographs (Mode P)) |
| J | CH HIGH SPEED BURST (aContinuous Shooting (Burst Mode)) |
| O | CL LOW SPEED BURST (aContinuous Shooting (Burst Mode)) |
| W | ISO BKT (aISO BKT) |
| V | WHITE BALANCE BKT (aWHITE BALANCE BKT) |
| s | BKT (Bracketing) |
| h | HDR (aHDR) |
| j | Multiple exposure (aMultiple Exposures) |
| Adv. | Adv. MODE (aPanoramas, Advanced Filters) |
| F | MOVIE (aRecording Movies) |
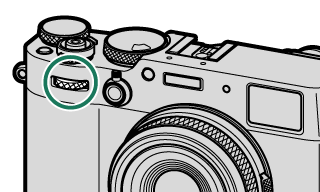
The Command Dials
Rotate or press the command dials to:
|
Rotate |
|
|---|---|
|
Press |
Choose the operation performed by rotating the front command dial 2 |


|
Rotate |
|
|---|---|
|
Press |
|
Aperture set to A (auto) and COMMAND selected for DBUTTON/DIAL SETTING > APERTURE RING SETTING (A).
Can be changed using DBUTTON/DIAL SETTING > COMMAND DIAL SETTING.
C selected for sensitivity.
Available only if FOCUS CHECK is assigned to a function button.
Exposure compensation dial rotated to C.
The rotation direction for the command dials can be selected using DBUTTON/DIAL SETTING > COMMAND DIAL DIRECTION.
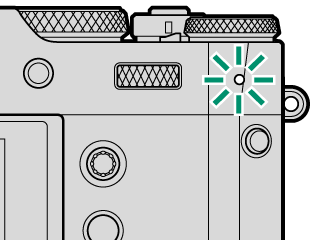
The Indicator Lamp
Camera status is shown by the indicator lamp.
| Indicator lamp | Camera status |
|---|---|
| Glows green | Focus locked. |
| Blinks green | Focus or slow shutter speed warning. Pictures can be taken. |
| Blinks green and orange | Camera on: Recording pictures. Additional pictures can be taken. |
| Camera off: Uploading pictures to a smartphone or tablet. * | |
| Glows orange | Recording pictures. No additional pictures can be taken at this time. |
| Blinks orange | Flash charging; flash will not fire when picture is taken. |
| Blinks red | Lens or memory error. |
* Displayed only if pictures are selected for upload.
Warnings may also appear in the display.
The indicator lamp remains off while your eye is to the viewfinder.
The BMOVIE SETTING > TALLY LIGHT option can be used to choose the lamp (indicator or AF-assist) that lights during movie recording and whether the lamp blinks or remains steady.
The indicator lamp blinks green whenever the displays are off during interval-timer photography.
The Control Ring
Use the control ring for quick access to camera functions during shooting. The function assigned to the control ring can be selected by pressing the control ring options button (Fn2). Choose from:
- STANDARD
- WHITE BALANCE
- FILM SIMULATION
- DIGITAL TELE-CONV.
The function assigned to the control ring can also be selected using DBUTTON/DIAL SETTING > CONTROL RING SETTING.
STANDARD
When STANDARD is selected, the function assigned to the control ring changes with the shooting mode.
| Shooting mode | Function |
|---|---|
| P, S, A, M/ Multiple Exposure |
Digital teleconverter |
| Advanced Filter | Filter selection |
| Panorama | Film simulation |
Regardless of the option selected, when M (manual) is chosen with the focus mode selector in shooting mode P, S, A, or M, the control ring can be used only for manual focus.
The Serial Number Plate
Do not remove the serial number plate, which provides the CMIIT ID, serial number, and other important information.
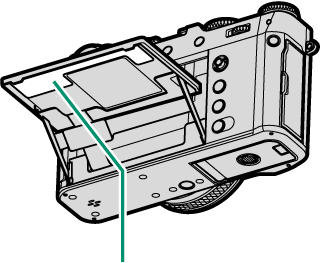
Serial number plate


