
 .
.Camera Displays
This section lists the indicators that may be displayed during shooting.
For illustrative purposes, displays are shown with all indicators lit.
- The Electronic Viewfinder
- The LCD Monitor
- Choosing a Display Mode
- Adjusting Display Brightness
- Display Rotation
- The [DISP/BACK] Button
- The Dual Display
- Customizing the Standard Display
- Virtual Horizon
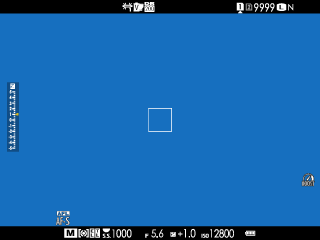
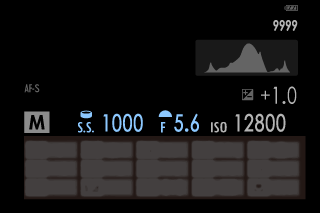
The Electronic Viewfinder
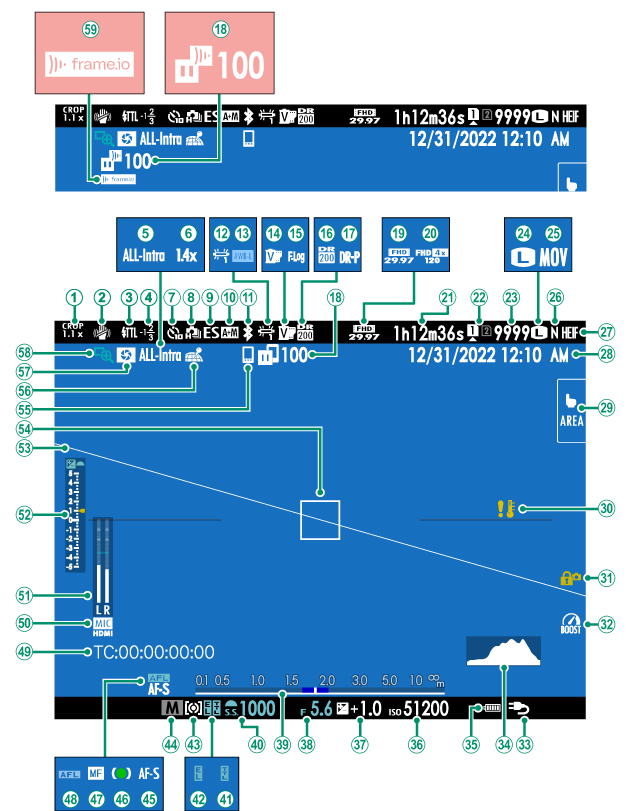
ACrop factor
BIS mode 2
CFlash (TTL) mode
DFlash compensation
EMovie compression
FDigital teleconverter
GSelf-timer indicator
HContinuous mode
IShutter type
JAF+MF indicator 2
KBluetooth ON/OFF
LWhite balance
MAWB lock
NFilm simulation
OF-Log/HLG recording
PDynamic range
QD-range priority
RImage transfer status 4
SMovie mode
THigh-speed recording indicator
URecording time available/elapsed recording time
VCard slot options
WNumber of available frames 1
XImage size
YFile format
ZImage quality
aHEIF format
bDate and time
cTouch screen mode
dTemperature warning
eControl lock 3
fBoost mode
gPower supply
hHistogram
iBattery level
jSensitivity
kExposure compensation
lAperture
mDistance indicator 2
nShutter speed
oTTL lock
pAE lock
qMetering
rShooting mode
sFocus mode 2
tFocus indicator 2
uManual focus indicator 2
vAF lock
wTime code
xMicrophone input channel
yRecording level 2
zExposure indicator
0Virtual horizon
1Focus frame
2Bluetooth host
3Location data download status
4Depth-of-field preview
5Focus check
6Connection status (Frame.io) 5
Shows “9999” if there is space for over 9999 frames.
Not displayed when [ON] is selected for D[SCREEN SET-UP] > [LARGE INDICATORS MODE(EVF)].
Displayed when controls have been locked by pressing and holding the [MENU/OK] button. Control lock can be ended by pressing and holding the [MENU/OK] button again.
The camera displays icons showing the status of files selected for or currently undergoing upload to Frame.io.
The camera displays an icon showing the status of the connection to Frame.io.
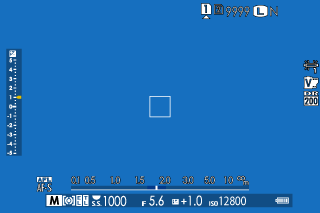
The LCD Monitor
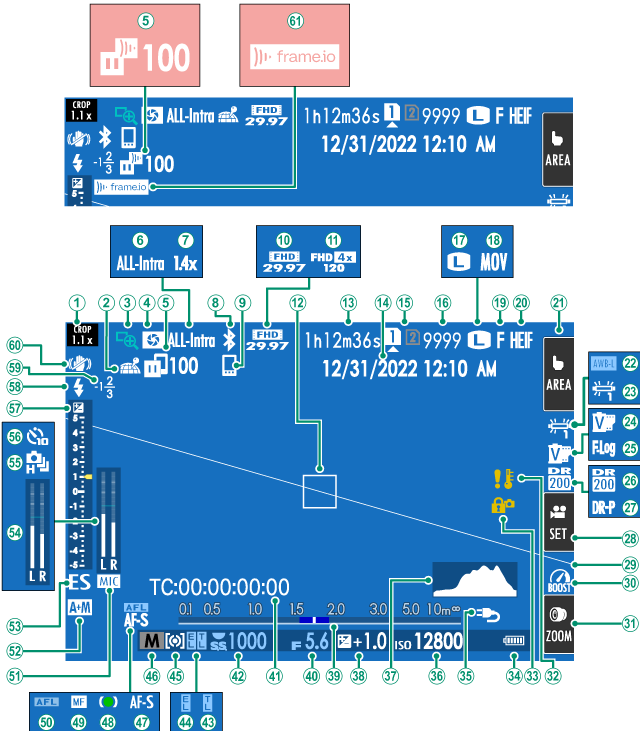
ACrop factor
BLocation data download status
CFocus check
DDepth-of-field preview
EImage transfer status 5
FMovie compression
GDigital teleconverter
HBluetooth ON/OFF
IBluetooth host
JMovie mode
KHigh-speed recording indicator
LFocus frame
MRecording time available/elapsed recording time
NDate and time
OCard slot options
PNumber of available frames 1
QImage size
RFile format
SImage quality
THEIF format
UTouch screen mode 3
VAWB lock
WWhite balance
XFilm simulation
YF-Log/HLG recording
ZDynamic range
aD-range priority
bMovie optimized control 3
cVirtual horizon
dBoost mode
eTouch zoom 3
fTemperature warning
gControl lock 4
hBattery level
iPower supply
jSensitivity
kHistogram
lExposure compensation
mDistance indicator 2
nAperture
oTime code
pShutter speed
qTTL lock
rAE lock
sMetering
tShooting mode
uFocus mode 2
vFocus indicator 2
wManual focus indicator 2
xAF lock
yMicrophone input channel
zAF+MF indicator 2
0Shutter type
1Recording level 2
2Continuous mode
3Self-timer indicator
4Exposure indicator
5Flash (TTL) mode
6Flash compensation
7IS mode 2
8Connection status (Frame.io) 6
Shows “9999” if there is space for over 9999 frames.
Not displayed when [ON] is selected for D[SCREEN SET-UP] > [LARGE INDICATORS MODE(LCD)].
Camera functions can also be accessed via touch controls.
Displayed when controls have been locked by pressing and holding the [MENU/OK] button. Control lock can be ended by pressing and holding the [MENU/OK] button again.
The camera displays icons showing the status of files selected for or currently undergoing upload to Frame.io.
The camera displays an icon showing the status of the connection to Frame.io.
Choosing a Display Mode
Press the [VIEW MODE] button to cycle through the following display modes. You can choose separate display modes for shooting and playback.
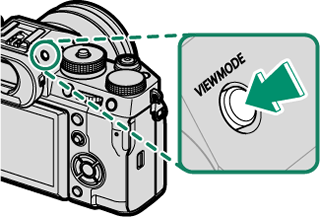
Use D[SCREEN SET-UP] > [VIEW MODE SETTING] in the setup menu to choose a display mode for the EVF and LCD monitor.
[SHOOTING]
| Option | Description |
|---|---|
| E[EYE SENSOR] | Putting your eye to the viewfinder turns the viewfinder on and the LCD monitor off; taking your eye away turns the viewfinder off and LCD monitor on. |
| [LCD ONLY] | LCD monitor on, viewfinder off. |
| [EVF ONLY] | Viewfinder on, LCD monitor off. |
| [EVF ONLY] + E | Putting your eye to the viewfinder turns the viewfinder on; taking it away turns the viewfinder off. The LCD monitor remains off. |
| E[EYE SENSOR + LCD IMAGE DISP.] | Putting your eye to the viewfinder during shooting turns the viewfinder on, but the LCD monitor is used for the display of images once you remove your eye from the viewfinder after shooting. The options selected for D[SCREEN SET-UP] > [IMAGE DISP.] apply to display in the LCD monitor. |
Go to D[SCREEN SET-UP] > [VIEW MODE SETTING] in the setup menu and press the [Q] button to choose the view modes available.
[PLAYBACK]
| Option | Description |
|---|---|
| E[EYE SENSOR] | Putting your eye to the viewfinder turns the viewfinder on and the LCD monitor off; taking your eye away turns the viewfinder off and LCD monitor on. |
| [LCD ONLY] | LCD monitor on, viewfinder off. |
| [EVF ONLY] | Viewfinder on, LCD monitor off. |
The Eye Sensor
The eye sensor may respond to objects other than your eye or to light shining directly on the sensor.
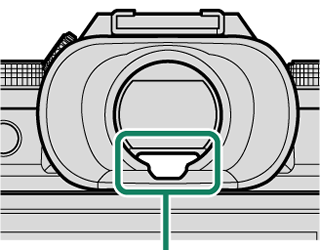
Eye sensor
Adjusting Display Brightness
The brightness and saturation of the viewfinder and LCD monitor can be adjusted using the items in the D[SCREEN SET-UP] menu. Choose [EVF BRIGHTNESS] or [EVF COLOR] to adjust viewfinder brightness or saturation, [LCD BRIGHTNESS] or [LCD COLOR] to do the same for the LCD monitor.
Display Rotation
When [ON] is selected for D[SCREEN SET-UP] > [AUTOROTATE DISPLAYS], the indicators in the viewfinder and LCD monitor automatically rotate to match camera orientation.
The [DISP/BACK] Button
The [DISP/BACK] button controls the display of indicators in the viewfinder and LCD monitor.
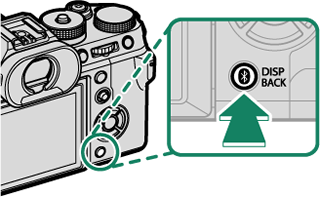
Indicators for the EVF and LCD must be selected separately. To choose the EVF display, place your eye to the viewfinder while using the [DISP/BACK] button.
Viewfinder
Full screen
Standard indicators

Dual display (manual focus mode only)
LCD monitor
Standard indicators
No indicators

Info display
Dual display (manual focus mode only)
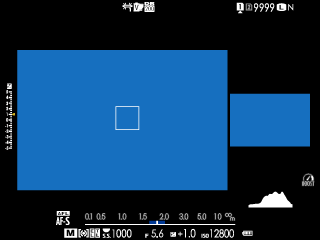
The Dual Display
The dual display consists of a large full-frame window and a smaller close-up of the focus area.
Customizing the Standard Display
To choose the items shown in the standard indicator display:
-
Display standard indicators.
Use the [DISP/BACK] button to display standard indicators.
-
Select [DISP. CUSTOM SETTING].
Select D[SCREEN SET-UP] > [DISP. CUSTOM SETTING] in the setup menu.
-
Choose items.
Highlight items and press [MENU/OK] to select or deselect.
Item Default [FRAMING GUIDELINE] R [FOCUS FRAME] R [FOCUS INDICATOR] R [AF DISTANCE INDICATOR] R [MF DISTANCE INDICATOR] R [HISTOGRAM] R [LIVE VIEW HIGHLIGHT ALERT] R [SHOOTING MODE] R [APERTURE/S-SPEED/ISO] R [INFORMATION BACKGROUND] R [Expo. Comp. (Digit)] R [Expo. Comp. (Scale)] R [FOCUS MODE] R [PHOTOMETRY] R [SHUTTER TYPE] R [FLASH] R [CONTINUOUS MODE] R [DUAL IS MODE] R [TOUCH SCREEN MODE] R [WHITE BALANCE] R [FILM SIMULATION] R [DYNAMIC RANGE] R [BOOST MODE] R [FRAMES REMAINING] R [IMAGE SIZE/QUALITY] R [MOVIE MODE & REC. TIME] R [DIGITAL TELE-CONV.] R [COMMUNICATION STATUS] R [MIC LEVEL] R [GUIDANCE MESSAGE] R [NO MEMORY CARD WARNING] R [DATE/TIME] R [BATTERY LEVEL] R [FRAMING OUTLINE] R -
Press [DISP/BACK] to save changes.
-
Press [DISP/BACK] as needed to exit the menus and return to the shooting display.
Framing Outline
Enable [FRAMING OUTLINE] to make the borders of the frame easier to see against dark backgrounds.
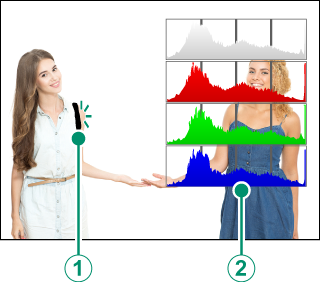
Histograms
Histograms show the distribution of tones in the image. Brightness is shown by the horizontal axis, the number of pixels by the vertical axis.
|
Number of pixels
|
|
|
Shadows |
Pixel brightness |
|


 Highlights
-
Optimal exposure: Pixels are distributed in an even curve throughout the tone range.

-
Overexposed: Pixels are clustered on the right side of the graph.

-
Underexposed: Pixels are clustered on the left side of the graph.

To view separate RGB histograms and a display showing areas of the frame that will be overexposed at current settings superimposed on the view through the lens, press the function button to which [HISTOGRAM] is assigned(a[FUNCTION (Fn) SETTING], Function Controls).
AOverexposed areas blink
BRGB histograms
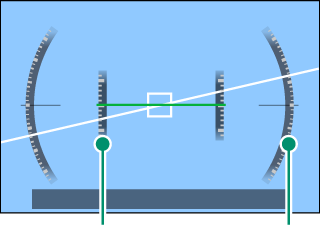
Virtual Horizon
Check whether the camera is level. The display type can be chosen using D[SCREEN SET-UP] > [ELECTRONIC LEVEL SETTING]. Use the virtual horizon to level the camera when mounting it on a tripod or the like.
2D
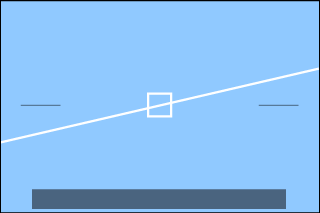
3D
Pitch Roll
- [OFF]: The virtual horizon is not displayed.
- [2D]: A white line shows the amount the camera is tilted left or right. The line turns green when the camera is level. The line may vanish if the camera is tilted forward or back.
- [3D]: The display shows whether the camera is tilted left or right and forward or back.
[ELECTRONIC LEVEL SWITCH] can be assigned to a function button and the button then used to switch between the 2D and 3D displays.


