
 .
.Uploading Files to Frame.io
Upload files to Frame.io.
- Connecting via Wireless LAN
- Connecting via Wired LAN (Ethernet)
- Connecting via USB Tethering
- Uploading Items to Frame.io
Confirm that the camera clock is set to the correct time and date before proceeding.
When connecting via wired LAN (Ethernet) or using the USB tethering feature, attach the file transmitter to your camera.
Connecting via Wireless LAN
Connect to Frame.io via wireless LAN.
You can connect without attaching the file transmitter to your camera.
-
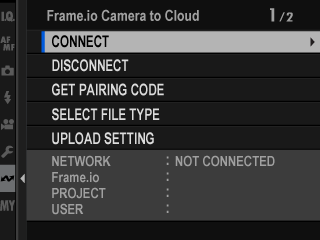
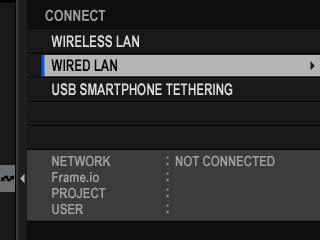
Select [Frame.io Camera to Cloud] > [CONNECT].
-
Select [CREATE NEW] to create a new communication setting profile.
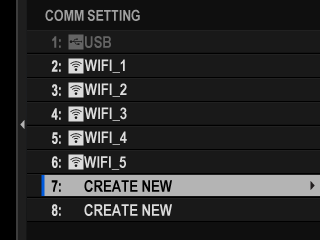
You can also select or edit existing communication setting profiles.
-
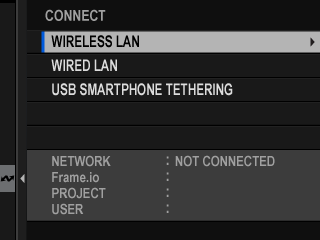
Select [WIRELESS LAN].
-
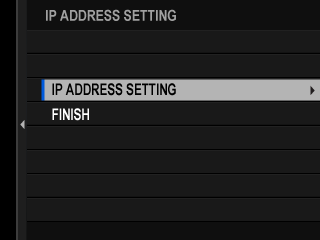
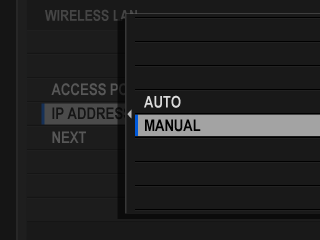
Select [ACCESS POINT SETTING].
Select [IP ADDRESS SETTING] to choose the IP address manually as described in “Connecting Using an IP Address” (aConnecting Using an IP Address).

-
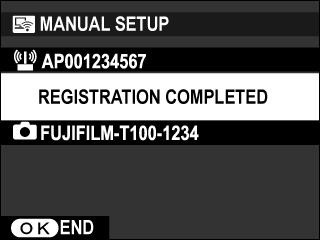
Select [SIMPLE SETUP].
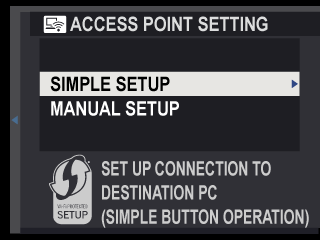
To select a wireless LAN router or enter the router SSID manually, choose [MANUAL SETUP].
-
Follow the on-screen instructions to ready the wireless LAN router.
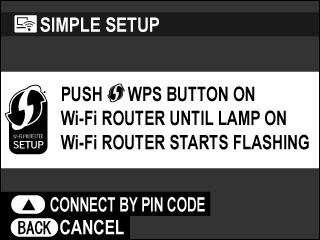
You also have the option of connecting using a PIN. Display the camera PIN by pressing the focus stick (focus lever) up and enter it on the wireless LAN router.
-
Press [MENU/OK] when setup is complete.
-
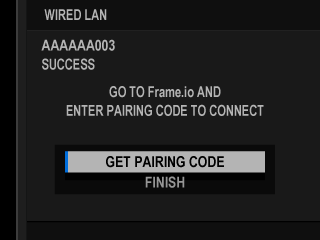
Once connected, select [GET PAIRING CODE].
A pairing code will be displayed.

-
Sign in to Frame.io from a computer or other device and enter the pairing code displayed on the camera.
-
Upload files to Frame.io (aUploading Items to Frame.io).
Connecting via Wired LAN (Ethernet)
Connect to Frame.io via wired LAN (Ethernet).
-
Connect to the wired LAN by plugging an Ethernet cable into the file transmitter’s LAN connector.
-
Select [Frame.io Camera to Cloud] > [CONNECT].
-
Select [CREATE NEW] to create a new communication setting profile.
You can also select or edit existing communication setting profiles.
-
Select [WIRED LAN].
-
Adjust [IP ADDRESS SETTING].
- Select [AUTO] to use an IP address assigned by the network.
- Select [MANUAL] to choose the IP address manually as described in “Connecting Using an IP Address” (aConnecting Using an IP Address).
-
Once connected, select [GET PAIRING CODE].
A pairing code will be displayed.
-
Sign in to Frame.io from a computer or other device and enter the pairing code displayed on the camera.
-
Upload files to Frame.io (aUploading Items to Frame.io).
Connecting via USB Tethering
Connect to Frame.io via a network connection on your smartphone.
-
Using a USB cable, connect the smartphone to the file transmitter’s USB connector.
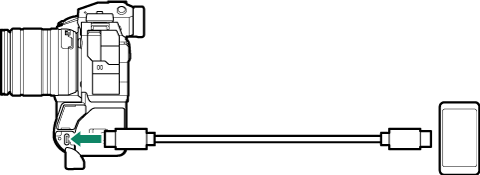
The camera’s USB connector cannot be used for this purpose.
Choose a cable with a USB Type C connector at one end and at the other a connector chosen to match your smartphone (typically USB Type C, USB Micro B, or Lightning).
Apple Lightning to USB Camera Adapters and USB on-the-go (OTG) cables cannot be used.
Before connecting the camera, check that the smartphone battery is fully charged, as otherwise the smartphone will attempt to charge itself from the battery in the camera or file transmitter.
-
Select [Frame.io Camera to Cloud] > CONNECT.
-
Select [CREATE NEW] to create a new communication setting profile.
You can also select or edit existing communication setting profiles.
-
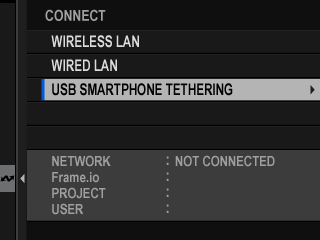
Select [USB SMARTPHONE TETHERING].
-
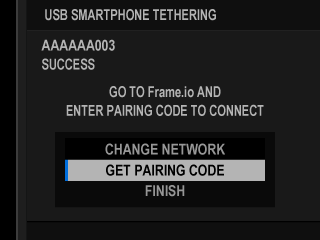
Once connected, select [GET PAIRING CODE].
A pairing code will be displayed.
-
Sign in to Frame.io from a computer or other device and enter the pairing code displayed on the camera.
-
Upload files to Frame.io (aUploading Items to Frame.io).
Connecting Using an IP Address
Connect to Frame.io using a manually-created network/USB setting profile giving the IP address and other network settings.
-
Select [MANUAL].
Select [AUTO] to assign the camera an IP address automatically.
-
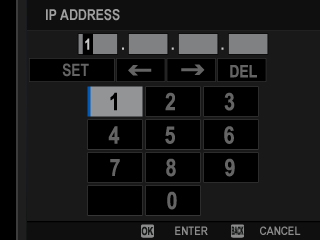
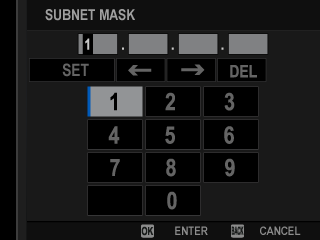
Enter an IP address.
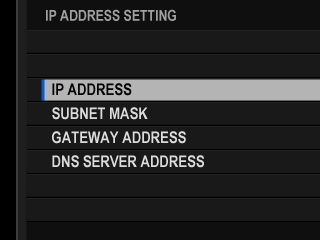
- Select [IP ADDRESS] and enter an IP address.
- Select [SUBNET MASK] and enter a subnet mask.
- Select [GATEWAY ADDRESS] and enter a gateway address.
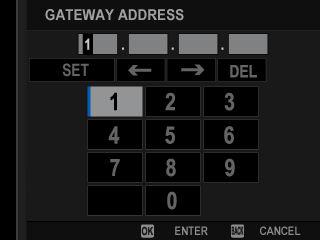
- Select [DNS SERVER ADDRESS] and enter a DNS server address.

Connection Status
The status of the connection to Frame.io is shown by an icon in the electronic viewfinder or LCD monitor.
| Icon | Connection status |
|---|---|
|
(white) |
Connected to Frame.io. |
|
(amber) |
Camera has temporarily suspended upload to Frame.io. To resume, select [Frame.io Camera to Cloud] > [UPLOAD SETTING] > [TRANSFER/SUSPEND] > [TRANSFER]. |
|
(gray) |
Not connected to Frame.io. |
|
(red) |
Frame.io server has set camera status to “paused”. To restore connection, clear “paused” status using computer or other device. |


Uploading Items to Frame.io
Uploading Selected Items Using “Frame.io Camera to Cloud”
-
Select [Frame.io Camera to Cloud] in network/USB settings menu.
-
Select [UPLOAD SETTING] > [SELECT IMAGE & TRANSFER].
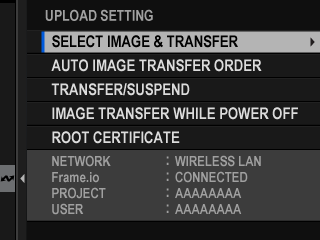
The [NETWORK] field shows how the camera is connected to the network and the [Frame.io] field, the status of the connection to Frame.io.
The [PROJECT] and [USER] fields show information supplied to Frame.io using a computer or other device. Note that some characters may not display correctly, in which case they will be replaced by question marks (“?”).
-
Mark items for upload.
Highlight photos and movies and press [MENU/OK] to mark them for upload.
- To switch to the memory card in the other slot or display only items that meet selected criteria, press [DISP/BACK] before marking begins.
- To select all items, press the [Q] button.
- Selecting any two items with the [AEL] button also selects all items between them.

-
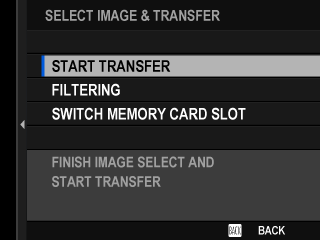
Press [DISP/BACK] and select [START TRANSFER].
The selected items will be uploaded to Frame.io.
Filtering Items/Choosing a Slot
To switch to the memory card in the other slot or display only items that meet selected criteria, press [DISP/BACK] in the selection dialog.
- To display only items that meet selected criteria, choose [FILTERING].
- To switch to the memory card in the other slot, choose [SWITCH MEMORY CARD SLOT].
![]()
Switching slots or changing the filter criteria removes any existing upload marking.
Image transfer orders can contain a maximum of 9999 items.
If [ON] is selected for [Frame.io Camera to Cloud] > [IMAGE TRANSFER WHILE POWER OFF], upload will continue even while the camera is off.
Uploading Photos and Movies as They Are Taken
Photos and movies shot with [ON] selected for [Frame.io Camera to Cloud] > [UPLOAD SETTING] > [AUTO IMAGE TRANSFER ORDER] in the network/USB setting menu are automatically marked for upload.
Selecting Photos and Movies for Upload During Playback
If H[Frame.io TRANSFER ORDER] is selected for D[BUTTON/DIAL SETTING] > a[ISO BUTTON SETTING], you can mark files for upload or change or remove their upload marking using the [ISO] button during playback.


