
 .
.Network/USB Setting Menus
Adjust camera network and USB settings.
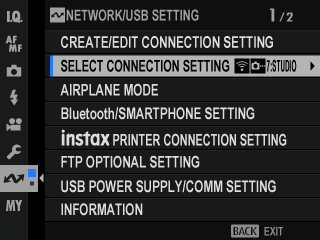
To access network/USB settings from the shooting or playback display, press [MENU/OK] and select the I (network/USB setting) tab.
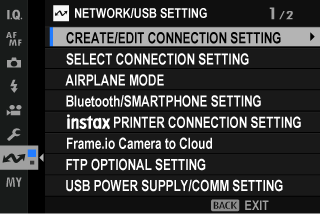
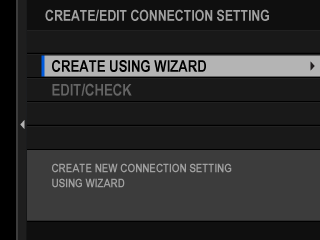
[CREATE/EDIT CONNECTION SETTING]
Create or edit connection setting profiles.
[CREATE USING WIZARD]
Choose network/USB and communication settings for a connection setting profile.
-
Select [CREATE/EDIT CONNECTION SETTING] > [CREATE USING WIZARD] in the network/USB setting menu.
-
Choose the desired network/USB settings.
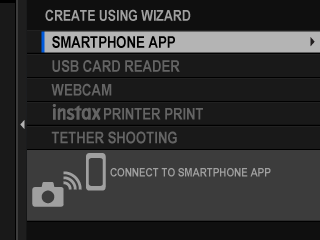
To use any of the following pre-existing connection setting profiles, choose [SELECT CONNECTION SETTING].
- [1: UNIVERSAL SETTING]
- [2: USB CARD READER]
- [3: [USB TETHER SHOOTING AUTO]
- [4: USB TETHER SHOOTING FIXED]
- [5: USB RAW CONV./BACKUP RESTORE]
- [6: USB WEBCAM]
-
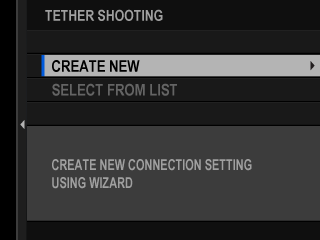
Select [CREATE NEW].
Choosing a tethered photography option displays the options shown. To create a new profile, select [CREATE NEW].
-
Adjust network/USB settings.
For more information, refer to the section on the setting in question.
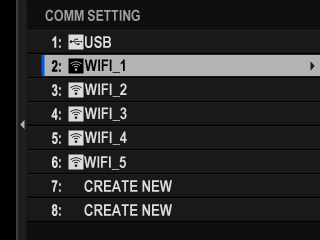
Saved connection setting profiles are marked by icons indicating the communication setting profile.
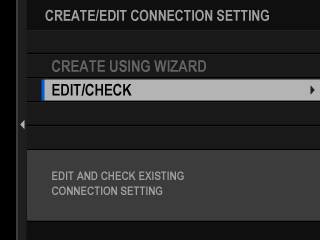
[EDIT/CHECK]
View or edit existing connection setting profiles.
The instructions that follow are devoted chiefly to choosing communication settings for connection setting profiles used in tethered photography.
-
Select [CREATE/EDIT CONNECTION SETTING] > [EDIT/CHECK] in the network/USB setting menu.
-
Choose a connection setting profile.
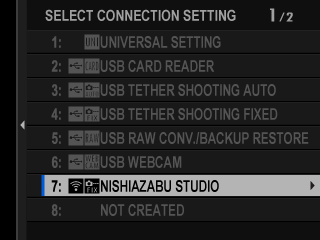
Options 1 to 6 ([1: UNIVERSAL SETTING] to [6: USB WEBCAM]) are not available.
-
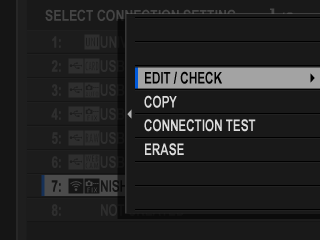
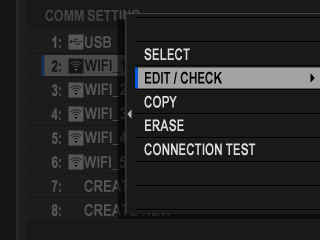
Select [EDIT/CHECK].
- To copy an existing connection setting profile, select [COPY]. Choosing an existing profile as the destination overwrites the profile selected in Step 2.
- To test the connection, select [CONNECTION TEST].
- To delete the selected connection setting profile, select [ERASE].
-
Select [COMM SETTING].
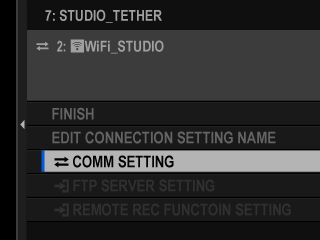
To rename the connection setting profile, select [EDIT CONNECTION NAME].
If the chosen connection setting profile is for FTP upload, select [FTP SERVER SETTING] to view or edit settings for connection to the FTP server (aAdjusting Settings for Connection to FTP Servers ).
If the chosen connection setting profile is for the remote record function, select [REMOTE REC FUNCTOIN SETTING] to view or edit settings for remote movie recording (aConnecting via Wireless LAN, Connecting via Wired LAN (Ethernet)).
-
Choose an existing communication setting profile.
To create a new profile, select [CREATE NEW].
-
Select [EDIT/CHECK].
- To save the selected communication setting profile to the current connection setting profile, choose [SELECT].
- To copy an existing communication setting profile, select [COPY]. Choosing an existing profile as the destination overwrites the profile selected in Step 5.
- To delete the selected communication setting profile, select [ERASE]. Deleting a communication setting profile saved to a connection setting profile also deletes the connection setting profile.
- To test the connection, select [CONNECTION TEST].
-
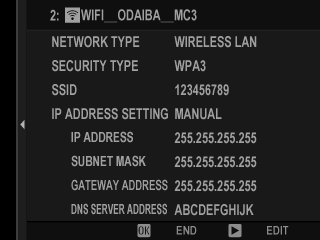
Review the settings displayed and select [END] to proceed without making changes. To edit settings, press the selector right.
You can now edit the communication setting profile as described in “Simple Access Point Connections” and “Connecting Using an IP Address”.
-
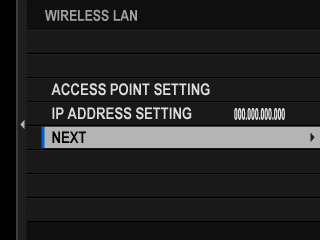
After editing the communication setting profile, select [NEXT].
-
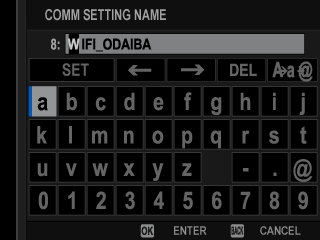
Name the communication setting profile.
-
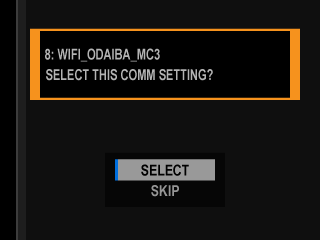
Choose [SELECT] to save the edited communication setting profile to the current connection setting profile.
-
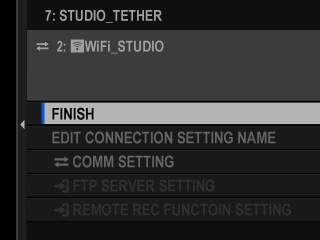
Select [FINISH] to end editing.
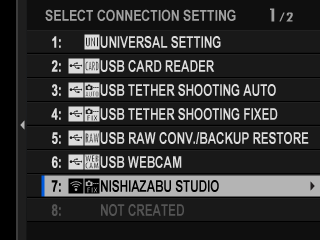
[SELECT CONNECTION SETTING]
Select a connection setting profile.
| Profile | Description |
|---|---|
| [1: UNIVERSAL SETTING] | Connect to smartphones via Bluetooth® and upload pictures or control the camera remotely while the smartphone displays the view through the lens. |
| [2: USB CARD READER] | Connect a card reader to a computer or smartphone via USB and copy pictures from memory cards. |
| [3: USB TETHER SHOOTING AUTO] |
Control the camera and take pictures remotely from a computer.
|
| [4: USB TETHER SHOOTING FIXED] | |
| [5: USB RAW CONV./BACKUP RESTORE] | Harness the power of the camera’s image processing engine when processing RAW pictures on a computer, or save or load camera settings. |
| [6: USB WEBCAM] | Connect the camera to a computer via USB for use as a webcam. |
| [7–16: User-created profiles] | Use network/USB settings saved using [CREATE/EDIT CONNECTION SETTING]. |
A firmware update resets [SELECT CONNECTION SETTING] in the network/USB setting menu to [UNIVERSAL SETTING]. Configure the settings again according to the external device to be connected.
Choosing a Connection Setting Profile
Follow the steps below to use pre-existing or user-created connection setting profiles.
-
Choose [SELECT CONNECTION SETTING] in the network/USB setting menu.
-
Choose the desired connection setting profile.
[AIRPLANE MODE]
Select [ON] to disable the camera’s wireless LAN and Bluetooth features.
| Options | |
|---|---|
| [ON] | [OFF] |
[Bluetooth/SMARTPHONE SETTING]
Adjust Bluetooth-related settings as well as a variety of smartphone-related settings.
Be sure your smartphone or tablet is running the latest version of the smartphone app.
[PAIRING REGISTRATION]
Pair the camera with a smartphone or tablet to which the smartphone app has been installed.
[SELECT PAIRING DESTINATION]
Choose a connection from a list of devices with which the camera has been paired using [PAIRING REGISTRATION]. Select [NO CONNECTION] to exit without connecting.
[DELETE PAIRING REG.]
Delete existing pairing information for a smartphone or tablet.
The selected device will be removed from the pairing list.
[Bluetooth DEVICE LIST]
List the devices with which the camera is paired (other than the smartphone) or end pairing with selected devices.
[Bluetooth ON/OFF]
If [ON] is selected, the camera will automatically connect with paired smartphones or tablets running the smartphone app.
| Options | |
|---|---|
| [ON] | [OFF] |
[AUTO IMAGE TRANSFER ORDER]
Select [ON] to upload pictures automatically as they are taken.
| Options | |
|---|---|
| [ON] | [OFF] |
[SMARTPHONE LOCATION SYNC.]
Select [ON] to enable ongoing download of location data from paired smartphones or tablets.
| Options | |
|---|---|
| [ON] | [OFF] |
Location data will only be downloaded while the smartphone app is running. Download will be interrupted if pairing is ended. The camera location data icon will be displayed in red if location data have not been updated for over 30 minutes.
[NAME]
Choose a name ([NAME]) to identify the camera on the wireless network (the camera is assigned a unique name by default).
[IMAGE TRANSFER WHILE POWER OFF]
If [ON] is selected, the camera will continue to upload pictures to paired smartphones or tablets even while off.
| Options | |
|---|---|
| [ON] | [OFF] |
[RESIZE IMAGE FOR SMARTPHONE]
Select [ON] (recommended) to enable compression, reducing file size for upload.
| Options | |
|---|---|
| [ON] | [OFF] |
The pictures on the camera memory card are not affected.
Compression is used only for pictures taken at a size of L.
[WIRELESS COM. FREQUENCY SETTING]
Choose the band for wireless LAN connections.
| Options | |
|---|---|
| [2.4GHz (IEEE802.11 b/g/n)] | [5GHz (IEEE802.11 a/n/ac)] |
Some countries and regions prohibit outdoor use of certain channels in the 5 GHz band. Check whether use of the 5.2 GHz (W52) band is permitted before selecting the 5 GHz option.
The options available vary with the country or region of sale.
[SELECT FILE TYPE]
Choose the types of files uploaded. You can select or deselect each file type individually.
| Options | ||
|---|---|---|
| [JPEG] | [RAW] | [HEIF] |
[Frame.io Camera to Cloud]
Adjust settings for use with Frame.io.
[CONNECT]
You can select the saved connection setting profiles to connect to the Frame.io project.
[DISCONNECT]
End the connection to the Frame.io project and terminate the network connection.
[GET PAIRING CODE]
A pairing code will be displayed to connect to the Frame.io project. Enter this code on the Frame.io screen accessed from your personal computer or tablet to connect Frame.io and the camera.
[SELECT FILE TYPE]
Choose the types of files uploaded to Frame.io. You can select or deselect each file type individually.
| Options | |||||
|---|---|---|---|---|---|
| [MOV - PROXY] | [MOV - ProRes] | [OTHER MOV/MP4] | [JPEG] | ||
| [RAW] | [HEIF] | [TIFF] | |||
[UPLOAD SETTING]
Adjust settings Frame.io upload settings.
[SELECT IMAGE & TRANSFER]
Mark picture for upload.
[AUTO IMAGE TRANSFER ORDER]
Select [ON] to automatically mark photos and movies for upload as they are taken.
| Options | |
|---|---|
| [ON] | [OFF] |
[TRANSFER/SUSPEND]
Pause or resume upload to Frame.io.
| Options | |
|---|---|
| [TRANSFER] | [SUSPEND] |
[IMAGE TRANSFER WHILE POWER OFF]
If [ON] is selected, upload of files to Frame.io will continue while the camera is off.
| Options | |
|---|---|
| ON | OFF |
[ROOT CERTIFICATE]
Copy a root certificate to the camera for use with Frame.io.
| Option | Description |
|---|---|
| [LOAD FROM MEMORY CARD] | Copy the root certificate from the camera memory card. |
| [DELETE] | Delete the current root certificate from the file transmitter. |
Frame.io and [FTP OPTIONAL SETTING] > [ROOT CERTIFICATE] use the same root certificate. Changing one changes the other.
[UPLOAD STATUS]
View Frame.io upload status.
[TRANSFER QUEUE]
View a list of the files awaiting upload.
[RESET TRANSFER ORDER]
Remove upload marking from all files selected for upload to Frame.io.
[FTP OPTIONAL SETTING]
Adjust settings for FTP upload.
[SELECT IMAGE & TRANSFER]
Mark picture for upload (aSelecting Pictures for Upload Using [FTP OPTIONAL SETTING]).
[AUTO IMAGE TRANSFER ORDER]
Select [ON] to automatically mark pictures for upload as they are taken.
| Options | |
|---|---|
| [ON] | [OFF] |
[SELECT FILE TYPE]
Choose the types of files uploaded to the FTP server. You can select or deselect each file type individually.
| Options | |||||
|---|---|---|---|---|---|
| [JPEG] | [RAW] | [HEIF] | [TIFF] | [MOV] | [MP4] |
[CAPTION FOR FTP TRANSFER]
Add captions to photos and movies during upload.
| Option | Description |
|---|---|
| [DEFAULT CAPTION] | Add the caption selected for D[SAVE DATA SETTING] > [DEFAULT CAPTION]. |
| [CREATED CAPTION] | Create new captions or select existing captions. |
| [NO CAPTION] | Do not add captions to pictures during upload. |
[TRANSFER/SUSPEND]
Pause or resume FTP upload.
| Options | |
|---|---|
| [TRANSFER] | [SUSPEND] |
[IMAGE TRANSFER WHILE POWER OFF]
If [ON] is selected, upload of pictures to the FTP server will continue while the camera is off.
| Options | |
|---|---|
| [ON] | [OFF] |
[FTP POWER SAVING]
If [ON] is selected, the file transmitter will turn off to save power when the upload of all pictures currently marked for transfer is complete. Marking additional pictures for upload turns the transmitter on again.
| Options | |
|---|---|
| [ON] | [OFF] |
[ROOT CERTIFICATE]
Copy a unique root certificate to the file transmitter for use when [FTPS] is selected for [FTP SERVER TYPE] (aAdjusting Settings for Connection to FTP Servers).
| Option | Description |
|---|---|
| [LOAD FROM MEMORY CARD] | Copy the root certificate from the camera memory card. |
| [DELETE] | Delete the current root certificate from the file transmitter. |
This item is for use only when a file transmitter is connected.
[RESET FTP TRANSFER ORDER]
Remove upload marking from all pictures selected for upload to the FTP server in the current connection setting profile.
[USB POWER SUPPLY/COMM SETTING]
Choose whether USB connections to computers, smartphones, or other devices are used for power delivery or data transfer.
| Option | Description |
|---|---|
| [AUTO] | The camera switches between power delivery and data transfer automatically. |
| [POWER SUPPLY ON/COMM OFF] | The camera draws power from the connected device, reducing the drain on the battery. Data transfer is disabled. |
| [POWER SUPPLY OFF/COMM ON] | The camera can exchange data with, but not draw power from, the connected device. |
The camera cannot draw power from Lightning connections or from devices that do not supply power. Select [POWER SUPPLY OFF/COMM ON] before connecting the camera to such devices. The connection may not be available for data transfer or the like when [POWER SUPPLY ON/COMM OFF] is selected.
Regardless of the option selected, the battery will charge while the camera is off.
[INFORMATION]
View network-related settings.
| Option | Description |
|---|---|
| [HARDWARE INFO] | View the camera’s MAC, Bluetooth, and wireless network IP address. If a file transmitter is currently connected, its MAC address and wireless and wired LAN IP addresses will also be displayed. |
| [TRANSFER ORDER STATUS] | View upload progress and the destination for files uploaded to Frame.io or via FTP. This item is available when the camera is connected to an optional FT-XH file transmitter. |
| [ERROR DESCRIPTION] | View the content of errors when a C or B icon is displayed or the camera is unable to connect to the file transmitter (aErrors). |
[RESET NETWORK/USB SETTING]
Reset network/USB settings to default values.


