
 .
.Remote Movie Recording Using a Web Browser
The optional FT-XH file transmitter supports remote movie recording. You can connect to up to four cameras using a web browser on a computer or tablet and record movies or adjust camera settings.
- Connecting to the Camera from a Web Browser
- Connecting to the Camera from a Computer or Tablet
- The Remote Recording Display
- Recording Movies Remotely
- Viewing Movies
- Saving and Loading Camera Settings
Connecting to the Camera from a Web Browser
Attaching an FT-XH file transmitter lets you connect to the camera from a web browser on a computer or tablet and control it remotely.
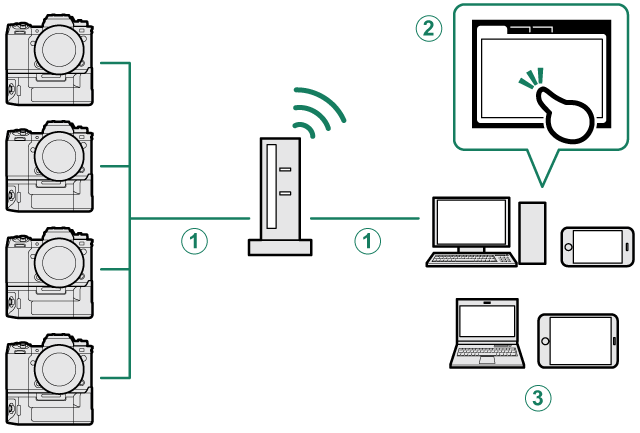
AWired LAN (Ethernet)/wireless LAN
BWeb browser
CComputer/tablet
Before recording movies remotely, you will need to create a connection setting profile for use when connecting the camera to a computer or tablet via wireless or wired LAN.
Connecting via Wireless LAN
Create a connection setting profile for use when connecting the camera to a computer or tablet via wireless LAN.
-
Select CREATE/EDIT CONNECTION SETTING > CREATE USING WIZARD in the network/USB setting menu and choose REMOTE REC FUNCTION.
-
Select CREATE NEW.
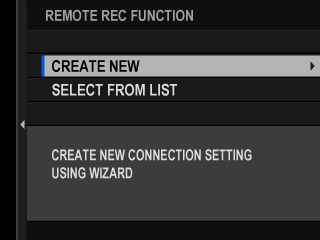
Choose SELECT FROM LIST to select from a list of existing connection setting profiles.
-
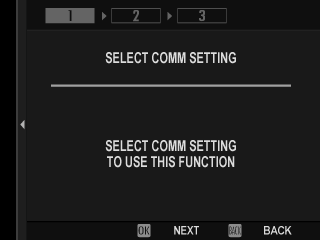
Press MENU/OK when prompted.
-
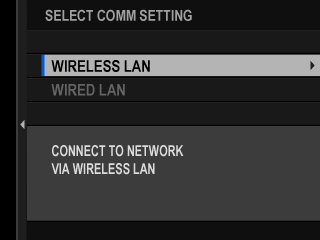
Select WIRELESS LAN.
-
Select CREATE NEW to create a new connection setting profile.
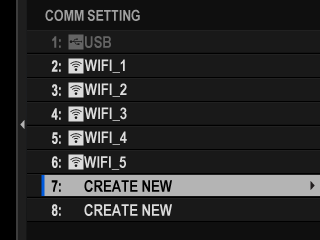
You can also select or edit existing profiles.
-
Adjust wireless LAN settings.
- ACCESS POINT SETTING: See “aSimple Access Point Connections”.
- IP ADDRESS SETTING: See “aConnecting Using an IP Address”.
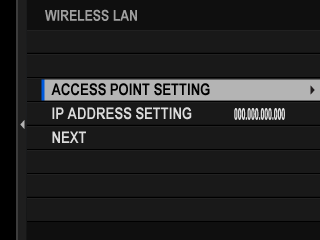
We recommend using (connecting via) a high-speed access point (for example, one that operates in the 5 GHz band).
-
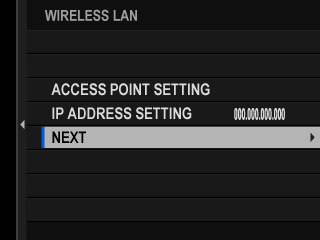
After adjusting wireless LAN settings, select NEXT.
-
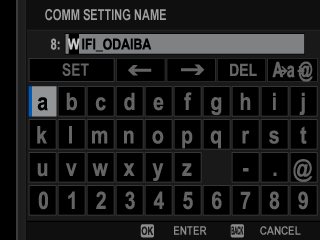
Name the communication setting profile.
-
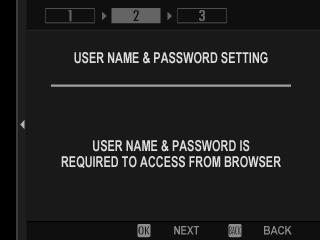
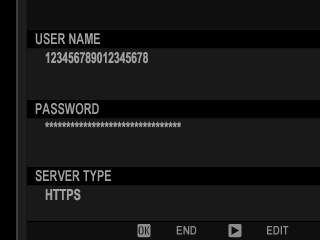
Create a user name and password for use when connecting to the camera from a computer or tablet.
Press MENU/OK.
-
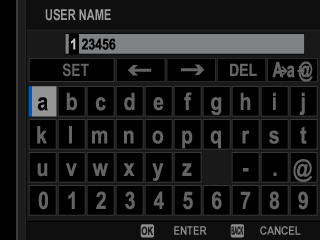
Enter a user name.
-
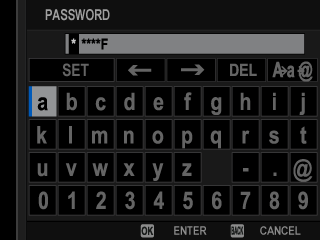
Enter a password.
-
Choose a server type.
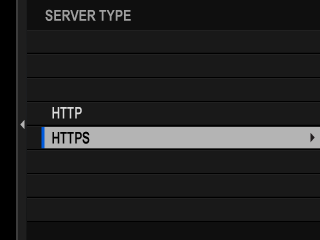
If you choose HTTPS, you will need to import a root certificate into the browser on your computer or tablet (aConnecting via HTTPS).
-
The camera will display the settings you selected.
Press MENU/OK.
You will need this information when connecting to the camera from a computer or tablet.
-
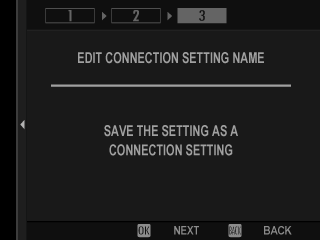
Save the connection setting profile.
Press MENU/OK.
-
Select CREATE NEW.

-
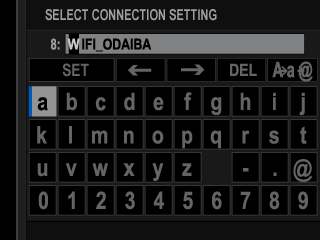
Name the connection setting profile.
-
Choose SELECT.
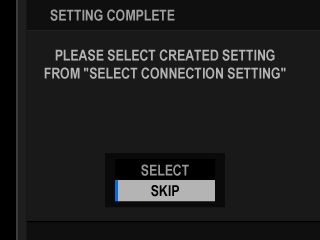
The connection setting profile can also be selected later using SELECT CONNECTION SETTING.
-
Connect to the camera from a computer or tablet (aConnecting to the Camera from a Computer or Tablet).
Connecting via HTTPS
If you selected HTTPS for SERVER TYPE, you will need to import a root certificate into the browser on your computer or tablet. Instructions on downloading and installing a root certificate are available from the following website:
Connecting via Wired LAN (Ethernet)
Create a connection setting profile for use when connecting the camera to a computer or tablet via wired LAN (Ethernet).
-
Select CREATE/EDIT CONNECTION SETTING > CREATE USING WIZARD in the network/USB setting menu and choose REMOTE REC FUNCTION.
-
Select CREATE NEW.
Choose SELECT FROM LIST to select from a list of existing connection setting profiles.
-
Press MENU/OK when prompted.
-
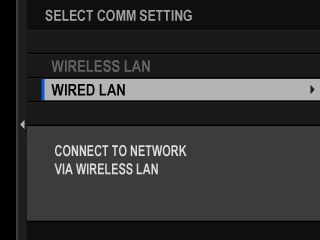
Select WIRED LAN.
-
Select CREATE NEW to create a new communication setting profile.
You can also select or edit existing profiles.
-
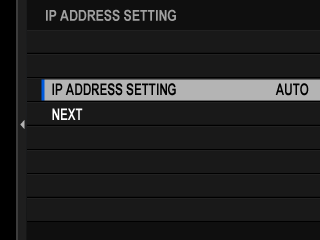
Adjust IP ADDRESS SETTING.
- Select AUTO to use an IP address assigned by the network.
- Select MANUAL to choose the IP address manually as described in “aConnecting Using an IP Address”.
-
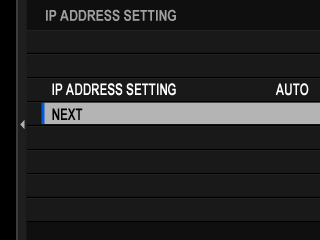
Select NEXT to proceed after adjusting IP address settings.
-
Name the communication setting profile.
-
Create a user name and password for use when connecting to the camera from a computer or tablet.
Press MENU/OK.
-
Enter a user name.
-
Enter a password.
-
Choose a server type.
If you choose HTTPS, you will need to import a root certificate into the browser on your computer or tablet (aConnecting via HTTPS).
-
The camera will display the settings you selected.
Press MENU/OK.
You will need this information when connecting to the camera from a computer or tablet.
-
Save the connection setting profile.
Press MENU/OK.
-
Select CREATE NEW.
-
Name the connection setting profile.
-
Choose SELECT.
The connection setting profile can also be selected later using SELECT CONNECTION SETTING.
-
Connect to the camera from a computer or tablet (aConnecting to the Camera from a Computer or Tablet).
Connecting to the Camera from a Computer or Tablet
Connect to the camera from a web browser on a computer or tablet.
We recommend using (connecting via) a high-speed access point (for example, one that operates in the 5 GHz band).
Connecting the first camera
Connect by using a web browser to enter the IP address or using a camera app to scan the QR code displayed by the camera.
Connecting using an IP address
-
Select INFORMATION > HARDWARE INFO in the network/USB setting menu.
The IP address of the camera is displayed.
-
Launch a web browser on your computer or tablet and enter the camera’s IP address in the address bar.
To connect to a camera with an IP address of 192.168.0.11, for example, enter “http://192.168.0.11”.
-
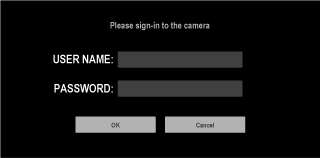
An entry screen appears. Enter the user name and password.
The remote recording display will appear in the browser.
Connecting by scanning a QR code
-
Select INFORMATION > HARDWARE INFO in the network/USB setting menu.
A QR code is displayed.
-
Launch the camera application on the tablet and scan the QR code.
The web browser launches, and the remote recording display appears.
Connecting a second or subsequent camera
Either enter the IP address in the remote recording display in the web browser or scan the QR code to connect.
When you connect a second or subsequent camera, set the same SERVER TYPE as the first camera beforehand (aConnecting via HTTPS).
Connecting using an IP address
-
Select INFORMATION > HARDWARE INFO in the network/USB setting menu.
The IP address of the camera is displayed.
-
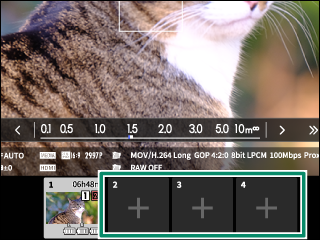
Click or tap the thumbnail of the + mark in the “Choose camera” area of the remote recording display.
-
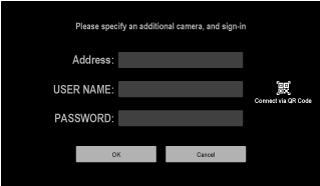
An entry screen appears. Enter the camera’s IP address and an account name and password.
The remote recording display will appear in the browser.
Connecting by scanning a QR code
To connect a second or subsequent camera by scanning a QR code, set SERVER TYPE of the first camera and second and subsequent cameras to HTTPS in advance.
-
Select INFORMATION > HARDWARE INFO in the network/USB setting menu.
A QR code is displayed.
-
Tap the thumbnail of the + mark in the “Choose camera” area.
-
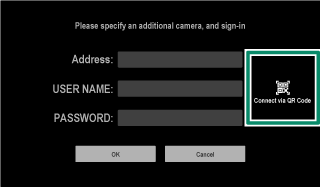
Tap “Connect via QR Code” to scan the QR code displayed by the camera.
The remote recording display will appear in the browser.
Disconnecting a second or subsequent camera
To end a connection after adding a camera, select the “remove connected device” option in the “Remote recording” menu and click or tap the thumbnail for the camera you want to remove.
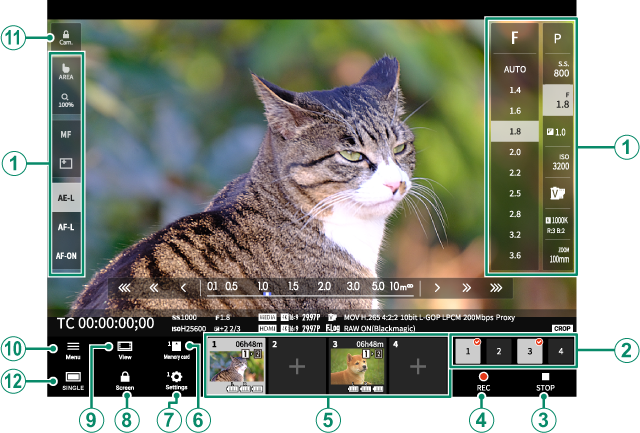
The Remote Recording Display
The controls available in the remote recording display are detailed below.
The display layout varies with the size of the computer or tablet screen, among other factors.
Overview
| Item | Description |
|---|---|
ACamera settings |
Adjust settings for the current camera. |
BChoose for REC/STOP |
Choose the camera or cameras to which the selected action (starting or stopping recording) will apply. |
CSTOP button |
Stop movie recording. |
DREC button |
Start movie recording. |
EChoose camera |
A list of thumbnails showing the views through the lenses of the connected cameras. Click or tap a thumbnail to select a camera to control. |
FCheck button for movies in memory card |
View the movies on the memory card in the current camera. |
GCamera settings (advanced) |
Adjust (advanced) settings for the current camera. |
HScreen lock button |
Enable or disable the controls in the remote recording display. |
IDisplay mode button |
Switch displays. |
JRemote recording menu |
Adjust remote recording settings (aRemote Recording Menu). |
KCamera lock button |
Lock or unlock the current camera, enabling or disabling its controls. |
L4-screen display button |
If this button is pressed, the screen display is divided into four parts to check the live views of multiple cameras at the same time. |
If you end the connection to a camera while it is locked, its controls will remain disabled, in which case you will need to turn the camera off.
Choose Camera
The views through the lenses of the connected cameras are shown in a thumbnail list. Click or tap a thumbnail to select a camera to control.
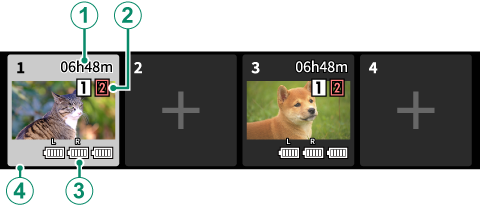
| Setting | Description |
|---|---|
ARecording time available |
The remaining recording time. When the time remaining grows short, the thumbnail will flash and the recording time will be displayed in red. |
BCard slot options |
Camera storage settings. The icon for the current slot is shown in orange. The display turns red if the camera is unable to record to the current card. |
CBattery level |
The battery level. The thumbnail will flash when the battery runs low. |
DThumbnail frame |
A frame appears around the thumbnail for the current camera. Regardless of whether they are currently selected, cameras that are currently recording are highlighted in red or, during high-speed recording, in green. |
Remote Recording Menu
Adjust remote recording settings.
Show histogram
Hide or view the histogram.
Show microphone level
Hide or view the microphone recording level.
Show tool bar
Hide or view the browser toolbar.
Clean display mode
Switch to Clean display mode to show the live view only.
Display with Image quality priority/Real-time performance priority
Choose how you prefer the view through the lens to be displayed, giving priority either to image quality or to ensuring that the picture updates in real time.
Prioritizing image quality maximizes image quality but may result in display lag.
Prioritizing real-time display keeps display lag to a minimum regardless of such factors as connection speed.
Light mode/Dark mode
Switch between the light- and dark-mode remote recording displays.
Stop the camera connection
Click or tap a thumbnail in the “Choose camera” area to end the connection to the selected camera.
Recording Movies Remotely
Start recording on one or more remote cameras or end recording on selected cameras without ending recording on others.
-
The cameras to which the chosen action (starting or stopping recording) will apply can be selected in the “Choose for REC/STOP” area.
Select cameras by clicking or tapping the numbers in the “Choose for REC/STOP” area. The numbers for the selected cameras will be highlighted.
-
Click or tap the “REC button”.
The selected cameras will start recording and their thumbnails will be highlighted in color.
-
To end recording, select the desired cameras in the “Choose for REC/STOP” area.
Select cameras by clicking or tapping the numbers in the “Choose for REC/STOP” area. The numbers for the selected cameras will be highlighted.
-
Click or tap the “STOP button”.
The selected cameras will stop recording.
Viewing Movies
View movies recorded to the camera memory card.
-
Select a camera in the “Choose camera” area.
-
Click or tap the “Check button for movies in memory card”.
The files on the camera memory card will be displayed.
Saving and Loading Camera Settings
Save settings for connected cameras to the computer or tablet or load previously-saved settings.
Saving Camera Settings
Save camera settings to a settings file on the computer or tablet.
-
Select a camera in the “Choose camera” area.
-
Select “Backup” in the “Camera settings (advanced)” menu.

-
Click or tap “Save settings”.
Settings for the selected camera will be saved to a settings file on the computer or tablet.
Loading Saved Settings
Load saved settings onto a selected camera.
-
Select a camera in the “Choose camera” area.
-
Select “Restore” in the “Camera settings (advanced)” menu.
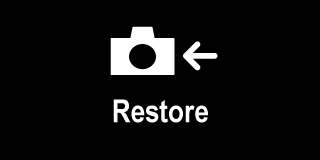
-
Select the desired settings file and click or tap “Load settings”.
The settings will be copied to the selected camera.
The location and procedure for loading files varies with the computer or tablet.
Only files created with cameras of the same type can be used.
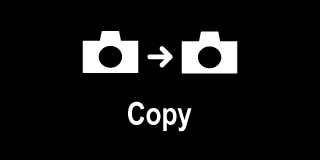
Copying Settings to Other Cameras
Settings can be copied to multiple cameras simultaneously.
-
Select the source camera in the “Choose camera” area.
-
Select “Copy” in the “Camera settings (advanced)” menu.
-
Select the destination cameras and click or tap “Copy”.
The settings currently in effect on the source camera will be copied to the destination cameras.

Only files created with cameras of the same type can be used.


