
 .
.[MOVIE SETTING] (Movie Recording)
Adjust options for movies shot with the mode dial rotated to F (movie).
To display options for movie recording, press [MENU/OK] in the movie shooting display and select the B ([MOVIE SETTING]) tab.
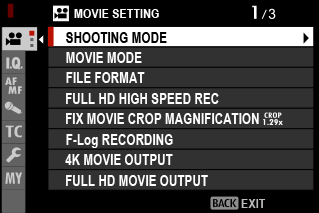
The options available vary with the shooting mode selected.
SHOOTING MODE
Choose a shooting mode for movies.
| Options | |||
|---|---|---|---|
| [PROGRAM AE] | [SHUTTER PRIORITY AE] | [APERTURE PRIORITY AE] | [MANUAL] |
[MOVIE MODE]
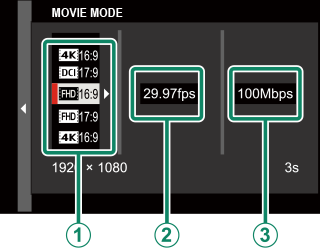
Before shooting movies, choose the frame rate, bit rate, and frame size and aspect ratio.
-
In the shooting menu, select B[MOVIE SETTING], then highlight [MOVIE MODE] and press [MENU/OK].
-
Press the focus stick (focus lever) up or down to highlight the desired frame size and aspect ratio (A) and press the stick right.
- Choose V[16:9] or d[17:9] for 4K movies with aspect ratios of 16 or 17 to 9.
- Choose W[16:9] or W[17:9] for Full HD movies with aspect ratios of 16 or 17 to 9.
-
Press the focus stick (focus lever) up or down to highlight a frame rate (B) and press the stick right.
Options [23.98P] [24P] [25P] [29.97P] [50P] [59.94P] -
Press the focus stick up or down to highlight a bit rate (C) and press [MENU/OK].
Options [50Mbps] [100Mbps] [200Mbps]
The choice of frame and bit rates varies with the movie mode.
[FILE FORMAT]
Choose a movie format.
| Option | Description |
|---|---|
| [MOV/H.264 LPCM] | High picture and sound quality. |
| [MP4/H.264 AAC] | A format suitable for movies that will be uploaded to the web. |
Movies are recorded to the memory card in 8-bit 4∶2∶0 and output to HDMI in 10-bit 4∶2∶2.
[FULL HD HIGH SPEED REC]
Record high-frame-rate Full HD movies. High-frame-rate movies can be played back in slow motion, giving you time to view fast-moving subjects or details too fleeting for the naked eye. Select [ON] to choose the recording and playback rates separately.
Playback
| Options | |||||
|---|---|---|---|---|---|
| [23.98P] | [24P] | [25P] | [29.97P] | [50P] | [59.94P] |
Recording
| Options | |||
|---|---|---|---|
| [100P] | [120P] | [200P] | [240P] |
High-speed movies are recorded with no sound.
Maximum recording length is 6 minutes, but varies with camera settings.
The footage recorded to the memory card is compressed with the goal of keeping the amount of data recorded to 200 Mbps per second.
The options available for playback rate vary with the option selected for rate of recording.
[FIX MOVIE CROP MAGNIFICATION]C
Fix the movie crop ratio at 1.29∶1. This makes it easier to match crops when filming in different formats.
| Options | |
|---|---|
| [ON] | [OFF] |
[F-Log RECORDING]
Select [ON] to record movies using a soft gamma curve with a wide gamut suitable for further processing post-production. Sensitivity is restricted to values between ISO 640 and 12800.
| Options | |
|---|---|
| [ON] | [OFF] |
[4K MOVIE OUTPUT]
Choose the destination for 4K movies shot while the camera is connected to an HDMI recorder or other device that supports 4K.
| Option | Description |
|---|---|
| b[4K] Y[4K] | 4K movies are recorded to the camera memory card and output to the HDMI device in 4K. |
| b[4K] Y[FHD] | 4K movies are recorded to a camera memory card in 4K and output to the HDMI device in Full HD. |
| b[FHD] Y[4K] | 4K movies are output to the HDMI device in 4K and recorded to the camera memory card in Full HD. |
| b— Y[4K] | 4K movies are output to the HDMI device in 4K. The camera does not record 4K movies to a memory card. |
This option is only available when V[16 : 9] or d[17 : 9] is selected for B[MOVIE SETTING] > [MOVIE MODE] in the shooting menu.
[FULL HD MOVIE OUTPUT]
Choose the destination for Full HD movies shot while the camera is connected to an HDMI device.
| Option | Description |
|---|---|
| b[FHD] Y[FHD] | Full HD movies are output to the HDMI device and recorded to the camera memory card. |
| b— Y[FHD] | Full HD movies are not recorded to the camera memory card but are output to the HDMI device. |
This option is only available when W[16 : 9] or W[17 : 9] is selected for B[MOVIE SETTING] > [MOVIE MODE] in the shooting menu.
When [OFF] is selected for [HDMI OUTPUT INFO DISPLAY], movies will be output to the HDMI device in 4:2:2 10-bit format.
[HDMI OUTPUT INFO DISPLAY]
If [ON] is selected, HDMI devices to which the camera is connected will mirror the information in the camera display.
| Options | |
|---|---|
| [ON] | [OFF] |
[4K HDMI STANDBY QUALITY]
Choose whether output to connected HDMI devices switches from 4K to Full HD during standby.
| Option | Description |
|---|---|
| V | Output to HDMI devices continues at 4K during standby. |
| W | Output to HDMI devices switches to Full HD during standby, reducing the drain on the battery. |
[HDMI REC CONTROL]
Choose whether the camera sends movie start and stop signals to the HDMI device when the shutter button is pressed to start and stop movie recording.
| Options | |
|---|---|
| [ON] | [OFF] |
F [PHOTOMETRY]
Options are the same as those for still photography, but settings must be adjusted separately (a[PHOTOMETRY]).
The photometry option selected in the photo menus applies to movies recorded using the t (movie recording) button.
F[IS MODE]
Reduce blur.
| Option | Description |
|---|---|
| [IBIS/OIS] | Enable in-body (IBIS) and optical (OIS) image stabilization. IBIS is used with lenses that do not support OIS. |
| [IBIS/OIS + DIS] | Enable in-body (IBIS), optical (OIS), and digital (DIS) image stabilization. The crop is adjusted according to the option selected for [MOVIE MODE]. |
| [OFF] | Image stabilization off; x appears in the display. Choose when the camera is mounted on a tripod or otherwise fixed in place. |
The setting selected with the lens image stabilization switch, if any, takes priority over the setting chosen with the IS mode.
Note that vibration or camera sounds may be noticeable as image stabilization takes effect.
[IBIS/OIS + DIS] is not available when high-speed Full HD recording is enabled.
F[IS MODE BOOST]
Choose the image stabilization level.
| Option | Description |
|---|---|
| [ON] | Suitable for hand-held shooting with no panning. |
| [OFF] | Suitable for hand-held shooting with panning. |
Assigning [IS MODE BOOST] to a function button allows the image stabilization level to be changed while recording is in progress (aFunction Controls).
F[ISO]
Adjust the camera’s sensitivity to light.
| Option | Description |
|---|---|
| [H (25600)] | Choose for special situations. Note that dynamic range may be reduced and that pictures may be mottled. |
| [160]–[12800] | Adjust sensitivity manually. Selected value is shown in display. |
| [AUTO] | Sensitivity is automatically adjusted in response to shooting conditions. |
[ZEBRA SETTING]
Highlights that may be overexposed are shown by zebra stripes in the movie mode display.
| Option | Description |
|---|---|
| [ZEBRA RIGHT] |  Right-slanting stripes. Right-slanting stripes. |
| [ZEBRA LEFT] |  Left-slanting stripes. Left-slanting stripes. |
| [OFF] | Stripes off. |
[ZEBRA LEVEL]
Choose the brightness threshold for the zebra stripe display.
| Options | ||||||||||
|---|---|---|---|---|---|---|---|---|---|---|
| [50] | [55] | [60] | [65] | [70] | [75] | [80] | [85] | [90] | [95] | [100] |
[MOVIE OPTIMIZED CONTROL]oL
Select [ON] to allow movie settings to be adjusted using only the command dials and touch-screen controls. You may find this helpful in preventing the sounds of camera controls being recorded with movies (a[MOVIE OPTIMIZED CONTROL]oL).
| Options | |
|---|---|
| [ON] | [OFF] |
[TALLY LIGHT]
Choose the lamp (indicator or AF-assist) that lights during movie recording and whether the lamp blinks or remains steady.
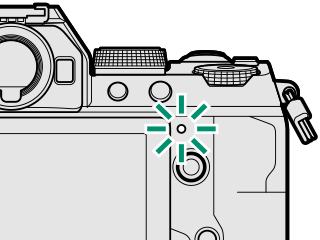
Indicator lamp
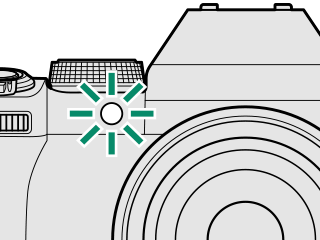
AF-assist illuminator
| Option | Description |
|---|---|
| [FRONT OFF] [REAR]z |
The indicator lamp lights during movie recording. |
| [FRONT OFF] [REAR]y |
The indicator lamp blinks during movie recording. |
| [FRONT]z [REAR]z |
The indicator and AF-assist lamps light during movie recording. |
| [FRONT]z [REAR OFF] |
The AF-assist lamp lights during movie recording. |
| [FRONT]y [REAR]y |
The indicator and AF-assist lamps blink during movie recording. |
| [FRONT]y [REAR OFF] |
The AF-assist lamp blinks during movie recording. |
| [FRONT OFF] [REAR OFF] |
The indicator and AF-assist lamps remain off during movie recording. |
xF[WIRELESS COMMUNICATION]
This item is also found in the photo menus (axF[WIRELESS COMMUNICATION] (Still Photography)).


