
 .
. The Shooting Menus ([MOVIE SETTING])
Adjust movie-recording options.
To display options for movie recording, press [MENU]/[OK] in the shooting display and select the ([MOVIE SETTING]) tab.
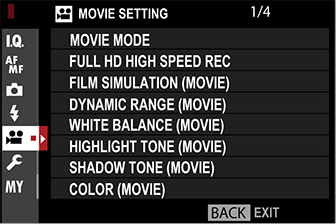
The options available vary with the shooting mode selected.
- [MOVIE MODE]
- [FULL HD HIGH SPEED REC]
- [FILM SIMULATION (MOVIE)]
- [DYNAMIC RANGE (MOVIE)]
- [WHITE BALANCE (MOVIE)]
- [HIGHLIGHT TONE (MOVIE)]
- [SHADOW TONE (MOVIE)]
- [COLOR (MOVIE)]
- [SHARPNESS (MOVIE)]
- [NOISE REDUCTION (MOVIE)]
- [F-Log RECORDING]
- [PERIPHERAL LIGHT CORRECTION (MOVIE)]
- [FOCUS AREA (MOVIE)]
- [MOVIE AF MODE]
- [AF-C CUSTOM SETTING (MOVIE)]
- [PRE-AF (MOVIE)]
- [FACE/EYE DETECTION SETTING (MOVIE)]
- [MF ASSIST (MOVIE)]
- [FOCUS CHECK (MOVIE)]
- [HDMI OUTPUT INFO DISPLAY]
- [4K MOVIE OUTPUT]
- [FULL HD MOVIE OUTPUT]
- [4K HDMI STANDBY QUALITY]
- [HDMI REC CONTROL]
- [AUDIO SETTING]
- [TIME CODE SETTING]
- [TALLY LIGHT]
- [MOVIE SILENT CONTROL]
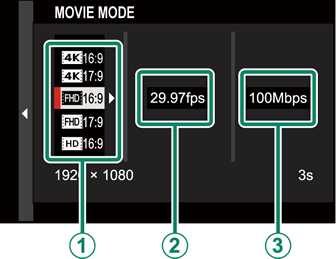
[MOVIE MODE]
Before shooting movies, choose the frame rate, bit rate, and frame size and aspect ratio.
-
In the shooting menu, select
[MOVIE SETTING], then highlight [MOVIE MODE] and press [MENU]/[OK]. -
Press the selector up or down to highlight the desired frame size and aspect ratio (
 ) and press the selector right. Choose from
  [16:9] (4K, aspect ratio 16:9), [17:9] (4K, aspect ratio 17:9),
  [16:9] (Full HD, aspect ratio 16:9), [17:9] (Full HD, aspect ratio 17:9), and
  [16:9] (HD, aspect ratio 16:9).
 -
Press the selector up or down to highlight a frame rate (
 ) and press the selector right.
Options [59.94P] [50P] [29.97P] [25P] [24P] [23.98P] -
Press the selector up or down to highlight a bit rate (
 ) and press [MENU]/[OK].
Options [200Mbps] [100Mbps] [50Mbps]
[FULL HD HIGH SPEED REC]
Record high-frame-rate Full HD movies that play back in slow motion, giving you time to view fast-moving subjects or details too fleeting for the naked eye: a batter’s swing, darting insects, or swiftly-flowing waters.
| Option | Description |
|---|---|
[2x 59.94P] 59.94P] [120P] [120P] |
Record Full HD footage at 2×, 4×, or 5× speed and frame rates of 120 or 100 fps. The movies play back at 1/2, 1/4, or 1/5 speed. Maximum recording length is 6 minutes. |
| [2x50P][100P] |
|
| [4x29.97P][120P] |
|
| [4x25P][100P] |
|
| [5x24P][120P] |
|
| [5x23.98P][120P] |
|
| [OFF] | High-speed recording off. |
High-speed movies are recorded with no sound.
[FILM SIMULATION (MOVIE)]
Choose a film simulation effect for movie recording.
| Option | Description |
|---|---|
 [PROVIA/ STANDARD] |
See “[FILM SIMULATION]”. |
 [Velvia/VIVID] |
|
 [ASTIA/ SOFT] |
|
 [CLASSIC CHROME] |
|
 [PRO Neg. Hi] |
|
 [PRO Neg. Std] |
|
 [ETERNA/CINEMA] |
|
 [ACROS] |
|
 [MONOCHROME] |
|
 [SEPIA] |
[DYNAMIC RANGE (MOVIE)]
Choose a dynamic range for movie recording.
| Option | Description |
|---|---|
 [100%] [100%] |
See “[DYNAMIC RANGE]”. |
 [200%] [200%] |
|
 [400%] [400%] |
The [MOVIE SETTING] > [DYNAMIC RANGE (MOVIE)] option is available when [OFF] is selected for [MOVIE SETTING] > [F-Log RECORDING]. [200%] is available at sensitivities of from ISO 400 to ISO 12800, [400%] at sensitivities of from ISO 800 to 12800. Auto dynamic range adjustment ([AUTO]) is not supported.
[WHITE BALANCE (MOVIE)]
Adjust white balance for movie recording.
| Option | Description |
|---|---|
| [AUTO] | See “[WHITE BALANCE]”. |
 / / / / |
|
 |
|
 |
|
 |
|
 |
|
 |
|
 |
|
 |
|
 |
[HIGHLIGHT TONE (MOVIE)]
Choose how the camera records highlights when shooting movies.
| Options | ||||||
|---|---|---|---|---|---|---|
| [+4] | [+3] | [+2] | [+1] | [0] | [-1] | [-2] |
[SHADOW TONE (MOVIE)]
Choose how the camera records shadows when shooting movies.
| Options | ||||||
|---|---|---|---|---|---|---|
| [+4] | [+3] | [+2] | [+1] | [0] | [-1] | [-2] |
[COLOR (MOVIE)]
Adjust color density for movie recording.
| Options | ||||||||
|---|---|---|---|---|---|---|---|---|
| [+4] | [+3] | [+2] | [+1] | [0] | [-1] | [-2] | [-3] | [-4] |
[SHARPNESS (MOVIE)]
Sharpen or soften outlines in movies.
| Options | ||||||||
|---|---|---|---|---|---|---|---|---|
| [+4] | [+3] | [+2] | [+1] | [0] | [-1] | [-2] | [-3] | [-4] |
[NOISE REDUCTION (MOVIE)]
Reduce noise in movies shot at high sensitivities.
| Options | ||||||||
|---|---|---|---|---|---|---|---|---|
| [+4] | [+3] | [+2] | [+1] | [0] | [-1] | [-2] | [-3] | [-4] |
[F-Log RECORDING]
Select [ON] to record movies using a soft gamma curve with a wide gamut suitable for further processing post-production. The minimum value for sensitivity is set to ISO 800.
[PERIPHERAL LIGHT CORRECTION (MOVIE)]
Select [ON] to enable peripheral illumination correction during movie recording.
Select [OFF] if you notice banding in movies recorded using this option. If [ON] is selected when a lens that does not transmit data to the camera is attached using a [FUJIFILM M MOUNT ADAPTER] (available separately), peripheral illumination will be adjusted according to the option selected for  [SHOOTING SETTING] > [MOUNT ADAPTER SETTING] > [PERIPHERAL ILLUMINATION CORRECTION] in the shooting menu (
 Peripheral Illumination Correction).
[FOCUS AREA (MOVIE)]
Choose the focus area for movies shot using autofocus or manual focus.
[MOVIE AF MODE]
Choose how the camera selects the focus point for movie recording.
| Option | Description |
|---|---|
| [MULTI] | Automatic focus-point selection. |
| [AREA] | The camera focuses on the subject in the selected focus area. |
[AF-C CUSTOM SETTING (MOVIE)]
Select focus-tracking options when recording movies in focus mode [C].
[TRACKING SENSITIVITY]
Choose how long the camera waits to switch focus when an object enters the focus area behind or in front of the current subject. See “[TRACKING SENSITIVITY]”.
| Options | ||||
|---|---|---|---|---|
| [0] | [1] | [2] | [3] | [4] |
[AF SPEED]
Adjust the autofocus response speed.
| Options | ||||||||||
|---|---|---|---|---|---|---|---|---|---|---|
| [-5] | [-4] | [-3] | [-2] | [-1] | [0] | [+1] | [+2] | [+3] | [+4] | [+5] |
[PRE-AF (MOVIE)]
This setting turns [ON] or [OFF] automatically depending on the options selected for focus mode and [FACE/EYE DETECTION SETTING (MOVIE)]. When this setting is [ON], the camera will continue to adjust focus even when the shutter button is not pressed halfway. Focus is adjusted continuously, ensuring that the camera focuses faster after the shutter button is pressed halfway.
The drain on the battery increases when [PRE-AF (MOVIE)] is [ON].
[FACE/EYE DETECTION SETTING (MOVIE)]
Enable or disable Intelligent Face Detection when recording movies. See “[FACE/EYE DETECTION SETTING]”.
| Option | Description |
|---|---|
| [FACE ON/EYE OFF] | Intelligent Face Detection only. |
| [FACE ON/EYE AUTO] | Not available. |
| [FACE ON/RIGHT EYE PRIORITY] | |
| [FACE ON/LEFT EYE PRIORITY] | |
| [FACE OFF/EYE OFF] | Intelligent Face Detection and eye priority off. |
When Intelligent Face Detection is enabled, the camera will focus using continuous AF even when single AF ([S]) is chosen with the focus selector. Intelligent Face Detection is not available in manual focus mode.
[MF ASSIST (MOVIE)]
Choose how focus is displayed in manual focus mode. DIGITAL SPLIT IMAGE is not available.
| Option | Description |
|---|---|
| [STANDARD] | See “[MF ASSIST]”. |
| [DIGITAL SPLIT IMAGE] | |
| [FOCUS PEAK HIGHLIGHT] |
[FOCUS CHECK (MOVIE)]
If [ON] is selected, the display will automatically zoom in on the selected focus area when the focus ring is rotated in manual focus mode.
| Options | |
|---|---|
| [ON] | [OFF] |
[HDMI OUTPUT INFO DISPLAY]
If [ON] is selected, HDMI devices to which the camera is connected will mirror the information in the camera display.
| Options | |
|---|---|
| [ON] | [OFF] |
[4K MOVIE OUTPUT]
Choose the destination for 4K movies shot while the camera is connected to an HDMI recorder or other device that supports 4K.
| Option | Description |
|---|---|
 [4K] [4K]  [FHD] [FHD] |
4K movies are recorded to a camera memory card in 4K and output to the HDMI device in Full HD. |
| [FHD] [4K] |
4K movies are output to the HDMI device in 4K and recorded to the camera memory card in Full HD. |
| ― [4K] |
4K movies are output to the HDMI device in 4K. The camera does not record 4K movies to a memory card. |
This option is only available when [16:9] or [17:9] is selected for [MOVIE SETTING] > [MOVIE MODE] in the shooting menu.
[FULL HD MOVIE OUTPUT]
Choose the destination for Full HD movies shot while the camera is connected to an HDMI device.
| Option | Description |
|---|---|
| [FHD] [FHD] |
Full HD movies are output to the HDMI device and recorded to the camera memory card. |
| ― [FHD] |
Full HD movies are not recorded to the camera memory card but are output to the HDMI device. |
This option is only available when [16:9] or [17:9] is selected for [MOVIE SETTING] > [MOVIE MODE] in the shooting menu.
[4K HDMI STANDBY QUALITY]
Choose whether output to connected HDMI devices switches from 4K to Full HD during standby.
| Option | Description |
|---|---|
|
Output to HDMI devices continues at 4K during standby. |
|
Output to HDMI devices switches to Full HD during standby, reducing the drain on the battery. |
[HDMI REC CONTROL]
Choose whether the camera sends movie start and stop signals to the HDMI device when the shutter button is pressed to start and stop movie recording.
| Options | |
|---|---|
| [ON] | [OFF] |
[AUDIO SETTING]
Adjust audio-related settings for movie recording.
[INTERNAL MIC LEVEL ADJUSTMENT]
Adjust the recording level for the built-in microphone.
| Option | Description |
|---|---|
| [AUTO] | The camera adjusts the recording level automatically. |
| [MANUAL] | Adjust the recording level manually. Press the selector right to choose from 25 recording levels. |
| [OFF] | Turn the built-in microphone off. |
[EXTERNAL MIC LEVEL ADJUSTMENT]
Adjust the recording level for external microphones.
| Option | Description |
|---|---|
| [AUTO] | The camera adjusts the recording level automatically. |
| [MANUAL] | Adjust the recording level manually. Press the selector right to choose from 25 recording levels. |
| [OFF] | Disable recording using external microphones. |
[MIC LEVEL LIMITER]
Reduces distortion caused by input that exceeds the limits of the microphone’s audio circuits.
| Options | |
|---|---|
| [ON] | [OFF] |
[WIND FILTER]
Choose whether to enable wind noise reduction during movie recording.
| Options | |
|---|---|
| [ON] | [OFF] |
[LOW CUT FILTER]
Choose whether to enable the low-cut filter, reducing low-frequency noise during movie recording.
| Options | |
|---|---|
| [ON] | [OFF] |
[HEADPHONES VOLUME]
Adjust the volume of audio output to headphones connected to the VPB-XH1 vertical power-booster grip.
| Option | Description |
|---|---|
| [10]—[1] | Choose a volume of from 1 to 10. |
| [0] | Mute output to the headphones. |
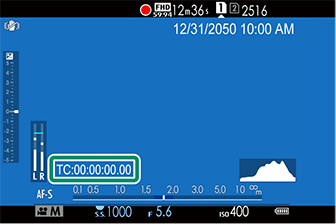
[TIME CODE SETTING]
Adjust time code (hour, minute, second, and frame number) display settings for movie recording.
[TIME CODE DISPLAY]
Select [ON] to display time codes during movie recording and playback.
| Options | |
|---|---|
| [ON] | [OFF] |
[START TIME SETTING]
Choose the time code starting time.
| Option | Description |
|---|---|
| [MANUAL INPUT] | Highlight this option and press the selector right to choose a start time manually. |
| [CURRENT TIME] | Set the start time to the current time. |
| [RESET] | Set the start time to 00:00:00. |
[COUNT UP SETTING]
Choose whether time is clocked continuously or only during movie recording.
| Option | Description |
|---|---|
| [REC RUN] | Time is clocked only during movie recording. |
| [FREE RUN] | Time is clocked continuously. |
[DROP FRAME]
At frame rates of [59.94P], and [29.97P], a discrepancy will gradually develop between the time code (measured in seconds) and the actual recording time (measured in fractions of a second). Choose whether the camera drops frames as necessary to match the recording time to the time code. Selecting a frame rate of [23.98P] disables frame drop.
| Option | Description |
|---|---|
| [ON] | The camera drops frames as necessary to maintain a strict match between the time code and the actual recording time. |
| [OFF] | Frames are not dropped. |
The time code display varies with the option selected.

[ON]

[OFF]
[HDMI TIME CODE OUTPUT]
Choose whether time codes are output to HDMI devices.
| Options | |
|---|---|
| [ON] | [OFF] |
[TALLY LIGHT]
Choose the lamp (indicator or AF-assist) that lights during movie recording and whether the lamp blinks or remains steady.
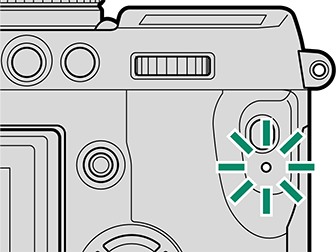
Indicator lamp
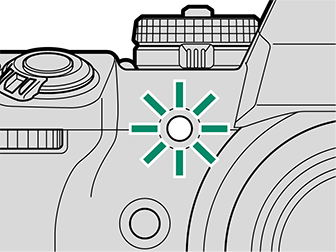
AF-assist illuminator
| Option | Description |
|---|---|
| [FRONT OFF] [REAR]  |
The indicator lamp lights during movie recording. |
| [FRONT OFF] [REAR]  |
The indicator lamp blinks during movie recording. |
| [FRONT] [REAR] |
The indicator and AF-assist lamps light during movie recording. |
| [FRONT] [REAR OFF] |
The AF-assist lamp lights during movie recording. |
| [FRONT] [REAR] |
The indicator and AF-assist lamps blink during movie recording. |
| [FRONT] [REAR OFF] |
The AF-assist lamp blinks during movie recording. |
| [FRONT OFF] [REAR OFF] |
The indicator and AF-assist lamps remain off during movie recording. |
[MOVIE SILENT CONTROL]
Select [ON] to disable camera dials and adjust movie settings using touch-screen controls, preventing the sounds made by camera controls being recorded with the movie (Muting Movie Controls).
| Options | |
|---|---|
| [ON] | [OFF] |


