
Adjust image quality settings.
The shooting menu is displayed when you press [MENU/OK] in shooting mode. Choose from tabs A, B, C, D, or E.
The options available vary with the shooting mode selected.
Simulate the effects of different kinds of film, including black-and-white (with or without color filters). Choose a palette according to your subject and creative intent.
| Option | Description |
|---|---|
| c[PROVIA/STANDARD] | Standard color reproduction. Suited to a wide range of subjects, from portraits to landscapes. |
| d[Velvia/VIVID] | A high-contrast palette of saturated colors, suited to nature photos. |
| e[ASTIA/SOFT] | Enhances the range of hues available for skin tones in portraits while preserving the bright blues of daylight skies. Recommended for outdoor portrait photography. |
| i[CLASSIC CHROME] | Soft color and enhanced shadow contrast for a calm look. |
| g[PRO Neg. Hi] | Offers slightly more contrast than h ([PRO Neg. Std]). Recommended for outdoor portrait photography. |
| h[PRO Neg. Std] | A soft-toned palette. The range of hues available for skin tones is enhanced, making this a good choice for studio portrait photography. |
| b[MONOCHROME] | Take pictures in standard black and white. |
| e[MONOCHROME + Ye FILTER] | Take black-and-white pictures with slightly increased contrast. This setting also slightly tones down the brightness of the sky. |
| d[MONOCHROME + R FILTER] | Take black-and-white pictures with increased contrast. This setting also tones down the brightness of the sky. |
| f[MONOCHROME + G FILTER] | Soften skin tones in black-and-white portraits. |
| f[SEPIA] | Take pictures in sepia. |
Film simulation options can be combined with tone and sharpness settings.
For more information, visit: “The World of Film Simulation episode 1”
Choose the three film simulation types used for film simulation bracketing (a [FILM SIMULATION]).
Use the timer for group- or self-portraits, to prevent blur caused by camera shake, or to release the shutter automatically when selected conditions are met (a Using the Self Timer).
Configure the camera to take photos automatically at a preset interval. If desired, frames shot using interval timer shooting can be joined to form a time-lapse movie.
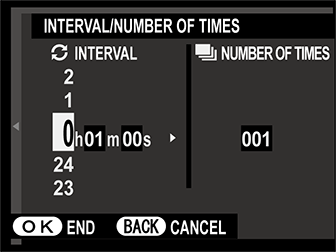
Highlight o [INTERVAL TIMER SHOOTING] in the shooting menu and press [MENU/OK].
Use the selector to choose the interval and number of shots. Press [MENU/OK] to proceed.
Highlight one of the following recording types and press [MENU/OK].
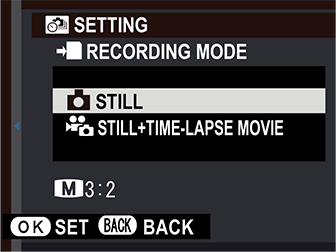
The frame size and rate for the time-lapse movie can be selected using P[TIME-LAPSE MOVIE MODE] before shooting begins.
Use the selector to choose the starting time and then press [MENU/OK].
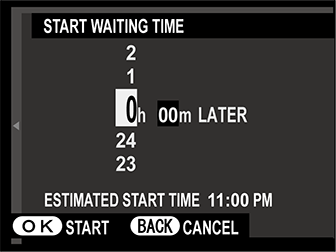
Shooting will start automatically.
Interval timer photography cannot be used at a shutter speed of [B] (bulb) or HDR, e (4K), or during panorama or multiple exposure photography. In burst mode, only one picture will be taken each time the shutter is released.
Use of a tripod is recommended.
Check the battery level before starting. We recommend using an optional AC-9V AC power adapter and CP-W126 DC coupler.
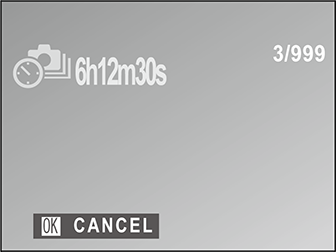
The display sometimes turns off between shots and lights a few seconds before the next shot is taken. The display can be activated at any time by pressing the shutter button.
Choose the frame size and rate for time-lapse movies.
| Option | Frame size | Rate |
|---|---|---|
| V[2160/30P]* | 3840 × 2160 (4K) |
30 fps |
| V[2160/15P]* | 15 fps | |
| i[1080/59.94P] | 1920 × 1080 (Full HD) |
59.94 fps |
| i[1080/50P] | 50 fps | |
| i[1080/24P] | 24 fps | |
| i[1080/23.98P] | 23.98 fps | |
| h[720/59.94P] | 1280 × 720 (HD) |
59.94 fps |
| h[720/50P] | 50 fps | |
| h[720/24P] | 24 fps | |
| h[720/23.98P] | 23.98 fps |
* Use a memory card with a UHS speed class of 3 or better when recording time-lapse movies that will be viewed on the camera.
For natural colors, choose a white balance option that matches the light source (a White Balance).
Adjust color density. Choose from 5 options between +2 and −2.
| Options | ||||
|---|---|---|---|---|
| +2 | +1 | 0 | -1 | -2 |
 .
.

