Adjust basic camera settings.
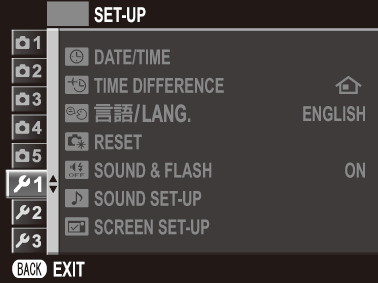
To access basic camera settings, press [MENU/OK] and select tab G.
Set the camera clock:
Select F[DATE/TIME] in the G ([SET-UP 1]) tab.
Press the focus stick (focus lever) left or right to highlight the year, month, day, hour, or minute and press up or down to change.
Switch the camera clock instantly from your home time zone to the local time at your destination when traveling. To specify the difference between your local and home time zone:
Highlight g[LOCAL] and press [MENU/OK].
Use the focus stick (focus lever) to choose the time difference between local time and your home time zone. Press [MENU/OK] when settings are complete.
To set the camera clock to local time, highlight g[LOCAL] and press [MENU/OK]. To set the clock to the time in your home time zone, select h[HOME]. If g[LOCAL] is selected, g will be displayed in yellow for about three seconds when the camera is turned on.
| Options | |
|---|---|
| g[LOCAL] | h[HOME] |
Choose a language.
Select Qa in the G ([SET-UP 1]) tab.
Highlight the desired option and press [MENU/OK].
Reset shooting or setup menu options to default values.
Highlight the desired option and press [MENU/OK].
| Option | Description |
|---|---|
| [SHOOTING MENU RESET] | Reset all shooting menu settings other than custom white balance to default values. |
| [SET-UP RESET] | Reset all setup menu settings other than F[DATE/TIME], N[TIME DIFFERENCE], and r[CONNECTION SETTING] to default values. |
A confirmation dialog will be displayed; highlight [OK] and press [MENU/OK].
Select [OFF] to disable the speaker, flash, and illuminator in situations in which camera sounds or lights may be unwelcome.
| Options | |
|---|---|
| [ON] | [OFF] |
o appears in the display when [OFF] is selected.
Adjust sound settings.
Adjust the volume of the sounds produced when camera controls are operated. Choose e[OFF] to disable control sounds.
| Options | |||
|---|---|---|---|
| b (high) | c (medium) | d (low) | e[OFF] (mute) |
Adjust the volume of the sounds produced by the electronic shutter. Choose e[OFF] to disable the shutter sound.
| Options | |||
|---|---|---|---|
| b (high) | c (medium) | d (low) | e[OFF] (mute) |
Choose the sound made by the electronic shutter.
| Options | ||
|---|---|---|
| i[SOUND 1] | j[SOUND 2] | k[SOUND 3] |
Adjust the volume for movie playback. Choose from 10 options between 10 (high) and 1 (low) or select 0 to mute audio during movie playback.
| Options | ||||||||||
|---|---|---|---|---|---|---|---|---|---|---|
| 10 | 9 | 8 | 7 | 6 | 5 | 4 | 3 | 2 | 1 | 0 |
Adjust display settings.
Choose how long images are displayed after shooting. Colors may differ slightly from those in the final image and “noise” mottling may be visible at high sensitivities. Note that at some settings, the camera will display pictures after shooting regardless of the option selected.
| Option | Description |
|---|---|
| [CONTINUOUS] | Pictures are displayed until the [MENU/OK] button is pressed or the shutter button is pressed halfway. To zoom in on the active focus point, press the [Fn2] (function 2) button; press again to cancel zoom. |
| [1.5 SEC] | Pictures are displayed for the selected time or until the shutter button is pressed halfway. |
| [0.5 SEC] | |
| [OFF] | Pictures are not displayed after shooting. |
Select [ON] to enable exposure preview in manual exposure mode.
| Options | |
|---|---|
| [ON] | [OFF] |
Select [OFF] when using the flash or on other occasions on which exposure may change when the picture is taken.
Adjust monitor brightness.
| Options | ||||||||||
|---|---|---|---|---|---|---|---|---|---|---|
| +5 | +4 | +3 | +2 | +1 | 0 | -1 | -2 | -3 | -4 | -5 |
Adjust monitor hue.
| Options | ||||||||||
|---|---|---|---|---|---|---|---|---|---|---|
| +5 | +4 | +3 | +2 | +1 | 0 | -1 | -2 | -3 | -4 | -5 |
Choose [ON] to preview the effects of film simulation, white balance, and other settings in the monitor, [OFF] to make shadows in low-contrast, back-lit scenes and other hard-to-see subjects more visible.
| Options | |
|---|---|
| [ON] | [OFF] |
If [OFF] is selected, the effects of camera settings will not be visible in the monitor and colors and tone will differ from those in the final picture. The display will however be adjusted to show the effects of advanced filters and of monochrome and sepia settings.
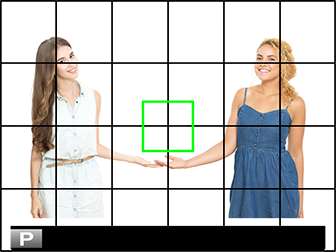
Choose a framing grid for shooting mode.
| Option | |||
|---|---|---|---|
| F[GRID 9] | G[GRID 24] | H[HD FRAMING] | |
| Display | |||
| For “rule of thirds” composition. | A six-by-four grid. | Frame HD pictures in the crop shown by the lines at the top and bottom of the display. | |
Framing guides are not shown at default settings but can be displayed using A[SCREEN SET-UP] > [DISP. CUSTOM SETTING] (a [DISP. CUSTOM SETTING]).
Choose [ON] to automatically rotate “tall” (portrait-orientation) pictures during playback.
| Options | |
|---|---|
| [ON] | [OFF] |
If [ON] is selected, the display will automatically zoom in on the selected focus area when the control ring is rotated in manual focus mode.
| Options | |
|---|---|
| [ON] | [OFF] |
Pressing the [Fn2] (function 2) button cancels focus zoom.
Choose the units used for the focus distance indicator.
| Options | |
|---|---|
| [METERS] | [FEET] |
Choose the items shown in the standard display.
Use the [DISP/BACK] button to display standard indicators.
Select A[SCREEN SET-UP] > [DISP. CUSTOM SETTING] in the setup menu.
Highlight items and press [MENU/OK] to select or deselect.
| Item | Default |
|---|---|
| [FRAMING GUIDELINE] | w |
| [ELECTRONIC LEVEL] | w |
| [FOCUS FRAME] | R |
| [AF DISTANCE INDICATOR] | w |
| [MF DISTANCE INDICATOR] | R |
| [HISTOGRAM] | w |
| [SHOOTING MODE] | R |
| [APERTURE/S-SPEED/ISO] | R |
| [INFORMATION BACKGROUND] | R |
| [Expo. Comp. (Digit)] | R |
| [Expo. Comp. (Scale)] | R |
| [FOCUS MODE] | R |
| [PHOTOMETRY] | R |
| [SHUTTER TYPE] | R |
| [FLASH] | R |
| [CONTINUOUS MODE] | R |
| [WHITE BALANCE] | R |
| [FILM SIMULATION] | R |
| [DYNAMIC RANGE] | R |
| [FRAMES REMAINING] | R |
| [IMAGE SIZE/QUALITY] | R |
| [MOVIE MODE & REC. TIME] | R |
| [DIGITAL TELE-CONV.] | R |
| [AUTO IMAGE TRANSFER] | R |
| [BATTERY LEVEL] | R |
Press [DISP/BACK] to save changes.
Press [DISP/BACK] as needed to exit the menus and return to the shooting display.
 .
.