This website uses cookies. By using the site you are agreeing to our Privacy Policy.

Enter a search term and click .

To choose the items displayed in the quick menu:

  1. Press and hold the [Q] button during shooting.

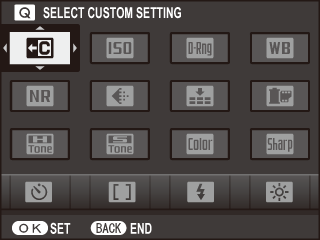
  2. The current quick menu will be displayed; use the selector to highlight the item you wish to change and press [MENU/OK].

    You will be given the following choice of items to assign to the selected position:

    • [SELECT CUSTOM SETTING]
    • [ISO]
    • [DYNAMIC RANGE]
    • [WHITE BALANCE]
    • [NOISE REDUCTION]
    • [IMAGE SIZE]
    • [IMAGE QUALITY]
    • [FILM SIMULATION]
    • [HIGHLIGHT TONE]
    • [SHADOW TONE]
    • [COLOR]
    • [SHARPNESS]
    • [SELF-TIMER]
    • [FACE DETECTION]
    • [PHOTOMETRY]
    • [AF MODE]
    • [FLASH MODE]
    • [FLASH COMPENSATION]
    • [MF ASSIST]
    • [MOVIE MODE]
    • [MOVIE ISO]
    • [MIC LEVEL ADJUSTMENT]
    • [SOUND & FLASH]
    • [LCD BRIGHTNESS]
    • [LCD COLOR]
    • [WIDE CONVERSION LENS]
    • [SHUTTER TYPE]
    • [NONE]

    Select [NONE] to assign no option to the selected position. When [SELECT CUSTOM SETTING] is selected, current settings are shown in the quick menu by the label [BASE].

  3. Highlight the desired item and press [MENU/OK] to assign it to the selected position.

The quick menu can also be edited using the BUTTON/DIAL SETTING > EDIT/SAVE QUICK MENU option in the setup menu.