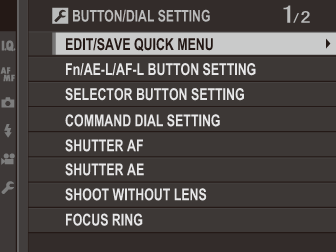
Access options for camera controls.
To access control options, press [MENU]/[OK], select the ([SET UP]) tab, and choose [BUTTON/DIAL SETTING].

Choose the items displayed in the quick menu.
Select [BUTTON/DIAL SETTING] > [EDIT/SAVE QUICK MENU] in the
([SET UP]) tab.
The current quick menu will be displayed; use the selector to highlight the item you wish to change and press [MENU]/[OK].
Highlight any of the following options and press [MENU]/[OK] to assign it to the selected position.
[IMAGE SIZE]
[IMAGE QUALITY]
[FILM SIMULATION] *
[GRAIN EFFECT] *
[DYNAMIC RANGE] *
[WHITE BALANCE] *
[HIGHLIGHT TONE] *
[SHADOW TONE] *
[COLOR] *
[SHARPNESS] *
[NOISE REDUCTION] *
[SELECT CUSTOM SETTING] *
[AF MODE]
[AF-C CUSTOM SETTINGS]
[FACE/EYE DETECTION SETTING]
[MF ASSIST]
[SELF-TIMER]
[PHOTOMETRY]
[SHUTTER TYPE]
[ISO]
[TOUCH SCREEN MODE]
[FLASH FUNCTION SETTING]
[FLASH COMPENSATION]
[MOVIE MODE]
[MIC LEVEL ADJUSTMENT]
[SOUND & FLASH]
[EVF/LCD BRIGHTNESS]
[EVF/LCD COLOR]
[NONE]
* Stored in custom settings bank.
Select [NONE] to assign no option to the selected position. When [SELECT CUSTOM SETTING] is selected, current settings are shown in the quick menu by the label [BASE].
Highlight the desired item and press [MENU]/[OK] to assign it to the selected position.
The quick menu can also be accessed in shooting mode by holding the [Q] button.
Choose the roles played by the function buttons.
Select [BUTTON/DIAL SETTING] > [Fn/AE‑L/AF‑L BUTTON SETTING] in the
([SET UP]) tab.
Highlight the desired control and press [MENU]/[OK].
Highlight any of the following options and press [MENU]/[OK] to assign it to the selected control.
[IMAGE SIZE]
[IMAGE QUALITY]
[RAW]
[FILM SIMULATION]
[GRAIN EFFECT]
[DYNAMIC RANGE]
[WHITE BALANCE]
[SELECT CUSTOM SETTING]
[FOCUS AREA]
[FOCUS CHECK]
[AF MODE]
[AF-C CUSTOM SETTINGS]
[FACE/EYE DETECTION SETTING]
[DRIVE SETTING]
[SELF-TIMER]
[PHOTOMETRY]
[SHUTTER TYPE]
[ISO]
[WIRELESS COMMUNICATION]
[FLASH FUNCTION SETTING]
[TTL-LOCK]
[MODELING FLASH]
[MIC LEVEL ADJUSTMENT]
[PREVIEW DEPTH OF FIELD]
[PREVIEW EXP./WB IN MANUAL MODE]
[PREVIEW PIC. EFFECT]
[HISTOGRAM]
[LARGE INDICATORS MODE]
[AE LOCK ONLY]
[AF LOCK ONLY]
[AE/AF LOCK]
[AF-ON]
[APERTURE SETTING]
[PLAYBACK]
[NONE] (control disabled)
Function button assignment options can also be accessed by holding the [DISP]/[BACK] button. The selector can not be assigned more than one role at a time.
If [AF‑ON] is selected, you can press the control instead of keeping the shutter button pressed halfway.
If [MODELING FLASH] is selected when a compatible shoe-mounted flash unit is attached, you can press the control to test-fire the flash and check for shadows and the like (modeling flash).
If [TTL-LOCK] is selected, you can press the control to lock flash output according to the option selected for [FLASH SETTING] > [TTL-LOCK MODE] (
[TTL-LOCK MODE]).
Choose the roles played by the up, down, left, and right buttons on the selector.
| Option | Description |
|---|---|
| [Fn BUTTON] | The selector buttons serve as function buttons. |
| [FOCUS AREA] | The selector buttons can be used to position the focus area. |
Selecting [FOCUS AREA] prevents you accessing the functions assigned to the function buttons.
Choose the roles played by the command dials.
| Option | Description |
|---|---|
| The front command dial controls aperture, the rear command dial shutter speed. | |
| The front command dial controls shutter speed, the rear command dial aperture. |
Choose whether the camera focuses when the shutter button is pressed halfway.
| Option | Description |
|---|---|
| [ON] | In focus mode [S] (AF‑S), the camera focuses when the shutter button is pressed halfway and locks focus while the button remains in this position. In focus mode [C] (AF‑C), focus is adjusted continually while the button is pressed halfway. |
| [OFF] | The camera does not focus when the shutter button is pressed halfway. |
If [ON] is selected, exposure will lock while the shutter button is pressed halfway.
| Options | |
|---|---|
| [ON] | [OFF] |
Select [OFF] to allow the camera to adjust exposure before each shot taken in burst mode.
Choose [ON] to enable the shutter release when no lens is attached.
| Options | |
|---|---|
| [ON] | [OFF] |
Choose the direction in which the focus ring is rotated to increase the focus distance.
| Options | |
|---|---|
If [AE & AF ON WHEN PRESSING] is selected, exposure and/or focus will lock while the [AE-L] or [AF-L] button is pressed. If [AE & AF ON/OFF SWITCH] is selected, exposure and/or focus will lock when the [AE-L] or [AF-L] button is pressed and remain locked until the button is pressed again.
| Options | |
|---|---|
| [AE & AF ON WHEN PRESSING] | [AE & AF ON/OFF SWITCH] |
Choose the method used to adjust aperture when using lenses with no aperture rings.
| Option | Description |
|---|---|
| [AUTO]+ |
Rotate the front command dial to choose the aperture. Rotate past minimum aperture to choose [A] (auto). |
| [AUTO] | Aperture is selected automatically; camera functions in exposure mode [P] (program AE) or [S] (shutter-priority AE). |
| [MANUAL] | Rotate the front command dial to choose the aperture; camera functions in exposure mode [A] (aperture-priority AE) or [M] (manual). |
Enable or disable touch-screen controls.
| Option | Description |
|---|---|
| [TOUCH SCREEN ON/OFF] |
[ON]: Touch controls enabled; the LCD monitor functions as a touch screen. [OFF]: Touch controls disabled; the LCD monitor cannot be used as a touch screen. |
| [EVF TOUCH SCREEN AREA SETTINGS] | Select the area of the LCD monitor ([ALL], [RIGHT], or [LEFT]) used for touch controls while the viewfinder is active, or choose [OFF] to disable touch controls while the viewfinder is in use. |