FUJIFILM X Webcam User’s Guide
Installing FUJIFILM X Webcam
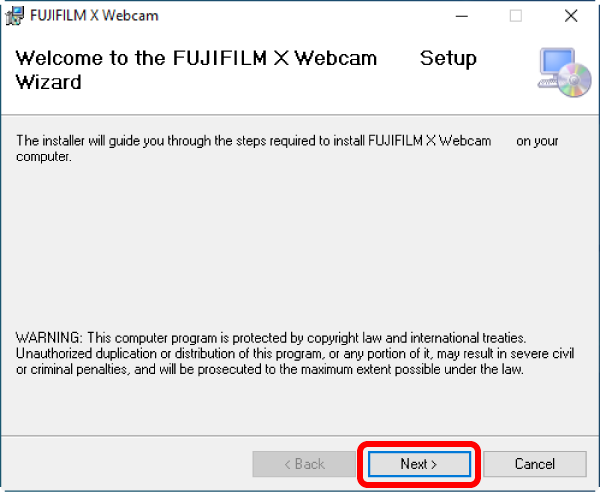
Unzip the downloaded zip archive and double-click “setup.exe” to launch the installer. Follow the on-screen instructions to complete the installation.
Click here to download FUJIFILM X Webcam.
Before installing FUJIFILM X Webcam, exit any other applications that may be running.
Installing FUJIFILM X Webcam requires Windows administrator privileges.
The computer must be restarted once installation is complete.
Before uninstalling FUJIFILM X Webcam, exit all web conference applications.
-
Unzip the downloaded zip archive and double-click “setup.exe”.

-
A welcome dialog will be displayed; click [Next].
-
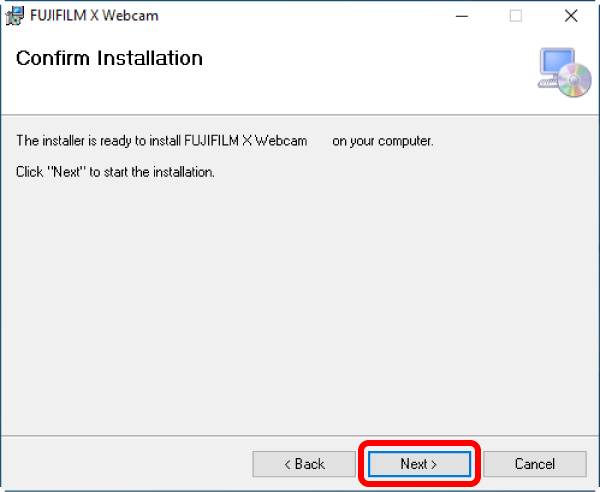
Click [Next] to start installation.
-
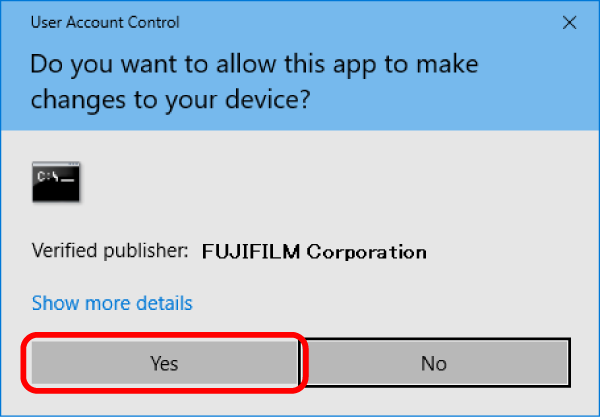
The installer will request permission to make changes to the computer. Select [Yes] to permit installation.
-
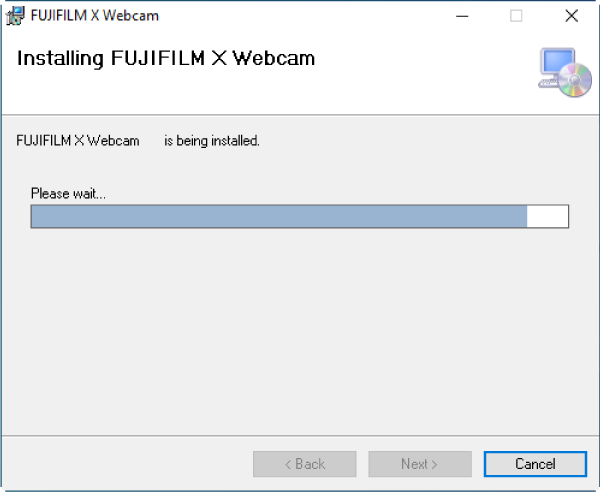
Wait for installation to complete.
-
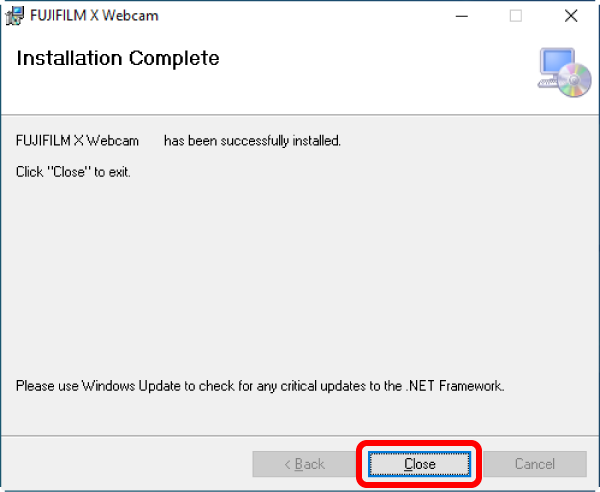
Click [Close] to exit the installer.
-
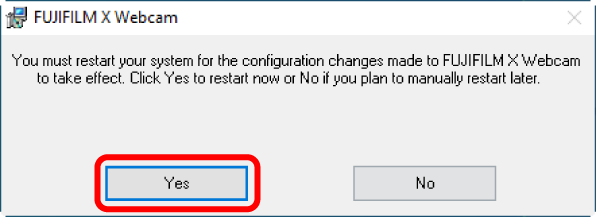
A dialog is displayed when installation is complete; click [Yes] to restart the computer.
- A “FUJIFILM X Webcam 2” shortcut will be created when the computer restarts.
The FUJIFILM X Webcam Mac Edition has two versions:
- X Webcam ver 2.2 or later is the version compatible with macOS 14 or later
- X Webcam ver 2.1 or earlier is the version compatible with macOS 13 or earlier
To install the ver 2.2 or later, you will need to configure the settings to allow the extension upon installation. Refer to the following instructions for details.
To install ver 2.1 or earlier, follow the installer guide.
Click here to download FUJIFILM X Webcam.
Before installing FUJIFILM X Webcam, exit any other applications that may be running.
Installing FUJIFILM X Webcam requires Mac administrator privileges.
The computer must be restarted once installation is complete.
Before uninstalling FUJIFILM X Webcam, exit all web conference applications.
-
Double-click “XWebcamIns***.pkg” (where “***” varies with the version number) to launch the installer.
-
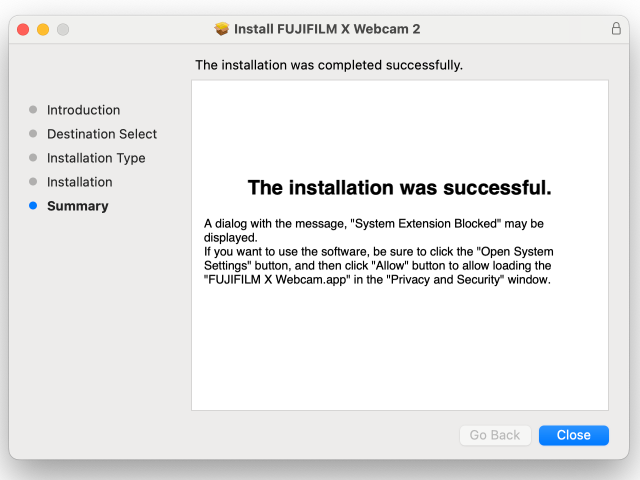
Follow the on-screen instructions to complete installation.
-
For macOS 14 or later, upon the completion of installation, you will be prompted with a confirmation dialog asking for allowing the system extension(s) for the new software.
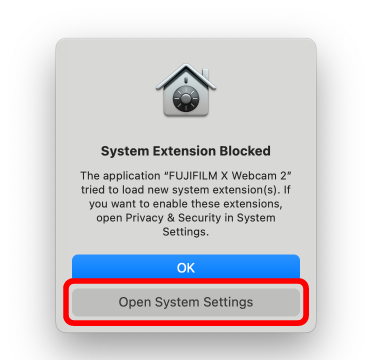
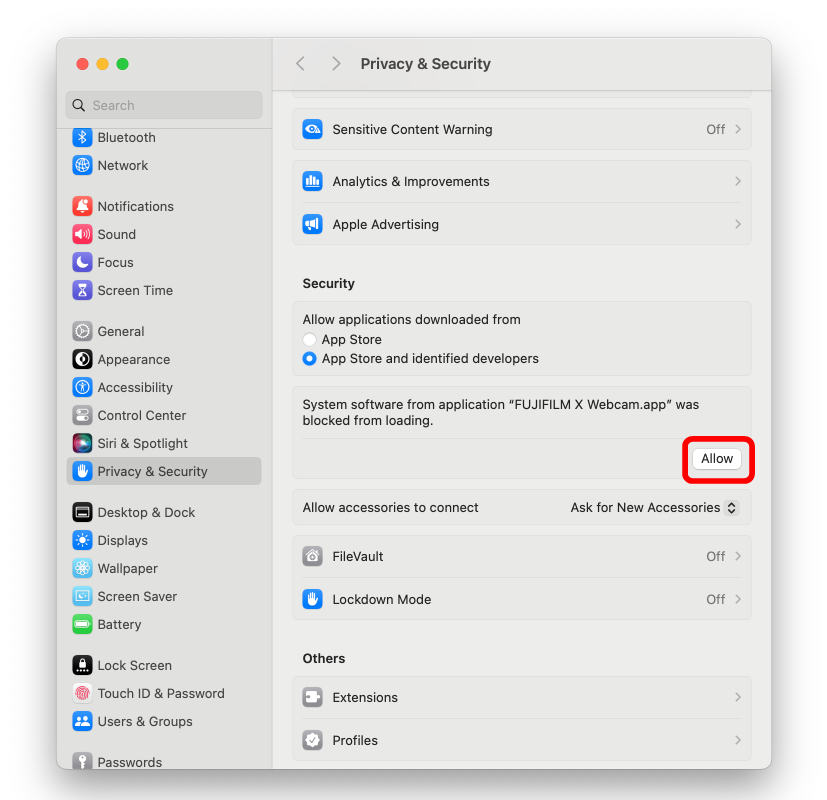
Click the [Open System Settings] button to open the [Privacy & Security] window, and then click the [Allow] button on the window for loading the application in the system software.
If you click the [OK] button on the System Extension Blocked dialog, the [Privacy & Security] window will not open and you will not be able to configure the settings to allow the extension. In such a case, manually open the [Privacy & Security] window from macOS [System Settings] to allow FUJIFILM X Webcam.app to be loaded in the system software.
Uninstalling FUJIFILM X Webcam
To uninstall the software, delete the following files and then restart the computer:
For X Webcam ver 2.2 or later
- Applications/FUJIFILM X Webcam 2.app
- Applications/FUJIFILM X Webcam.app
For X Webcam ver 2.1 or earlier
- Applications/FUJIFILM X Webcam 2.app
- Library/CoreMediaIO/Plug-ins/DAL/FUJIFILM X Webcam.plugin
How to open the Applications folder
- Select [Go] from the menu bar in the [Finder].
- Select [Applications] from the [Go] list.
How to open the Library folder
- Select [Go] from the menu bar in the [Finder].
- Select [Computer] from the [Go] list.
- Select the OS startup disk from the list of the opened folder.
- Select [Library] from the list of the opened folder.
Configuring and Connecting the Camera and Computer
Configuring the Camera
Some camera settings cannot be changed while the camera is connected to a computer; adjust settings before proceeding. You will also need to adjust the following settings when using the camera as a webcam for a web conferencing app:
Any adjustments made prior to connection will remain in effect once the camera is connected. Note, however, that the digital zoom, exposure compensation, film simulation, and white balance settings in effect when you last exited X Webcam will be restored.
| Item (required) | Setting | |
|---|---|---|
| Mode (still photography/movie recording) | Still photography | |
| Drive mode | [S] (single frame) | |
| [STILL]/[MOVIE] mode dial *1 | [STILL] | |
| [CONNECTION SETTING] in the setup menus *2 |
[PC CONNECTION MODE] | [USB TETHER SHOOTING AUTO] |
| [CONNECTION MODE] | [USB TETHER SHOOTING AUTO] | |
| [PC SHOOT MODE] | [USB AUTO] | |
| Recommended items (simple webcam) | Setting |
|---|---|
| [AF/MF SETTING] > [PRE-AF] | [ON] *3 |
| [AF/MF SETTING] > [FACE/EYE DETECTION SETTING] | [FACE DETECTION ON] |
| [CONNECTION SETTING] > [USB POWER SUPPLY SETTING] in the setup menus *1 |
[ON] |
| Exposure settings | Full auto (auto shutter speed, auto aperture, and auto ISO sensitivity) |
| Focus mode | Single AF ([AF-S][S]) |
If you find that exposure changes unpredictably, try selecting [PREVIEW EXP./WB] for [SCREEN SETTING] > [PREVIEW EXP./WB IN MANUAL MODE] in the setup menu. *3
After the web conference finishes, we recommend to switch the [PC CONNECTION MODE] in the setup menus to [USB CARD READER] or options other than the [USB TETHER SHOOTING]. When using the camera in [USB TETHER SHOOTING] while connecting the camera with a USB cable to an output other than computers, the camera might not activate properly.
*1 Supported cameras only.
*2 Name of menu item varies from camera to camera.
*3 See also: “Using FUJIFILM X Webcam”.
Connecting the Camera and Computer
Connect the camera and computer using a USB cable.
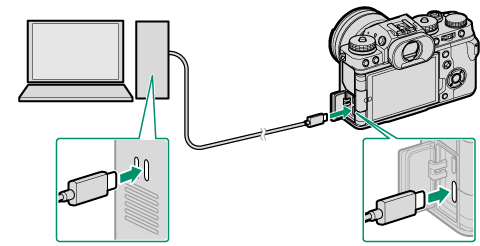
Note: The illustration shows the X-T4.
Exit X Acquire, CaptureOne, the Lightroom plugin, HS-V5, and X RAW STUDIO when using FUJIFILM X Webcam. You will also need to exit any additional web conferencing apps not currently in use.
Configuring the Computer
Launch a web conference application on your computer.
Select [FUJIFILM X Webcam 2] as your camera in the application’s audio/video settings.
For more information, see the documentation for the web conference application.
Using FUJIFILM X WebcamVersions 2.00 or Later
Launching FUJIFILM X Webcam 2 displays a settings dialog. These settings can be changed while the camera is connected to the computer; to change other settings, you must first turn the camera off and disconnect the USB cable before adjusting settings using camera controls.
The instructions that follow apply to FUJIFILM X Webcam versions 2.00 or later. Users of earlier versions are requested to upgrade to versions 2.00 or later. A list of supported cameras can be viewed here.
If the “Launch when camera connected” option is selected in FUJIFILM X Webcam 2, FUJIFILM X Webcam 2 will launch automatically when the image from the camera is displayed.
If the “Launch when camera connected” option is not selected in FUJIFILM X Webcam 2, FUJIFILM X Webcam 2 will not launch automatically. Launch FUJIFILM X Webcam 2 manually by clicking the shortcut icon.
The settings dialog is not available with cameras that offer an [X WEBCAM] option for [CONNECTION SETTING] > [CONNECTION MODE] in the setup menu.
App Controls and Their Functions
The names and functions of the controls in the FUJIFILM X Webcam 2 dialog are described below.
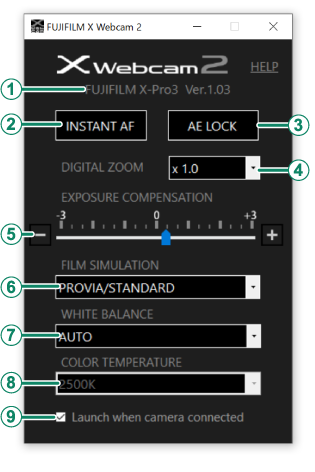
- ACamera Name
- The name of the connected camera.
- B[INSTANT AF]
- Click to focus using instant AF.
- C[AE LOCK]
- Click to lock exposure. Click again to end exposure lock.
- D[DIGITAL ZOOM]
- Choose a zoom ratio for digital zoom.
- E[EXPOSURE COMPENSATION]
- Adjust exposure using the slider or by clicking the “+” and “−” buttons.
- F[FILM SIMULATION]
- Choose a film simulation.
- G[WHITE BALANCE]
- Choose a white balance mode.
- H[COLOR TEMPERATURE]
- Choose a color temperature for use when [COLOR TEMPERATURE] is selected for white balance mode.
- I[Launch when camera connected]
- If this option is selected, FUJIFILM X Webcam will launch automatically when the camera is connected.
FUJIFILM X Webcam 2
application icon

Launch the FUJIFILM X Webcam 2 application to display the settings dialog.

Clicking this icon will not execute any action, but do not delete it as it is linked to the conference application that connects the camera.
Settings dialog
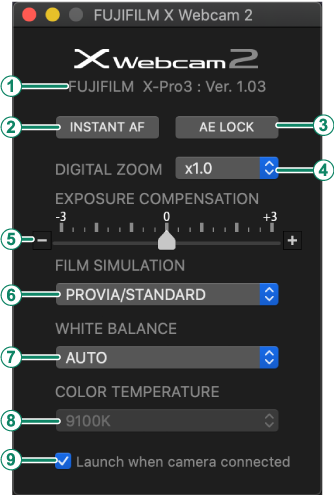
- ACamera Name
- The name of the connected camera.
- B[INSTANT AF]
- Click to focus using instant AF.
- C[AE LOCK]
- Click to lock exposure. Click again to end exposure lock.
- D[DIGITAL ZOOM]
- Choose a zoom ratio for digital zoom.
- E[EXPOSURE COMPENSATION]
- Adjust exposure using the slider or by clicking the “+” and “−” buttons.
- F[FILM SIMULATION]
- Choose a film simulation.
- G[WHITE BALANCE]
- Choose a white balance mode.
- H[COLOR TEMPERATURE]
- Choose a color temperature for use when [COLOR TEMPERATURE] is selected for white balance mode.
- I[Launch when camera connected]
- If this option is selected, FUJIFILM X Webcam will launch automatically when the camera is connected.
[INSTANT AF]
The role of the instant AF button varies with focus mode.
- In manual focus mode ([MF]/[M]), the camera will focus using instant AF when the button is clicked.
- In single ([AF-S]/[S]) and continuous ([AF-C]/[C]) AF modes, you can click the button to refocus using autofocus.
- For stable focus, select [OFF] for [PRE-AF].
Select manual focus mode ([MF]/[M]) when using [INSTANT AF] with X-Pro2.
If the lens features a depth-of-field indicator, rotate the focus ring to [AF].
[AE LOCK]
The role of AE lock varies with exposure mode ([P], [S], [A], or [M]).
- In modes [P] (program AE), [S] (shutter-priority AE), and [A] (aperture-priority AE), it can be used to prevent exposure changing unpredictably.
- AE lock is not available in manual exposure mode (mode [M]). If you find that exposure changes unpredictably, try selecting [PREVIEW EXP./WB] for [SCREEN SETTING] > [PREVIEW EXP./WB IN MANUAL MODE] in the setup menu.
X-Pro2 supports AE Lock only in manual focus mode ([MF]/[M]) or when [OFF] is selected for [AF/MF SETTING] > [FACE/EYE DETECTION SETTING].
[FILM SIMULATION]
The film simulation options available vary with the camera connected.
The camera saves the last option selected when you exit the app or turn the camera off.
The selected option may not produce the desired results with older versions of the camera firmware. Be sure to update to the latest version.
[DIGITAL ZOOM]
This menu lists the digital zoom settings available with the current camera.
In focus modes other than manual ([MF]/[M]), enabling digital zoom sets the focus mode to [AF-S] and selects [OFF] and [SINGLE POINT] for [PRE-AF] and [AF MODE].
Terminating the connection resets digital zoom on the camera to 1.0×. The previously-selected zoom ratio will be restored the next time the camera is connected if “focus mode switching on zoom” is enabled.
The camera zooms in on the focus area selected for single-point AF.
[WHITE BALANCE]/[COLOR TEMPERATURE]
The camera saves the last white balance or color temperature selected when you exit the app or turn the camera off.
Error Messages
The following messages are displayed when a connection error occurs.
| Message | Description |
|---|---|
|
Waiting for connection |
The connection to the camera was terminated before FUJIFILM X Webcam was launched. Connect the camera to the computer via USB and turn the camera on. |
|
App conflict |
The computer is unable to connect to the camera due to a conflict with another app. Exit X Acquire or other potentially conflicting app. |


| Message | Description |
|---|---|
|
Wrong mode |
The camera was connected in the wrong mode. Select [USB TETHER SHOOTING AUTO] for [CONNECTION MODE] in the camera menus. Note that the names of menu items may vary from camera to camera. See “Configuring the Camera”. |
|
Connection error |
The camera has been disconnected or turned off. Wait for the “waiting for connection” message to be displayed. If the “connection error” message does not clear from the display, check that the camera is connected. |
|
Battery warning |
The camera battery is low. Insert a fully-charged battery or connect the camera to a power source. |