
 .
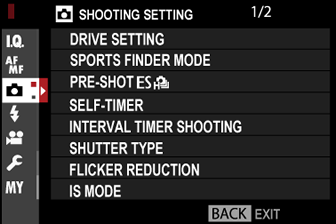
.AThe Shooting Menus (SHOOTING SETTING)
Adjust shooting options.
To display shooting options, press MENU/OK in the shooting display and select the A (SHOOTING SETTING) tab.
The options available vary with the shooting mode selected.
- DRIVE SETTING
- SPORTS FINDER MODE
- PRE-SHOTsJ
- SELF-TIMER
- INTERVAL TIMER SHOOTING
- SHUTTER TYPE
- FLICKER REDUCTION
- IS MODE
- ISO AUTO SETTING
- MOUNT ADAPTOR SETTING
- WIRELESS COMMUNICATION
DRIVE SETTING
Adjust settings for the various drive modes.
| Option | Description | |||||||
|---|---|---|---|---|---|---|---|---|
| BKT SETTING | Choose the settings used when the drive dial is rotated to BKT (aBKT SETTING). | |||||||
| CH HIGH SPEED BURST |
Select the frame rate used when the drive dial is rotated to CH (continuous high speed). The display frame rate when the electronic shutter is used is 40 fps, or 60 fps in 1.25× crop mode.
1 Available with electronic shutter only. 2 10 fps with electronic shutter. |
|||||||
| CL LOW SPEED BURST |
Select the frame rate used when the drive dial is rotated to CL (continuous low speed).
|
|||||||
| ADV. FILTER SETTING | Choose the filter used when the drive dial is rotated to ADV. (aAdvanced Filter Options). |
BKT SETTING
Choose the bracketing type and adjust bracketing options for the BKT drive mode.
| Option | Description | ||||||||
|---|---|---|---|---|---|---|---|---|---|
| BKT SELECT |
The following options are available when BKT is selected for drive mode.
|
||||||||
| AE BKT |
The following options are available when OAE BKT is chosen for BKT SELECT.
|
||||||||
| ISO BKT |
The following options are available when WISO BKT is chosen for BKT SELECT.
|
||||||||
| FILM SIMULATION BKT | Choose the three film simulation types used for film simulation bracketing (aFILM SIMULATION). | ||||||||
| WHITE BALANCE BKT |
The following options are available when VWHITE BALANCE BKT is chosen for BKT SELECT.
|
||||||||
| FOCUS BKT |
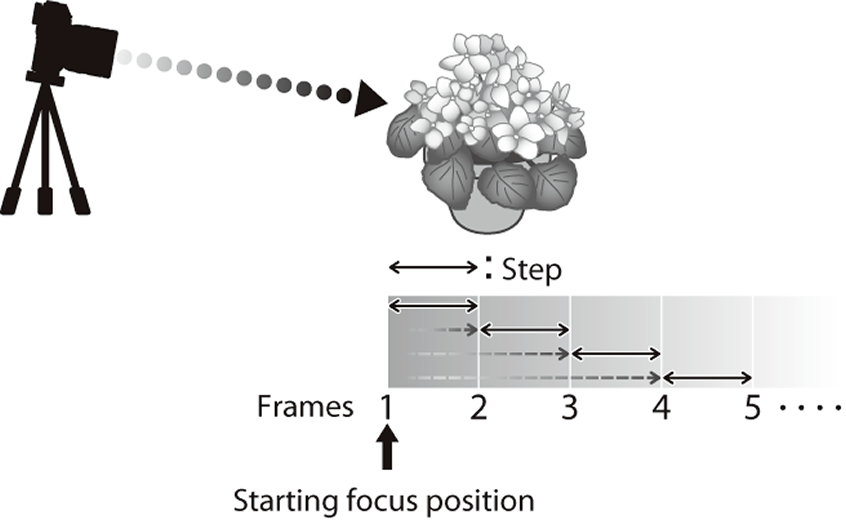
The following settings are available when ZFOCUS BKT is chosen for BKT SELECT.
Do not adjust zoom during shooting. Focus and FRAMES/STEP The relation between focus and the options chosen for FRAMES and STEP is shown in the illustration.
Focus proceeds from the starting position toward infinity. Small STEP values translate to small changes in focus, larger values to larger changes. Regardless of the option chosen for FRAMES, shooting ends when focus reaches infinity. |
SPORTS FINDER MODE
Take pictures using the crop in the center of the display. Choose this option for pictures of athletes, birds, and other moving subjects.

| Option | Description |
|---|---|
| ON | Pictures are taken using a 1.25× crop, reducing the picture angle by an amount equivalent to increasing lens focal length by 1.25×; the crop is shown by a frame in the display. |
| OFF | The 1.25× crop is disabled. |
The HIMAGE QUALITY SETTING > IMAGE SIZE item in the shooting menu is fixed at P.
The sports finder is not available in modes that offer an electronic shutter.
PRE-SHOTsJ
To reduce the lag between your pressing the shutter button all the way down and the resulting picture being recorded to the memory card, the camera starts shooting with the electronic shutter when the shutter button is pressed halfway and saves a series shots starting just before the shutter button is pressed the rest of the way down.
| Options | |
|---|---|
| ON | OFF |
Pre-shot photography is available only when sELECTRONIC SHUTTER is selected in CH (high speed burst) drive mode.
SELF-TIMER
Choose a shutter release delay.
| Option | Description |
|---|---|
| R2 SEC | The shutter is released two seconds after the shutter button is pressed. Use to reduce blur caused by the camera moving when the shutter button is pressed. The self-timer lamp blinks as the timer counts down. |
| S10 SEC | The shutter is released ten seconds after the shutter button is pressed. Use for photographs in which you wish to appear yourself. The self-timer lamp blinks immediately before the picture is taken. |
| OFF | Self-timer off. |
If an option other than OFF is selected, the timer will start when the shutter button is pressed all the way down. The display shows the number of seconds remaining until the shutter is released. To stop the timer before the picture is taken, press DISP/BACK.

Stand behind the camera when using the shutter button. Standing in front of the lens can interfere with focus and exposure.
The self-timer turns off automatically when the camera is turned off.
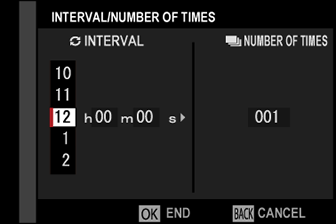
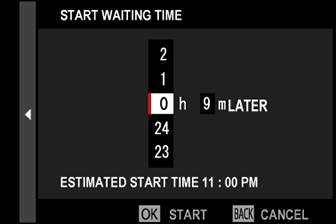
INTERVAL TIMER SHOOTING
Configure the camera to take photos automatically at a preset interval.
-
Highlight INTERVAL TIMER SHOOTING in the A (SHOOTING SETTING) tab and press MENU/OK.
-
Use the selector to choose the interval and number of shots. Press MENU/OK to proceed.
-
Use the selector to choose the starting time and then press MENU/OK. Shooting will start automatically.

Interval timer photography cannot be used at a shutter speed of B (bulb) or with multiple exposure photography. In burst mode, only one picture will be taken each time the shutter is released.
Use of a tripod is recommended.
Check the battery level before starting. We recommend using the AC-9VS AC power adapter supplied with the VG-XT3 vertical battery grip.
The display turns off between shots and lights a few seconds before the next shot is taken.
The display can be activated at any time by pressing the shutter button.
To continue shooting until the memory card is full, set the number of shots to ∞.
SHUTTER TYPE
Choose the shutter type. Choose the electronic shutter to mute the shutter sound.
| Option | Description |
|---|---|
| tMECHANICAL SHUTTER | Take pictures with the mechanical shutter. |
| sELECTRONIC SHUTTER | Take pictures with the electronic shutter. |
| tE-FRONT CURTAIN SHUTTER | Reduces the lag between the shutter button being pressed and the start of the exposure. |
| uMECHANICAL + ELECTRONIC | The camera chooses the mechanical or electronic shutter according to shooting conditions. |
| vE-FRONT + MECHANICAL | The camera chooses the mechanical or electronic front curtain shutter according to shooting conditions. |
| wE-FRONT + MECHANICAL + ELECTRONIC | The camera chooses the mechanical, electronic, or electronic front curtain shutter according to shooting conditions. |
If sELECTRONIC SHUTTER, uMECHANICAL + ELECTRONIC, or wE-FRONT + MECHANICAL + ELECTRONIC is selected, shutter speeds faster than 1/8000 s can be chosen by rotating the shutter speed dial to 8000 and then rotating the rear command dial.
When using the electronic shutter, note the following:
- Distortion may be visible in shots of moving subjects.
- Distortion may also be visible in hand-held shots taken at high shutter speeds; use of a tripod is recommended.
- Banding and fog may occur in shots taken under fluorescent lights or other flickering or erratic illumination.
- When taking pictures with the shutter muted (aSHUTTER VOLUME), respect your subjects’ image rights and right to privacy.
When using the electronic front-curtain shutter, note the following:
- Faster shutter speeds are more likely to result in uneven exposure and loss of resolution in out-of-focus areas of the frame.
The following restrictions apply when the electronic shutter is used:
- Sensitivity is restricted to values of ISO 12800–160
- Long exposure noise reduction has no effect
- The flash can not be used
FLICKER REDUCTION
Reduce flicker in pictures and the display when shooting under fluorescent lighting and other similar light sources.
| Option | Description |
|---|---|
| ALL FRAMES | Flicker reduction is applied to all frames continuous shooting frame rate reduces. |
| FIRST FRAME | Flicker measurement is taken prior to the first frame only and the same reduction amount is applied to all subsequent frames that flicker may occur. |
| OFF | Flicker reduction disabled. |
Flicker reduction increases the time needed to record pictures.
OFF is selected for FLICKER REDUCTION when the electronic shutter is used.
Flicker reduction is not available during movie recording.
IS MODE
Reduce blur.
| Option | Description |
|---|---|
| lCONTINUOUS | Image stabilization on. |
| mSHOOTING ONLY | Image stabilization enabled only when the shutter button is pressed halfway (focus mode C) or the shutter is released. |
| OFF | Image stabilization off; x appears in the display. Recommended when the camera is on a tripod. |
This option is available only with lenses that support image stabilization.
ISO AUTO SETTING
Choose the base sensitivity, maximum sensitivity, and minimum shutter speed for the A position on the sensitivity dial. Settings for AUTO1, AUTO2, and AUTO3 can be stored separately; the defaults are shown below.
| Item | Options | Default | ||
|---|---|---|---|---|
| AUTO1 | AUTO2 | AUTO3 | ||
| DEFAULT SENSITIVITY | 12800–160 | 160 | ||
| MAX. SENSITIVITY | 12800–400 | 800 | 1600 | 3200 |
| MIN. SHUTTER SPEED | 1⁄500–1/4 SEC, AUTO | AUTO | ||
The camera automatically chooses a sensitivity between the default and maximum values; sensitivity is only raised above the default value if the shutter speed required for optimal exposure would be slower than the value selected for MIN. SHUTTER SPEED.
If the value selected for DEFAULT SENSITIVITY is higher than that selected for MAX. SENSITIVITY, DEFAULT SENSITIVITY will be set to the value selected for MAX. SENSITIVITY.
The camera may select shutter speeds slower than MIN. SHUTTER SPEED if pictures would still be underexposed at the value selected for MAX. SENSITIVITY.
If AUTO is selected for MIN. SHUTTER SPEED, the camera will automatically choose a minimum shutter speed approximately equal to the inverse of the lens’ focal length, in seconds (for example, if the lens has a focal length of 50 mm, the camera will choose a minimum shutter speed in the neighborhood of 1⁄50 s). The minimum shutter speed is not affected by the option selected for image stabilization.
MOUNT ADAPTER SETTING
Adjust settings for M-mount lenses connected using an optional FUJIFILM M MOUNT ADAPTER.
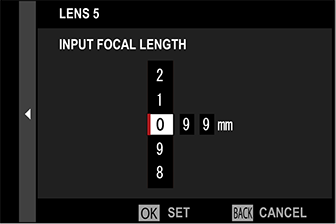
Choosing a Focal Length
Choose a lens number from LENS 1 through LENS 6 and enter the lens’ true focal length.
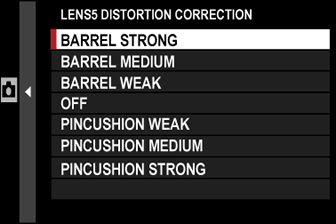
Distortion Correction
Choose from STRONG, MEDIUM, or WEAK options to correct BARREL or PINCUSHION distortion.
Color Shading Correction
Color (shading) variations between the center and edges of the frame can be adjusted separately for each corner.
To use color shading correction, follow the steps below.
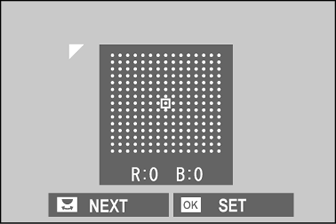
-
Rotate the rear command dial to choose a corner. The selected corner is indicated by a triangle.
-
Use the selector to adjust shading until there is no visible difference in color between the selected corner and the center of the image. Press the selector left or right to adjust colors on the cyan–red axis. Press the selector up or down to adjust colors on the blue–yellow axis.
To determine the amount required, adjust color shading correction while taking photos of blue sky or a sheet of gray paper.
Peripheral Illumination Correction
Choose from values between –5 and +5. Choosing positive values increases peripheral illumination, while choosing negative values reduces peripheral illumination. Positive values are recommended for vintage lenses, negative values to create the effect of images taken with an antique lens or a pinhole camera.
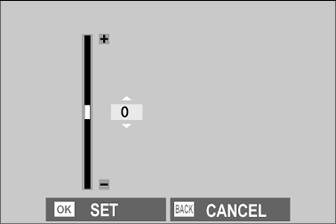
To determine the amount required, adjust peripheral illumination correction while taking photos of blue sky or a sheet of gray paper.
WIRELESS COMMUNICATION
Connect to smartphones running the latest version of the FUJIFILM Camera Remote app. The smartphone can then be used to:
Control the camera and take pictures remotely
Receive pictures uploaded from the camera
Browse the pictures on the camera and download selected pictures
Upload location data to the camera
For downloads and other information, visit:


