Adjust image quality settings.
The shooting menu is displayed when you press MENU/OK in shooting mode. Choose from tabs A, B, C, D, or E.
The options available vary with the shooting mode selected.
Enable touch digital zoom (a Touch Zoom).
Adjust settings for M-mount lenses connected using an optional FUJIFILM M MOUNT ADAPTER.
If the lens has a focal length of 21, 24, 28, or 35 mm, choose a matching option in the lMOUNT ADAPTOR SETTING menu.
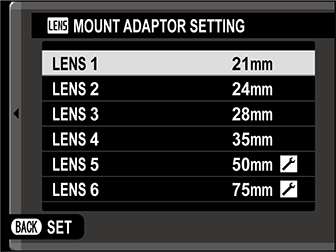
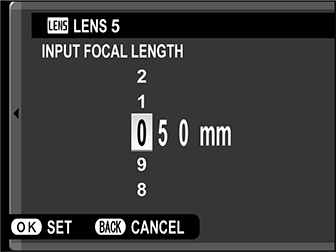
For other lenses, select option 5 or 6 to display the menu at right, press the selector right to display focal length settings, and use the selector to enter the focal length.
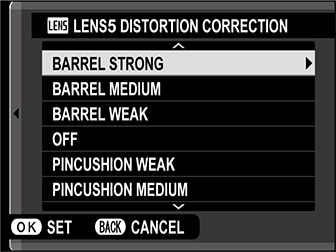
Choose from STRONG, MEDIUM, or WEAK options to correct BARREL or PINCUSHION distortion.
Color (shading) variations between the center and edges of the frame can be adjusted separately for each corner.
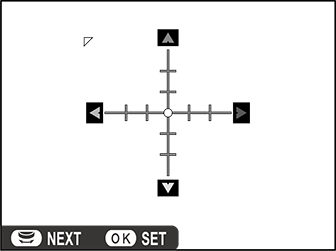
To use color shading correction, follow the steps below.
Rotate the sub-command dial to choose a corner. The selected corner is indicated by a triangle.
Use the selector to adjust shading until there is no visible difference in color between the selected corner and the center of the image. Press the selector left or right to adjust colors on the cyan–red axis. Press the selector up or down to adjust colors on the blue–yellow axis.
To determine the amount required, adjust color shading correction while taking photos of blue sky or a sheet of gray paper.
Choose from values between –5 and +5. Choosing positive values increases peripheral illumination, while choosing negative values reduces peripheral illumination. Positive values are recommended for vintage lenses, negative values to create the effect of images taken with an antique lens or a pinhole camera.

To determine the amount required, adjust peripheral illumination correction while taking photos of blue sky or a sheet of gray paper.
Choose ON to enable the shutter release when no lens is attached.
| Options | |
|---|---|
| ON | OFF |
Choose how focus is displayed in manual focus mode.
| Option | Description |
|---|---|
| STANDARD | Focus is displayed normally. |
| FOCUS PEAK HIGHLIGHT | The camera heightens high-contrast outlines. Choose a color and peaking level. |
Choose how the camera meters exposure.
The selected option will only take effect when FAF/MF SETTING > FACE/EYE DETECTION SETTING is FACE OFF/EYE OFF.
| Mode | Description |
|---|---|
| oMULTI | The camera instantly determines exposure based on an analysis of composition, color, and brightness distribution. Recommended in most situations. |
| pSPOT | The camera meters lighting conditions in an area at the center of the frame equivalent to 2% of the total. Recommended with backlit subjects and in other cases in which the background is much brighter or darker than the main subject. |
| qAVERAGE | Exposure is set to the average for the entire frame. Provides consistent exposure across multiple shots with the same lighting, and is particularly effective for landscapes and portraits of subjects dressed in black or white. |
Select ON to meter the current focus frame when SINGLE POINT is selected for FAF/MF SETTING > AF MODE and SPOT is selected for CPHOTOMETRY.
| Options | |
|---|---|
| ON | OFF |
Adjust flash settings.
Choose a flash mode.
| Mode | Description |
|---|---|
| AUTO FLASH KRED EYE REDUCTION* |
The flash fires when required. Recommended in most situations. |
| NFORCED FLASH LFORCED FLASH* |
The flash fires whenever a picture is taken. Use for backlit subjects or for natural coloration when shooting in bright light. |
| OSLOW SYNCHRO MRED EYE & SLOW* |
Capture both the main subject and the background under low light (note that brightly lit scenes may be overexposed). |
| l2ND CURTAIN SYNC. d2ND CURTAIN SYNC.* |
The flash fires immediately before the shutter closes. |
| DCOMMANDER | The built-in flash can be used to control optional remote flash units. |
| PSUPPRESSED FLASH | The flash does not fire even when the subject is poorly lit. A tripod is recommended. |
* Red-eye removal is available in these modes when Intelligent Face Detection is active and red-eye removal is on. Red-eye removal minimizes "red-eye" caused when light from the flash is reflected from the subject’s retinas.
Adjust flash brightness. Choose from values between +2 EV and –2 EV. Note that the desired results may not be achieved depending on shooting conditions and the distance to the subject.
| Options | ||||||||||||
|---|---|---|---|---|---|---|---|---|---|---|---|---|
| +2 | +1 2/3 | +1 1/3 | +1 | +2/3 | +1/3 | ±0 | -1/3 | -2/3 | -1 | -1 1/3 | -1 2/3 | -2 |
Choose ON to remove red-eye effects caused by the flash.
| Options | |
|---|---|
| ON | OFF |
Red-eye reduction is performed only when a face is detected.
Red-eye removal is not available with RAW images.
 .
.