Adjust image quality settings.
The shooting menu is displayed when you press MENU/OK in shooting mode. Choose from tabs A, B, C, D, or E.
The options available vary with the shooting mode selected.
Choose a scene for SP mode (a SP SCENE POSITION).
| Scene | Description |
|---|---|
| hPORTRAIT | Choose for portraits. |
| HNIGHT (TRIPOD) | Choose this mode for slow shutter speeds when shooting at night. |
| pFIREWORKS | Slow shutter speeds are used to capture the expanding burst of light from a firework. |
| QSUNSET | Choose this mode to record the vivid colors in sunrises and sunsets. |
| RSNOW | Choose for crisp, clear shots that capture the brightness of scenes dominated by shining white snow. |
| sBEACH | Choose for crisp, clear shots that capture the brightness of sunlit beaches. |
| UPARTY | Capture indoor background lighting under low-light conditions. |
| VFLOWER | Effective for taking more vivid shots of flowers. |
| WTEXT | Take clear pictures of text or drawings in print. |
| jMULTIPLE EXPOSURE | Create a photograph that combines two exposures (a Multiple Exposures). |
Choose an advanced filter for Adv. mode (a Advanced Filters).
| Filter | Description |
|---|---|
| G TOY CAMERA | Choose for a retro toy camera effect. |
| I POP COLOR | Create high-contrast images with saturated colors. |
| J HIGH-KEY | Create bright, low-contrast images. |
| Z LOW-KEY | Create uniformly dark tones with few areas of emphasized highlights. |
| E FISH-EYE | Create a distorting effect of a fisheye lens. |
| K DYNAMIC TONE | Dynamic tone expression is used for a fantasy effect. |
| i HDR ART | Create artistic effect by emphasizing tone reproduction and dynamic range. |
| H MINIATURE | The tops and bottoms of pictures are blurred for a diorama effect. |
| L CROSS SCREEN | Create a star pattern where lines radiate out from bright objects. The effects of the cross screen filter can be viewed after shooting. |
| n RICH&FINE | Add a rich & fine effect recommend for tabletop photography. |
| m MONOCHROME (NIR) | Monochrome photography as taken by Near-infrared camera. |
| u PARTIAL COLOR (RED) | Areas of the image that are the selected color are recorded in that color. All other areas of the image are recorded in black-and-white. |
| v PARTIAL COLOR (ORANGE) | |
| w PARTIAL COLOR (YELLOW) | |
| x PARTIAL COLOR (GREEN) | |
| y PARTIAL COLOR (BLUE) | |
| z PARTIAL COLOR (PURPLE) |
|
| j FOG REMOVE | Create clearer image by removing fog factor. |
| X SOFT FOCUS | Create a look that is evenly soft throughout the whole image. |
Adjust focus settings.
Choose the focus area for autofocus, manual focus, and focus zoom (a Focus-Point Selection).
Choose how the camera focuses (a Focus Mode).
| Mode | Description |
|---|---|
|
p MANUAL FOCUS |
Focus manually using the lens focus ring. Choose for manual control of focus or in situations in which the camera is unable to focus using autofocus (a Manual Focus). |
|
k CONTINUOUS AF |
Focus is continually adjusted to reflect changes in the distance to the subject while the shutter button is pressed halfway. Use for subjects that are in motion. Eye-detection AF is not available. |
|
l SINGLE AF |
Focus locks while the shutter button is pressed halfway. Choose for stationary subjects. |
Choose the AF mode for focus modes l and k (a Autofocus Options (AF Mode)).
Choose how the camera focuses in focus mode AF-S (l) or AF-C (k).
| Option | Description |
|---|---|
| RELEASE | Shutter response is prioritized over focus. Pictures can be taken when the camera is not in focus. |
| FOCUS | Focus is prioritized over shutter response. Pictures can be only taken when the camera is in focus. |
If ON is selected in focus mode l, focus can be adjusted manually by rotating the focus ring while the shutter button is pressed halfway.
| Options | |
|---|---|
| ON | OFF |
Lenses with a focus distance indicator must be set to manual focus mode (MF) before this option can be used. Selecting MF disables the focus distance indicator. Set the focus ring to the center of the focus distance indicator, as the camera may fail to focus if the ring is set to infinity or the minimum focus distance.
Focus peaking can be used to check focus. To enable focus peaking, select FOCUS PEAK HIGHLIGHT for cMF ASSIST.
AF+MF Focus Zoom
When ON is selected for ASCREEN SET-UP > FOCUS CHECK and SINGLE POINT selected for AF MODE, focus zoom can be used to zoom in on the selected focus area.
Intelligent Face Detection sets focus and exposure for human faces anywhere in the frame, preventing the camera from focusing on the background in group portraits. Choose for shots that emphasize portrait subjects. Faces can be detected with the camera in vertical or horizontal orientation; if a face is detected, it will be indicated by a green border. If there is more than one face in the frame, the camera will select the face closest to the center; other faces are indicated by white borders. You can also choose whether the camera detects and focuses on eyes when Intelligent Face Detection is on. Choose from the following options:
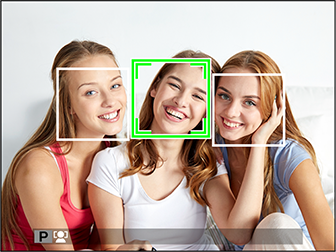
| Option | Description |
|---|---|
| FACE ON/EYE OFF | Intelligent Face Detection only. |
| FACE ON/EYE AUTO | The camera automatically chooses which eye to focus on when a face is detected. |
| FACE ON/RIGHT EYE PRIORITY | The camera focuses on the right eye of subjects detected using Intelligent Face Detection. |
| FACE ON/LEFT EYE PRIORITY | The camera focuses on the left eye of subjects detected using Intelligent Face Detection. |
| FACE OFF/EYE OFF | Intelligent Face Detection and eye priority off. |
In some modes, the camera may set exposure for the frame as a whole rather than the portrait subject.
If the subject moves as the shutter button is pressed, the face may not be in the area indicated by the green border when the picture is taken.
If the camera is unable to detect the subject’s eyes because they are hidden by hair, glasses, or other objects, the camera will instead focus on faces.
If ON is selected, the camera will continue to adjust focus even when the shutter button is not pressed halfway. Note that this increases the drain on the battery.
| Options | |
|---|---|
| ON | OFF |
If ON is selected, the AF-assist illuminator will light to assist autofocus.
| Options | |
|---|---|
| ON | OFF |
The AF-assist illuminator turns off automatically when OFF is selected for oSOUND & FLASH in the setup menu.
The camera may be unable to focus using the AF-assist illuminator in some cases. If the camera is unable to focus, try increasing the distance to the subject.
Avoid shining the AF-assist illuminator directly into your subject’s eyes.
Choose how the shutter button functions when e4K > f4K BURST is selected as the drive mode.
| Option | Description |
|---|---|
| WHEN PRESSING | Pictures are taken while the shutter button is pressed. |
| ON/OFF SWITCH | Shooting starts when the shutter button is pressed and ends when the button is pressed a second time. |
| PRE RECORD | The camera starts saving frames to a memory buffer when the shutter button is pressed halfway. When the shutter button is pressed the rest of the way down, the camera transfers the frames shot in the previous second to the memory card and continues shooting until the shutter button is released. |
Adjust the camera’s sensitivity to light.
| Option | Description |
|---|---|
|
AUTO1 AUTO2 AUTO3 |
Sensitivity is automatically adjusted in response to shooting conditions. Choose the base sensitivity, maximum sensitivity, and minimum shutter speed for AUTO1, AUTO2, and AUTO3. |
| 12800–200 | Adjust sensitivity manually. Selected value is shown in display. |
|
H (25600/51200), L (100) |
Choose for special situations. Note that mottling may appear in pictures taken at H, while L reduces dynamic range. |
Sensitivity is not reset when the camera is turned off.
If a RAW option is selected for image quality, pictures taken with L selected for NISO will be recorded at ISO 200, while those taken with H selected will be recorded at ISO 12800.
Adjusting Sensitivity
High values can be used to reduce blur when lighting is poor, while lower values allow slower shutter speeds or wider apertures in bright light; note, however, that mottling may appear in pictures taken at high sensitivities.
Choose the base sensitivity, maximum sensitivity, and minimum shutter speed for AUTO1, AUTO2, and AUTO3. Defaults are shown below.
| Item | Options | Default | ||
|---|---|---|---|---|
| AUTO1 | AUTO2 | AUTO3 | ||
| DEFAULT SENSITIVITY | 6400–200 | 200 | ||
| MAX. SENSITIVITY | 6400–400 | 800 | 1600 | 3200 |
| MIN. SHUTTER SPEED | 1⁄500–1/4 SEC, AUTO | AUTO | ||
The camera automatically chooses a sensitivity between the default and maximum values; sensitivity is only raised above the default value if the shutter speed required for optimal exposure would be slower than the value selected for MIN. SHUTTER SPEED.
If the value selected for DEFAULT SENSITIVITY is higher than that selected for MAX. SENSITIVITY, DEFAULT SENSITIVITY will be set to the value selected for MAX. SENSITIVITY.
The camera may select shutter speeds slower than MIN. SHUTTER SPEED if pictures would still be underexposed at the value selected for MAX. SENSITIVITY. If AUTO is selected for MIN. SHUTTER SPEED, the camera will automatically choose a minimum shutter speed approximately equal to the inverse of the lens’ focal length, in seconds (for example, if the lens has a focal length of 50 mm, the camera will choose a minimum shutter speed in the neighborhood of 1/50 s). The minimum shutter speed is not affected by the option selected for image stabilization.
Choose the size and aspect ratio at which still pictures are recorded.
| Option | Image size |
|---|---|
| O3 : 2 | 6000 × 4000 |
| P3 : 2 | 4240 × 2832 |
| Q3 : 2 | 3008 × 2000 |
| Option | Image size |
|---|---|
| O16 : 9 | 6000 × 3376 |
| P16 : 9 | 4240 × 2384 |
| Q16 : 9 | 3008 × 1688 |
| Option | Image size |
|---|---|
| O1 : 1 | 4000 × 4000 |
| P1 : 1 | 2832 × 2832 |
| Q1 : 1 | 2000 × 2000 |
IMAGE SIZE is not reset when the camera is turned off or another shooting mode is selected.
Aspect Ratio
Pictures with an aspect ratio of 3:2 have the same proportions as a frame of 35 mm film, while an aspect ratio of 16:9 is suited to display on High Definition (HD) devices. Pictures with an aspect ratio of 1:1 are square.
Selecting 1 : 1
To switch to an aspect ratio of 1 : 1 before taking pictures, simply press the control to which SQUARE MODE(1:1) is assigned (a Assigning a Role to the Function Buttons). Press the control again to restore the previously-selected aspect ratio.
| Current image size | Image size selected using control to which SQUARE MODE(1:1) is assigned |
|---|---|
| O3:2 or O16:9 | O1:1 |
| P3:2 or P16:9 | P1:1 |
| Q3:2 or Q16:9 | Q1:1 |
Choose a file format and compression ratio. Select FINE or NORMAL to record JPEG images, RAW to record RAW images, or FINE+RAW or NORMAL+RAW to record both JPEG and RAW images. FINE and FINE+RAW use lower JPEG compression ratios for higher-quality JPEG images, while NORMAL and NORMAL+RAW use higher JPEG compression ratios to increase the number of images that can be stored.
The Fn Button
To toggle RAW image quality on or off for a single shot, assign RAW to the Fn button (a Assigning Roles to the Function Buttons). If a JPEG option is currently selected for image quality, pressing the Fn button temporarily selects the equivalent JPEG+RAW option. If a JPEG+RAW option is currently selected, pressing the Fn button temporarily selects the equivalent JPEG option, while if RAW is selected, pressing the Fn button temporarily selects FINE. Taking a picture or pressing the Fn button again restores the previous setting.
Control contrast. Choose lower values to increase contrast when shooting indoors or under overcast skies, higher values to reduce loss of detail in highlights and shadows when photographing high-contrast scenes. Higher values are recommended for scenes that include both sunlight and deep shade, for such high-contrast subjects as sunlight on water, brightly-lit autumn leaves, and portraits taken against a blue sky, and for white objects or people wearing white; note, however, that mottling may appear in pictures taken at higher values.
| Options | |||
|---|---|---|---|
| AUTO | V100% | W200% | X400% |
If AUTO is selected, the camera will automatically choose either V100% or W200% according to the subject and shooting conditions. Shutter speed and aperture will be displayed when the shutter button is pressed halfway.
W200% is available at sensitivities of ISO 400 and above, X400% at sensitivities of ISO 800 and above.
 .
.