Adjust basic camera settings.
To access basic camera settings, press MENU/OK and select tab H.
Choose the roles played by camera controls.
Choose the roles played by the function buttons.
Select hBUTTON SETTING > FUNCTION (Fn) SETTING in the H (SET-UP 2) tab.
Highlight the desired control and press MENU/OK.
Highlight any of the following options and press MENU/OK to assign it to the selected control.
PREVIEW DEPTH OF FIELD
ISO
SELF-TIMER
IMAGE SIZE
SQUARE MODE(1:1)
IMAGE QUALITY
DYNAMIC RANGE
FILM SIMULATION
WHITE BALANCE
PHOTOMETRY
TOUCH ZOOM
AE BKT SETTING
AE LOCK
AF LOCK
AE/AF LOCK
INSTANT AF
AF MODE
FOCUS MODE
FOCUS AREA
RELEASE TYPE
FLASH MODE
FLASH COMPENSATION
MOVIE MODE
FACE/EYE DETECTION SETTING
RAW
WIRELESS COMMUNICATION
AUTO IMAGE TRANSFER
Bluetooth ON/OFF
SHUTTER TYPE
PREVIEW EXP. IN MANUAL MODE
PREVIEW PIC. EFFECT
NONE
To disable the Fn button, choose NONE.
The FUNCTION (Fn) SETTING menu can also be displayed by pressing and holding the Fn or DISP/BACK button.
Choose the items displayed in the quick menu.
Select hBUTTON SETTING > EDIT/SAVE QUICK MENU in the H (SET-UP 2) tab.
The current quick menu will be displayed; use the selector to highlight the item you wish to change and press MENU/OK.
Highlight any of the following options and press MENU/OK to assign it to the selected position.
ISO
DYNAMIC RANGE
WHITE BALANCE
NOISE REDUCTION
IMAGE SIZE
IMAGE QUALITY
FILM SIMULATION
HIGHLIGHT TONE
SHADOW TONE
COLOR
SHARPNESS
SELF-TIMER
FACE/EYE DETECTION SETTING
PHOTOMETRY
AF MODE
FOCUS MODE
FLASH MODE
FLASH COMPENSATION
IS MODE
MF ASSIST
MOVIE MODE
MOVIE ISO
MIC LEVEL ADJUSTMENT
SOUND & FLASH
LCD BRIGHTNESS
LCD COLOR
SHUTTER TYPE
NONE
Select NONE to assign no option to the selected position.
The quick menu can also be accessed in shooting mode by holding the Q button.
Choose the direction in which the focus ring is rotated to increase the focus distance.
| Options | |
|---|---|
| XCW (clockwise) | YCCW (counterclockwise) |
Enable or disable touch-screen controls.
| Options | |
|---|---|
| ON | OFF |
Adjust power management settings.
Choose the length of time before the camera turns off automatically when no operations are performed. Shorter times increase battery life; if OFF is selected, the camera must be turned off manually.
| Options | ||
|---|---|---|
| 5 MIN | 2 MIN | OFF |
Select ON for faster focus and to reduce the time needed to restart the camera after it has been turned off.
| Options | |
|---|---|
| ON | OFF |
Remove dust from the camera image sensor.
Dust that cannot be removed using sensor cleaning can be removed manually.
Adjust file management settings.
New pictures are stored in image files named using a four-digit file number assigned by adding one to the last file number used. The file number is displayed during playback as shown. FRAME NO. controls whether file numbering is reset to 0001 when a new memory card is inserted or the current memory card is formatted.
Frame number
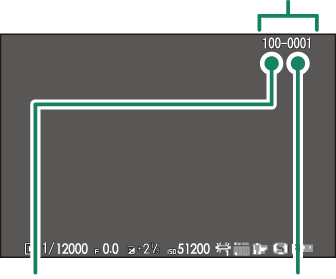
| Directory number | File number |
| Option | Description |
|---|---|
| CONTINUOUS | Numbering continues from the last file number used or the first available file number, whichever is higher. Choose this option to reduce the number of pictures with duplicate file names. |
| RENEW | Numbering is reset to 0001 after formatting or when a new memory card is inserted. |
If the frame number reaches 999-9999, the shutter release will be disabled. Format the memory card after transferring to a computer any pictures you wish to keep.
Selecting RRESET sets FRAME NO. to CONTINUOUS but does not reset the file number.
Frame numbers for pictures taken with other cameras may differ.
Choose ON to save unprocessed copies of pictures taken using pFLASH SET-UP > RED EYE REMOVAL.
| Options | |
|---|---|
| ON | OFF |
Change the file name prefix. sRGB images use a four-letter prefix (default “DSCF”), Adobe RGB images a three-letter prefix (“DSF”) preceded by an underscore.
| Option | Default prefix | Sample file name |
|---|---|---|
| sRGB | DSCF | ABCD0001 |
| AdobeRGB | _DSF | _ABC0001 |
Stamp the time and/or date of recording on photographs as they are taken.
| Option | Description |
|---|---|
| R+S | Stamp new photographs with the date and time of recording. |
| R | Stamp new photographs with the date of recording. |
| OFF | Do not stamp the time and date on new photographs. |
Time and date stamps cannot be deleted. Turn DATE STAMP off to prevent time and date stamps appearing on new photographs.
If the camera clock is not set, you will be prompted to set the clock to the current date and time.
We recommend that you turn the DPOF “print date” option off when printing images with a time and date stamp.
Time and date stamps do not appear on movies or RAW images or on shots taken using 4K burst or multi-focus.
Choose the gamut of colors available for color reproduction.
| Option | Description |
|---|---|
| sRGB | Recommended in most situations. |
| Adobe RGB | For commercial printing. |
 .
.