
 .
.SCREEN SETTING
Make changes to display settings.
To access display settings, press MENU/OK, select the D (SET UP) tab, and choose SCREEN SET-UP.
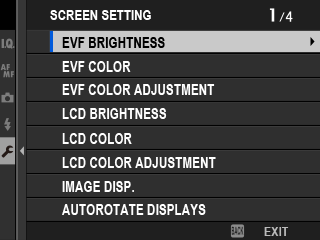
EVF BRIGHTNESS
Adjust the brightness of the display in the electronic viewfinder.
| Option | Description |
|---|---|
| AUTO | Automatic brightness adjustment. |
| MANUAL | Adjust brightness manually; choose from options between −7 and +5. |
EVF COLOR
Adjust the saturation of the display in the electronic viewfinder.
| Options | ||||||||||
|---|---|---|---|---|---|---|---|---|---|---|
| -5 | -4 | -3 | -2 | -1 | 0 | +1 | +2 | +3 | +4 | +5 |
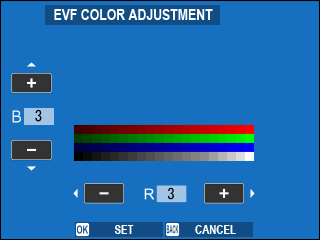
EVF COLOR ADJUSTMENT
Adjust the color of the display in the electronic viewfinder.
-
Adjust colors using the focus stick (focus lever).
-
Press MENU/OK.
LCD BRIGHTNESS
Adjust monitor brightness.
| Options | ||||||||||
|---|---|---|---|---|---|---|---|---|---|---|
| -5 | -4 | -3 | -2 | -1 | 0 | +1 | +2 | +3 | +4 | +5 |
LCD COLOR
Adjust monitor saturation.
| Options | ||||||||||
|---|---|---|---|---|---|---|---|---|---|---|
| -5 | -4 | -3 | -2 | -1 | 0 | +1 | +2 | +3 | +4 | +5 |
LCD COLOR ADJUSTMENT
Adjust the color of the display in the LCD monitor.
-
Adjust colors using the focus stick (focus lever).
-
Press MENU/OK.
IMAGE DISP.
Choose how long images are displayed after shooting.
| Option | Description |
|---|---|
| CONTINUOUS | Pictures are displayed until the MENU/OK button is pressed or the shutter button is pressed halfway. To zoom in on the active focus point, press the center of the rear command dial; press again to cancel zoom. |
| 1.5 SEC/0.5 SEC | Pictures are displayed for the selected time or until the shutter button is pressed halfway. |
| OFF | Pictures are not displayed after shooting. |
Colors may differ slightly from those in the final image.
“Noise” mottling may be visible at high sensitivities.
AUTOROTATE DISPLAYS
Choose whether the indicators in the viewfinder and LCD monitor rotate to match camera orientation.
| Options | |
|---|---|
| ON | OFF |
PREVIEW EXP./WB IN MANUAL MODE
Choose whether to enable exposure and/or white balance preview in manual exposure mode.
| Option | Description |
|---|---|
| PREVIEW EXP./WB | Enable exposure and white balance preview. |
| PREVIEW WB | Preview white balance only. Choose this option in situations in which exposure and white balance are likely to change during shooting, as may be the case when you use a flash with an incandescent monitoring lamp. |
| OFF | Disable exposure and white balance preview. Choose this option when using a flash or on other occasions on which exposure may change when the picture is taken. |
NATURAL LIVE VIEW
Choose whether the effects of film simulation, white balance, and other settings are visible in the monitor.
| Option | Description |
|---|---|
| ON | The effects of camera settings are not visible in the monitor, but shadows in low-contrast, back-lit scenes and other hard-to-see subjects more visible. Colors and tone will differ from those in the final picture. The display will however be adjusted to show the effects of monochrome and sepia settings. |
| OFF | The effects of film simulation, white balance, and other settings can be previewed in the monitor. |
F-Log VIEW ASSIST
Select ON to display a tone-corrected preview (equivalent to BT.709) when recording or viewing F-log movies.
| Options | |
|---|---|
| ON | OFF |
FRAMING GUIDELINE
Choose a framing grid for shooting mode.
| Option | |||
|---|---|---|---|
| F GRID 9 |
G GRID 24 |
H HD FRAMING |
|
| Display | |||
| For “rule of thirds” composition. | A six-by-four grid. | Frame HD pictures in the crop shown by the lines at the top and bottom of the display. | |
Framing guides are not shown at default settings but can be displayed using DSCREEN SET-UP > DISP. CUSTOM SETTING (aCustomizing the Standard Display).
AUTOROTATE PB
Choose ON to automatically rotate “tall” (portrait-orientation) pictures during playback.
| Options | |
|---|---|
| ON | OFF |
PLAYBACK MAGNIFICATION
Choose the zoom ratio selected when the center of the rear command dial is pressed during playback.
| Option | Description |
|---|---|
| 2x (FROM CENTER) |
View the center area of the picture at the selected zoom ratio. Regardless of the setting selected, pictures will not be displayed at greater than actual size. |
| 4x (FROM CENTER) |
|
| 8x (FROM CENTER) |
|
| ACTUAL SIZE (FROM FOCUS POINT) |
View the picture at a zoom ratio of 100%, centered on the focus area. |
| PREVIOUS MAG. (FROM CENTER) |
Display each picture at the same zoom ratio as the previous picture, starting at the center of the image. Pictures will not, however, be displayed at greater than actual size. |
FOCUS SCALE UNITS
Choose the units used for the focus distance indicator.
| Options | |
|---|---|
| METERS | FEET |
DUAL DISPLAY SETTING
Choose the content of the two windows in the dual display.
| Option | Description |
|---|---|
| R:FOCUS L:FRAME | The right (small) window shows a close-up of the focus area, while the left (large) window shows the entire frame. |
| R:FRAME L:FOCUS | The right (small) window shows the entire frame, while the left (large) window shows a close-up of the focus area. |
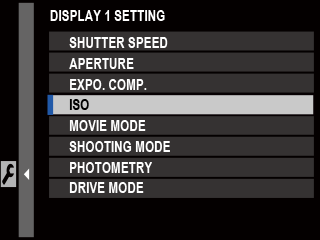
DISP. CUSTOM SETTING
Choose the items shown in the standard indicator display (aCustomizing the Standard Display).
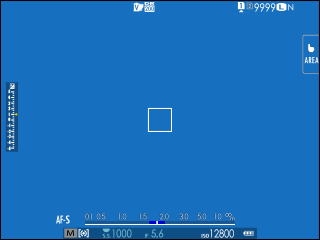
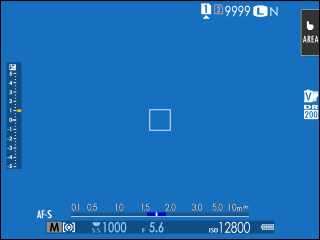
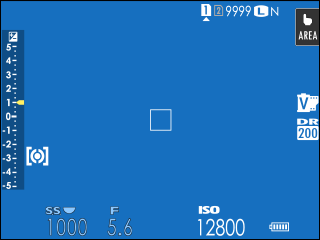
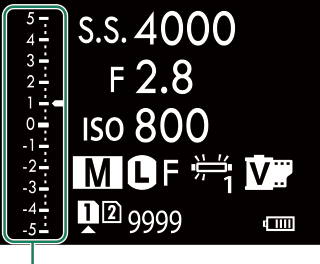
LARGE INDICATORS MODE(EVF)
Select ON to display large indicators in the electronic viewfinder. The indicators displayed can be selected using DSCREEN SET-UP > LARGE INDICATORS DISP. SETTING.
OFF
ON

Some icons are not displayed when ON is selected for LARGE INDICATORS MODE(EVF) (aThe Electronic Viewfinder).
If LARGE INDICATORS MODE is assigned to a function button, the button can be used to toggle LARGE INDICATORS MODE on (ON) and off (OFF) (aFunction Controls).
LARGE INDICATORS MODE(LCD)
Select ON to display large indicators in the LCD monitor. The indicators displayed can be selected using DSCREEN SET-UP > LARGE INDICATORS DISP. SETTING.
OFF
ON
Some icons are not displayed when ON is selected for LARGE INDICATORS MODE(LCD) (aThe LCD Monitor).
If LARGE INDICATORS MODE is assigned to a function button, the button can be used to toggle LARGE INDICATORS MODE on (ON) and off (OFF) (aFunction Controls).
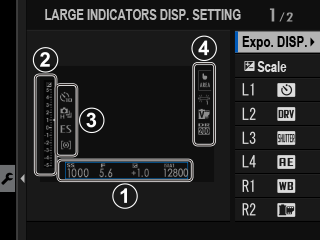
LARGE INDICATORS DISP. SETTING
Choose the indicators displayed when ON is selected for D SCREEN SET-UP > LARGE INDICATORS MODE(EVF) or LARGE INDICATORS MODE(LCD).
| Option | Description |
|---|---|
|
AExpo. DISP. |
Choose the items listed at the bottom of the display. Selected items are indicated by check marks (R); to deselect, highlight the check marks and press MENU/OK. |
|
Bd Scale |
Select ON to display the exposure indicator. |
|
CL1, L2, L3, L4 |
Choose up to four large icons for display on the left side of the screen. |
|
DR1, R2, R3, R4 |
Choose up to four large icons for display on the right side of the screen. |
INFORMATION CONTRAST ADJ.
Adjust display contrast.
| Option | Description |
|---|---|
| HIGH CONTRAST | High contrast. |
| STANDARD | Normal contrast. |
| LOW CONTRAST | Low contrast. |
| DARK AMBIENT LIGHTING | Contrast adjusted for dim ambient lighting. |
LOCATION INFO
Select ON to display location info downloaded from a smartphone.
| Options | |
|---|---|
| ON | OFF |
SUB MONITOR SETTING
Choose the indicators displayed in the secondary LCD monitor. Separate displays are available for still photography and movie recording. Choose from the following:
| Option | Description |
|---|---|
| INFORMATION | Display camera settings. You can choose the settings displayed. |
| DIALS | Display dials showing ISO sensitivity and shutter speed. |
| HISTOGRAM | Display a histogram. |
You can switch between displays by pressing the secondary LCD monitor mode button.
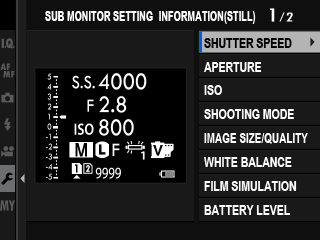
The INFORMATION Display
Follow the steps below to choose the indicators shown in the INFORMATION display.
-
Select D SCREEN SET-UP > SUB MONITOR SETTING in the setup menu.
-
Highlight STILL MODE or MOVIE MODE and press MENU/OK.
-
Highlight INFORMATION and press MENU/OK.

-
Highlight the indicator you wish to change and press MENU/OK.
-
Highlight the indicator you wish to display and press MENU/OK.
Choose from:
- SHUTTER SPEED
- APERTURE
- EXPO. COMP.
- ISO
- MOVIE MODE
- SHOOTING MODE
- PHOTOMETRY
- DRIVE MODE
- FOCUS MODE
- WHITE BALANCE
- IMAGE SIZE/QUALITY
- SHUTTER TYPE
- FILM SIMULATION
- DYNAMIC RANGE
- 35mm FORMAT MODE
- BOOST MODE
- DUAL IS MODE
- SELF-TIMER
- NONE
-
Repeat Steps 4 and 5 to change additional indicators.
The d Scale indicator can only be enabled or disabled.
d Scale
SUB MONITOR BACKGROUND COLOR
Adjusting the background color of the secondary LCD monitor according to lighting conditions makes the display easier to read.
| Option | Description |
|---|---|
| BLACK | Recommended for use with dark ambient lighting. |
| WHITE | Recommended for use with bright ambient lighting. |
The background is displayed in white when the secondary LCD monitor backlight is on.
xQ MENU BACKGROUND
Choose the background color used for the quick menu when it is displayed during still photography.
| Options | |
|---|---|
| TRANSPARENT | BLACK |
FQ MENU BACKGROUND
Choose the background color used for the quick menu when it is displayed during movie recording.
| Options | |
|---|---|
| TRANSPARENT | BLACK |
