.
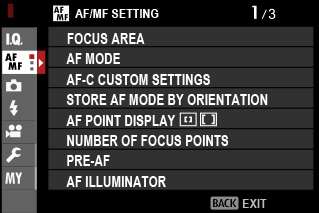
.The Shooting Menus ([AF/MF SETTING])
Adjust focus settings.
To display focus settings, press [MENU/OK] in the shooting display and select the G[(AF/MF SETTING)] tab.
The options available vary with the shooting mode selected.
[FOCUS AREA]
Choose the focus area for autofocus, manual focus, and focus zoom.
[AF MODE]
Choose the AF mode for focus modes [S] and [C].
| Option | Description |
|---|---|
|
r [SINGLE POINT] |
The camera focuses on the subject in the selected focus point. The number of focus points available can be selected using G[AF/MF SETTING] > [NUMBER OF FOCUS POINTS]. Use for pin-point focus on a selected subject. |
|
y [ZONE] |
The camera focuses on the subject in the selected focus zone. Focus zones include multiple focus points, making it easier to focus on subjects that are in motion. |
|
z [WIDE/ |
The camera may be unable to focus on small objects or subjects that are moving rapidly. |
|
j [ALL] |
Rotate the rear command dial in the focus-point selection display (aSelecting a Focus Point、The Focus-Point Display) to cycle through AF modes in the following order: r[SINGLE POINT], y[ZONE], and z[WIDE/TRACKING]. |
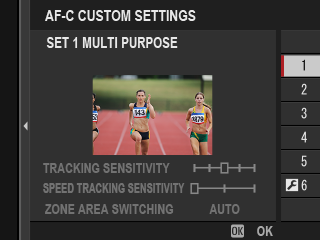
[AF-C CUSTOM SETTINGS]
Select focus-tracking options for focus mode [C]. Choose from Sets 1–5 according to your subject or select Set 6 for custom focus-tracking options.
| Option | Description |
|---|---|
| [SET 1 MULTI PURPOSE] | A standard tracking option that works well with the typical range of moving subjects. |
| [SET 2 IGNORE OBSTACLES & CONTINUE TO TRACK SUBJECT] | The focus system attempts to track the chosen subject. Choose with subjects that are hard to keep in the focus area or if other objects are likely to enter the focus area with the subject. |
| [SET 3 FOR ACCELERATING/DECELERATING SUBJECT] | The focus system attempts to compensate for subject acceleration or deceleration. Choose for subjects prone to rapid changes in velocity. |
| [SET 4 FOR SUDDENLY APPEARING SUBJECT] | The focus system attempts to focus quickly on subjects entering the focus area. Choose for subjects that appear abruptly or when rapidly switching subjects. |
| [SET 5 FOR ERRATICALLY MOVING & ACCEL./DECEL. SUBJECT] | Choose for hard-to-track subjects prone not only to sudden changes in velocity but also to large movements front to back and left to right. |
| [SET 6 CUSTOM] | Adjust [TRACKING SENSITIVITY], [SPEED TRACKING SENSITIVITY], and [ZONE AREA SWITCHING] to suit your preferences based on the values for Sets 1–5 (aFocus Tracking Options, Custom Focus Tracking Options). |
Focus Tracking Options
The individual parameters that are part of a focus tracking set are described below.
[TRACKING SENSITIVITY]
This parameter determines how long the camera waits to switch focus when an object enters the focus area behind or in front of the current subject. The higher the value, the longer the camera will wait.
![]()
| Options | ||||
|---|---|---|---|---|
| [0] | [1] | [2] | [3] | [4] |
The higher the value, the longer it takes the camera to refocus when you attempt to switch subjects.
The lower the value, the more likely the camera is to switch focus from your subject to other objects in the focus area.
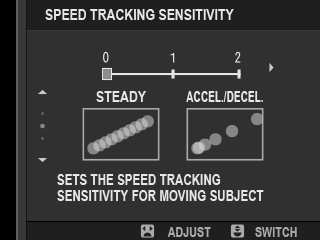
[SPEED TRACKING SENSITIVITY]
This parameter determines how sensitive the tracking system is to changes in subject velocity. The higher the value, the greater the precision with which the system attempts to respond to sudden movement.
| Options | ||
|---|---|---|
| [0] | [1] | [2] |
The higher the value, the more difficulty the camera will have focusing in situations in which autofocus does not perform well, such as when the subject is highly reflective or low in contrast.
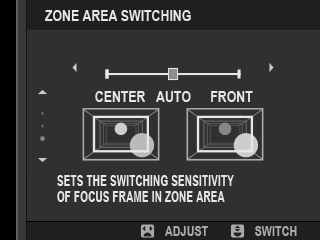
[ZONE AREA SWITCHING]
This parameter determines the focus area given priority in zone AF.
| Option | Description |
|---|---|
| [FRONT] | Zone AF assigns priority to the subjects closest to the camera. |
| [AUTO] | The camera locks focus on the subject at the center of the zone and then switches focus areas as necessary to track it. |
| [CENTER] | Zone AF assigns priority to subjects in the center of the zone. |
This option takes effect only when y[ZONE] is selected for AF mode.
Set Values
Parameter values for the different sets are listed below.
| [TRACKING SENSITIVITY] | [SPEED TRACKING SENSITIVITY] | [ZONE AREA SWITCHING] | |
|---|---|---|---|
| [SET 1] | [2] | [0] | [AUTO] |
| [SET 2] | [3] | [0] | [CENTER] |
| [SET 3] | [2] | [2] | [AUTO] |
| [SET 4] | [0] | [1] | [FRONT] |
| [SET 5] | [3] | [2] | [AUTO] |
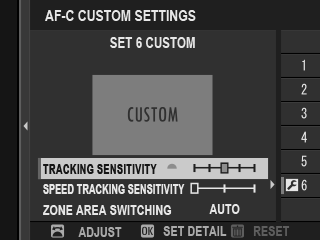
Custom Focus Tracking Options
Follow the steps below to adjust settings for Set 6.
-
Select [AF-C CUSTOM SETTINGS] > [SET 6 CUSTOM].
-
Highlight items using the focus stick (focus lever) and rotate the front command dial to change. To reset settings to their original values, press the [DRIVE/DELETE] button.
-
Press [DISP/BACK] when settings are complete.
[STORE AF MODE BY ORIENTATION]
Choose whether the focus mode and focus area used when the camera is in portrait orientation are stored separately from those used when the camera is in landscape orientation.
| Option | Description |
|---|---|
| [OFF] | The same settings are used in both orientations. |
| [FOCUS AREA ONLY] | The focus area for each orientation can be selected separately. |
| [ON] | The focus mode and focus area can be selected separately. |
[AF POINT DISPLAY]yz
Choose whether individual focus frames are displayed when [ZONE] or [WIDE/TRACKING] is selected for G[AF/MF SETTING] > [AF MODE].
| Options | |
|---|---|
| [ON] | [OFF] |
[NUMBER OF FOCUS POINTS]
Choose the number of focus points available for focus-point selection in manual focus mode or when [SINGLE POINT] is selected for [AF MODE].
| Option | Description |
|---|---|
| [117 POINTS (9 × 13)] | Choose from 117 focus points arranged in a 9- by 13-point grid. |
| [425 POINTS (17 × 25)] | Choose from 425 focus points arranged in a 17- by 25-point grid. |
[PRE-AF]
If [ON] is selected, the camera will continue to adjust focus even when the shutter button is not pressed halfway. The camera adjusts focus continuously, allowing it to focus faster when the shutter button is pressed halfway. Choosing this option helps prevent missed shots.
| Options | |
|---|---|
| [ON] | [OFF] |
Choosing [ON] increases the drain on the battery.
[AF ILLUMINATOR]
If [ON] is selected, the AF-assist illuminator will light to assist autofocus.
| Options | |
|---|---|
| [ON] | [OFF] |
The camera may be unable to focus using the AF-assist illuminator in some cases.
If the camera is unable to focus, try increasing the distance to the subject.
Avoid shining the AF-assist illuminator directly into your subject’s eyes.
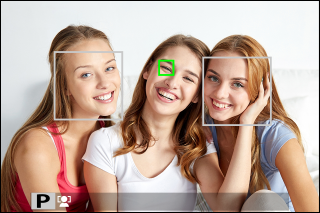
[FACE/EYE DETECTION SETTING]
Intelligent Face Detection sets focus and exposure for human faces anywhere in the frame, preventing the camera from focusing on the background in group portraits. Choose for shots that emphasize portrait subjects. You can also choose whether the camera detects and focuses on either the left or right eye when Intelligent Face Detection is on.
| Option | Description |
|---|---|
| [FACE DETECTION ON] |
Adjust settings for Intelligent Face Detection. You can also adjust eye detection settings.
|
| [OFF] | Intelligent Face Detection and eye priority off. |
If the subject moves as the shutter button is pressed, the face may not be in the area indicated by the green border when the picture is taken.
In some modes, the camera may set exposure for the frame as a whole rather than the portrait subject.
The face selected by the camera is indicated by a green border. Any other faces detected by the camera are indicated by gray borders. To have the camera focus on a different subject, tap inside the gray border. The g icon will change from white to green.
You can also switch subjects by pressing the function button to which n[FACE SELECT] op is assigned and then using the focus stick (focus lever) or (during viewfinder photography) touch controls (an [FACE SELECT] op).
To switch from face detection to manual focus-area selection, press the center of the focus stick (focus lever). Press again to re-enable face detection.
If the selected subject leaves the frame, the camera will wait a set time for its return and consequently the green frame may sometimes appear in locations where no face is seen.
You cannot switch subjects during burst photography.
Depending on shooting conditions, face selection may be suspended at the close of burst shooting.
Faces can be detected with the camera in vertical or horizontal orientation.
If the camera is unable to detect the subject’s eyes because they are hidden by hair, glasses, or other objects, the camera will instead focus on faces.
Face/eye detection options can also be accessed via shortcuts (aShortcut Options).
[AF+MF]
If [ON] is selected in focus mode S and focus has been locked (whether by pressing the shutter button halfway or by other means), focus lock can be ended and focus adjusted manually by rotating the focus ring.
| Options | |
|---|---|
| [ON] | [OFF] |
[STANDARD] and [FOCUS PEAK HIGHLIGHT] MF assist options can be selected using [MF ASSIST].
AF + MF Focus Zoom
When [ON] is selected for G[AF/MF SETTING] > [FOCUS CHECK] and [SINGLE POINT] selected for [AF MODE], focus zoom can be used to zoom in on the selected focus area. The zoom ratio can be selected using the rear command dial.
[MF ASSIST]
Choose how focus is displayed in manual focus mode.
| Option | Description |
|---|---|
| [STANDARD] | Focus is displayed normally (focus peaking, digital split image, and digital microprism are not available). |
| [DIGITAL SPLIT IMAGE] | Displays a black-and-white ([MONOCHROME]) or color ([COLOR]) split image in the center of the frame. Frame the subject in the split-image area and rotate the focus ring until the four parts of the split image are correctly aligned. |
| [DIGITAL MICROPRISM] | A grid pattern that emphasizes blur is displayed when the subject is out of focus, disappearing to be replaced by a sharp image when the subject is in focus. |
| [FOCUS PEAK HIGHLIGHT] | The camera heightens high-contrast outlines. Choose a color and peaking level. |
You can also choose MF assist options by holding the center of the rear command dial.
FOCUS CHECK
If [ON] is selected, the display will automatically zoom in on the selected focus area when the focus ring is rotated in manual focus mode.
| Options | |
|---|---|
| [ON] | [OFF] |
Pressing the center of the rear command dial cancels focus zoom.
The zoom position is centered on the current focus area and changes when the focus area is changed.
[INTERLOCK SPOT AE & FOCUS AREA]
Select [ON] to meter the current focus frame in focus mode [S] or [C].
| Options | |
|---|---|
| [ON] | [OFF] |
[INSTANT AF SETTING]
Choose whether the camera focuses using single AF ([AF‑S]) or continuous AF ([AF‑C]) when a button to which focus lock or [AF-ON] is assigned is pressed in manual focus mode.
| Options | |
|---|---|
| [AF‑S] | [AF‑C] |
[DEPTH-OF-FIELD SCALE]
Choose [FILM FORMAT BASIS] to help you make practical assessments of depth of field for pictures that will be viewed as prints and the like, [PIXEL BASIS] to help you assess depth of field for pictures that will be viewed at high resolutions on computers or other electronic displays.
| Options | |
|---|---|
| [PIXEL BASIS] | [FILM FORMAT BASIS] |
[RELEASE/FOCUS PRIORITY]
Choose how the camera focuses in focus mode [AF-S] or [AF-C].
| Option | Description |
|---|---|
| [RELEASE] | Shutter response is prioritized over focus. Pictures can be taken when the camera is not in focus. |
| [FOCUS] | Focus is prioritized over shutter response. Pictures can be only taken when the camera is in focus. |
[AF RANGE LIMITER]
Limit the range of available focus distances for increased focus speed.
| Option | Description |
|---|---|
| [OFF] | Focus limiter disabled. |
| [CUSTOM] |
Limit focus to a range of distances defined by a minimum and maximum.
|
| [PRESET1] | Limit focus to a preset range. |
| [PRESET2] |
The values listed and displayed for the focus limiter may differ from the actual focus distance.
The following additional operations can be performed when [CUSTOM] is selected:
- You can tap objects in the touch screen display to choose the focus range.
- Instead of tapping an object in the display, you set the maximum focus distance to infinity by rotating the focus ring.
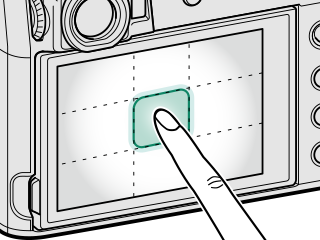
[TOUCH SCREEN MODE]
Choose the shooting operations performed using touch controls.
Still Photography
| Mode | Description | |
|---|---|---|
 |
[TOUCH SHOOTING] | Tap your subject in the display to focus and release the shutter. In burst mode, pictures will be taken while you keep your finger on the display. |
|
|
[AF]
[AF OFF] |
|
 |
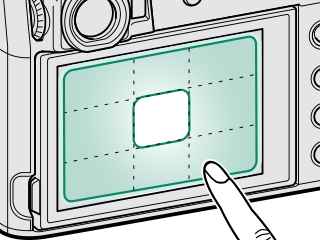
[AREA] | Tap to select a point for focus or zoom. The focus frame will move to the selected point. |
 |
[OFF] | Touch controls disabled. |

[Movie Recording]
| Mode | Description | |
|---|---|---|
|
[TOUCH SHOOTING] | Instead of pressing the shutter button, you can tap your subject in the display to focus and start recording. During recording, you can tap the display to focus as described below. To end recording, press the shutter button. |
 |
[AF] |
Tapping the display focuses the camera on the selected point. Use the shutter button to start and stop recording.
|
|
[AREA] |
Tap to position the focus area. Use the shutter button to start and stop recording.
|
|
[OFF] |
Touch controls disabled. |
To disable touch controls and hide the touch screen mode indicator, select OFF for D[BUTTON/DIAL SETTING] > [TOUCH SCREEN SETTING] > x [TOUCH SCREEN SETTING].
Touch Controls for Focus Zoom
Different touch controls are used during focus zoom (focus check enabled).
Central Area
Tapping the center of the display performs the operations below.
| Mode | Still Photography | Movie Recording |
|---|---|---|
| [TOUCH SHOOTING] | [AF-S/MF]: Take a picture | [AF-S]:AF |
| [MF]: Instant AF | ||
| [AF] | [AF-S]:AF | [AF-S]:AF |
| [MF]: Instant AF | [MF]: Instant AF | |
| [AREA] | [AF-S]:AF | [AF-S]:AF |
| [MF]: Instant AF | [MF]: Instant AF | |
| [OFF] | [AF-S/MF]:OFF | [AF-S/MF]:OFF |
Other Areas
Tapping other areas simply scrolls the display, whether during still photography or movie recording and regardless of the option selected for touch screen mode.
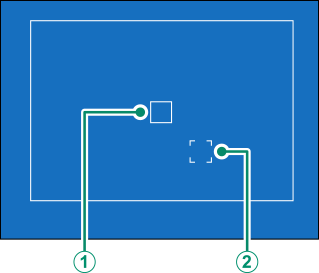
CORRECTED AF FRAME
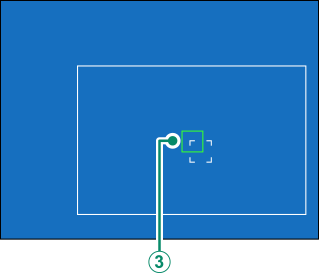
View a guide to the actual focus position when framing shots in the OVF with the subject close to the camera. When [ON] is selected, the camera will display the focus position for objects approximately 50 cm from the camera (B) in addition to the standard AF frame (A). Pressing the shutter button halfway displays a green AF frame (C) at the actual focus position.
Normal display
Display when shutter button is pressed halfway
| Options | |
|---|---|
| [ON] | [OFF] |
The guide will not be displayed when the camera focuses at distances of less than 50 cm.
You can temporarily select [OFF] for the guide display by pressing the center of the focus stick (focus lever).