.
.BThe Shooting Menus ([MOVIE SETTING])
Adjust movie-recording options.
To display options for movie recording, press [MENU]/[OK] in the shooting display and select the B ([MOVIE SETTING]) tab.

The options available vary with the shooting mode selected.
- F[AF-C CUSTOM SETTING]
- F[FACE/EYE DETECTION SETTING]
- F[MF ASSIST]
- F[FOCUS CHECK]
- [HDMI OUTPUT INFO DISPLAY]
- [4K MOVIE OUTPUT]
- [FULL HD MOVIE OUTPUT]
- [4K HDMI STANDBY QUALITY]
- [HDMI REC CONTROL]
- [ZEBRA SETTING]
- [ZEBRA LEVEL]
- [AUDIO SETTING]
- [MIC/REMOTE RELEASE]
- [TIME CODE SETTING]
- [TALLY LIGHT]
- [MOVIE SILENT CONTROL]
[MOVIE MODE]
Before shooting movies, choose the frame rate, bit rate, and frame size and aspect ratio.

-
In the shooting menu, select B[MOVIE SETTING], then highlight [MOVIE MODE] and press [MENU]/[OK].
-
Press the focus stick (focus lever) up or down to highlight the desired frame size and aspect ratio (A) and press the stick right.
- Choose V[16:9] or d[17:9] for 4K movies with aspect ratios of 16 or 17 to 9.
- Choose W[16:9] or W[17:9] for Full HD movies with aspect ratios of 16 or 17 to 9.
-
Press the focus stick (focus lever) up or down to highlight a frame rate (B) and press the stick right.
Options [59.94P] [50P] [29.97P] [25P] [24P] [23.98P] -
Press the focus stick up or down to highlight a bit rate (C) and press [MENU]/[OK].
Options [200Mbps] [100Mbps] [50Mbps]
The choice of frame and bit rates varies with the movie mode.
[FULL HD HIGH SPEED REC]
Record high-frame-rate Full HD movies. High-frame-rate movies can be played back in slow motion, giving you time to view fast-moving subjects or details too fleeting for the naked eye.
| Option | Description |
|---|---|
| [2xa59.94P] F[120P] |
Record Full HD footage at frame rates of 120 or 100 fps. The movies play back at 1/2, 1/4, or 1/5 speed. Maximum recording length is 6 minutes. The footage recorded to the memory card is compressed with the goal of keeping the amount of data recorded to 200 Mb per second. |
| [2xa50P] F[100P] |
|
| [4xa29.97P] F[120P] |
|
| [4xa25P] F[100P] |
|
| [5xa24P] F[120P] |
|
| [5xa23.98P] F[120P] |
|
| [OFF] | High-speed recording off. |
High-speed movies are recorded with no sound.
F[FILM SIMULATION]
Choose a film simulation effect for movie recording.
| Option | Description |
|---|---|
| c [PROVIA/ STANDARD] |
See “[FILM SIMULATION]”. |
| d[Velvia/VIVID] | |
| e[ASTIA/ SOFT] |
|
| i[CLASSIC CHROME] | |
| g[PRO Neg. Hi] | |
| h[PRO Neg. Std] | |
| X[ETERNA/CINEMA] | |
| a[ACROS] | |
| b[MONOCHROME] | |
| f[SEPIA] |
F[B & W ADJ.ab (Warm/Cool)]
Add a reddish or bluish tinge (warm or cool color cast) to monochrome pictures taken with the a[ACROS] or b[MONOCHROME] film simulation.
| Option | Description |
|---|---|
| [+9] — [+1] | Higher positive values equate to a redder color cast. |
| [0] | Normal monochrome (grayscale). |
| [-1] — [-9] | Lower negative values equate to a bluer color cast. |
F[WHITE BALANCE]
Adjust white balance for movie recording.
| Option | Description |
|---|---|
| [AUTO] | See “[WHITE BALANCE]”. |
| k/l/m | |
| k | |
| i | |
| j | |
| k | |
| l | |
| m | |
| n | |
| g |
F[DYNAMIC RANGE]
Choose a dynamic range for movie recording.
| Option | Description |
|---|---|
| V[100%] | See “[DYNAMIC RANGE]”. |
| W[200%] | |
| X[400%] |
Auto dynamic range adjustment ([AUTO]) is not supported.
W[200%] is available at sensitivities of from ISO 320 to ISO 12800, X[400%] at sensitivities of from ISO 640 to 12800.
The B[MOVIE SETTING] > F[DYNAMIC RANGE] option is available when [OFF] is selected for B[MOVIE SETTING] > [F-Log RECORDING].
F[HIGHLIGHT TONE]
Choose how the camera records highlights when shooting movies.
| Options | ||||||
|---|---|---|---|---|---|---|
| [+4] | [+3] | [+2] | [+1] | [0] | [-1] | [-2] |
F[SHADOW TONE]
Choose how the camera records shadows when shooting movies.
| Options | ||||||
|---|---|---|---|---|---|---|
| [+4] | [+3] | [+2] | [+1] | [0] | [-1] | [-2] |
F[COLOR]
Adjust color density for movie recording.
| Options | ||||||||
|---|---|---|---|---|---|---|---|---|
| [+4] | [+3] | [+2] | [+1] | [0] | [-1] | [-2] | [-3] | [-4] |
F[SHARPNESS]
Sharpen or soften outlines in movies.
| Options | ||||||||
|---|---|---|---|---|---|---|---|---|
| [+4] | [+3] | [+2] | [+1] | [0] | [-1] | [-2] | [-3] | [-4] |
F[NOISE REDUCTION]
Reduce noise in movies shot at high sensitivities.
| Options | ||||||||
|---|---|---|---|---|---|---|---|---|
| [+4] | [+3] | [+2] | [+1] | [0] | [-1] | [-2] | [-3] | [-4] |
V[INTERFRAME NR]
Select [ON] to enable interframe noise reduction.
| Options | |
|---|---|
| [ON] | [OFF] |
Interframe noise reduction is available only when frame rates of 29.97P or slower are selected at a frame size of V or d.
“Ghosting” may occur with moving subjects or if the camera is moved during shooting.
[F-Log RECORDING]
Select [ON] to record movies using a soft gamma curve with a wide gamut suitable for further processing post-production. Sensitivity is restricted to values between ISO 640 and 12800.
| Options | |
|---|---|
| [ON] | [OFF] |
F[PERIPHERAL LIGHT CORRECTION]
Select [ON] to enable peripheral illumination correction during movie recording.
| Options | |
|---|---|
| [ON] | [OFF] |
If [ON] is selected when a lens that does not transmit data to the camera is attached using a [FUJIFILM M MOUNT ADAPTER] (available separately), peripheral illumination will be adjusted according to the option selected for A[SHOOTING SETTING] > [MOUNT ADAPTER SETTING] > [PERIPHERAL ILLUMINATION CORRECTION] in the shooting menu (aPeripheral Illumination Correction).
Select [OFF] if you notice banding in movies recorded using this option.
F[FOCUS AREA]
Choose the focus area for movies shot using autofocus. You can also choose the focus area (and consequently also the focus zoom position) for movies shot using manual focus.
[MOVIE AF MODE]
Choose how the camera selects the focus point for movie recording.
| Option | Description |
|---|---|
| [MULTI] | Automatic focus-point selection. |
| [AREA] | The camera focuses on the subject in the selected focus area. |
F[AF-C CUSTOM SETTING]
Select focus-tracking options when recording movies in focus mode [C].
[TRACKING SENSITIVITY]
Choose how long the camera waits to switch focus when an object enters the focus area behind or in front of the current subject. See “[TRACKING SENSITIVITY]”.
| Options | ||||
|---|---|---|---|---|
| [0] | [1] | [2] | [3] | [4] |
[AF SPEED]
Adjust the autofocus response speed.
| Options | ||||||||||
|---|---|---|---|---|---|---|---|---|---|---|
| [-5] | [-4] | [-3] | [-2] | [-1] | [0] | [+1] | [+2] | [+3] | [+4] | [+5] |
F[FACE/EYE DETECTION SETTING]
Enable or disable Intelligent Face Detection when recording movies.
| Option | Description |
|---|---|
| [FACE DETECTION ON] | See “[FACE/EYE DETECTION SETTING]”. |
| [OFF] | Intelligent Face Detection and eye priority off. |
When Intelligent Face Detection is enabled, the camera will focus using continuous AF even when single AF ([S]) is chosen with the focus mode selector. Intelligent Face Detection is not available in manual focus mode.
F[MF ASSIST]
Choose how focus is displayed in manual focus mode.
| Option | Description |
|---|---|
| [STANDARD] | Focus is displayed normally (focus peaking is not available). |
| [FOCUS PEAK HIGHLIGHT] | The camera heightens high-contrast outlines. Choose a color and peaking level. |
F[FOCUS CHECK]
If [ON] is selected, the display will automatically zoom in on the selected focus area when the focus ring is rotated in manual focus mode.
| Options | |
|---|---|
| [ON] | [OFF] |
[HDMI OUTPUT INFO DISPLAY]
If [ON] is selected, HDMI devices to which the camera is connected will mirror the information in the camera display.
| Options | |
|---|---|
| [ON] | [OFF] |
[4K MOVIE OUTPUT]
Choose the destination for 4K movies shot while the camera is connected to an HDMI recorder or other device that supports 4K.
| Option | Description |
|---|---|
| b[4K] Y[4K] | 4K movies are recorded to the camera memory card and output to the HDMI device in 4K. |
| b[4K] Y[FHD] | 4K movies are recorded to a camera memory card in 4K and output to the HDMI device in Full HD. |
| b[FHD] Y[4K] | 4K movies are output to the HDMI device in 4K and recorded to the camera memory card in Full HD. |
| b― Y[4K] | 4K movies are output to the HDMI device in 4K. The camera does not record 4K movies to a memory card. |
This option is only available when V[16:9] or V[17:9] is selected for B[MOVIE SETTING] > [MOVIE MODE] in the shooting menu.
[FULL HD MOVIE OUTPUT]
Choose the destination for Full HD movies shot while the camera is connected to an HDMI device.
| Option | Description |
|---|---|
| b[FHD] Y[FHD] | Full HD movies are output to the HDMI device and recorded to the camera memory card. |
| b― Y[FHD] | Full HD movies are not recorded to the camera memory card but are output to the HDMI device. |
This option is only available when W[16:9] or W[17:9] is selected for B[MOVIE SETTING] > [MOVIE MODE] in the shooting menu.
Movies are recorded to the memory card in 4:2:0 8-bit format.
When [OFF] is selected for [HDMI OUTPUT INFO DISPLAY], movies will be output to the HDMI device in 4:2:2 10-bit format.
[4K HDMI STANDBY QUALITY]
Choose whether output to connected HDMI devices switches from 4K to Full HD during standby.
| Option | Description |
|---|---|
| V | Output to HDMI devices continues at 4K during standby. |
| W | Output to HDMI devices switches to Full HD during standby, reducing the drain on the battery. |
[HDMI REC CONTROL]
Choose whether the camera sends movie start and stop signals to the HDMI device when the shutter button is pressed to start and stop movie recording.
| Options | |
|---|---|
| [ON] | [OFF] |
[ZEBRA SETTING]
Highlights that may be overexposed are shown by zebra stripes in the movie mode display.
| Option | Description |
|---|---|
| [ZEBRA RIGHT] |  Right-slanting stripes. Right-slanting stripes. |
| [ZEBRA LEFT] |  Left-slanting stripes. Left-slanting stripes. |
| [OFF] | Stripes off. |
[ZEBRA LEVEL]
Choose the brightness threshold for the zebra stripe display.
| Options | ||||||||||
|---|---|---|---|---|---|---|---|---|---|---|
| [100] | [95] | [90] | [85] | [80] | [75] | [70] | [65] | [60] | [55] | [50] |
[AUDIO SETTING]
Adjust audio-related settings for movie recording.
[INTERNAL MIC LEVEL ADJUSTMENT]
Adjust the recording level for the built-in microphone.
| Option | Description |
|---|---|
| [AUTO] | The camera adjusts the recording level automatically. |
| [MANUAL] | Adjust the recording level manually. Press the focus stick (focus lever) right to choose from 25 recording levels. |
| [OFF] | Turn the built-in microphone off. |
[EXTERNAL MIC LEVEL ADJUSTMENT]
Adjust the recording level for external microphones.
| Option | Description |
|---|---|
| [AUTO] | The camera adjusts the recording level automatically. |
| [MANUAL] | Adjust the recording level manually. Press the focus stick (focus lever) right to choose from 25 recording levels. |
| [OFF] | Disable recording using external microphones. |
[MIC LEVEL LIMITER]
Reduces distortion caused by input that exceeds the limits of the microphone’s audio circuits.
| Options | |
|---|---|
| [ON] | [OFF] |
[WIND FILTER]
Choose whether to enable wind noise reduction during movie recording.
| Options | |
|---|---|
| [ON] | [OFF] |
[LOW CUT FILTER]
Choose whether to enable the low-cut filter, reducing low-frequency noise during movie recording.
| Options | |
|---|---|
| [ON] | [OFF] |
[HEADPHONES VOLUME]
Adjust the headphone volume.
| Option | Description |
|---|---|
| [10]—[1] | Choose a volume of from 1 to 10. |
| [0] | Mute output to the headphones. |
[MIC/REMOTE RELEASE]
Specify whether the device connected to the microphone/remote release connector is a microphone or a remote release.
| Options | |
|---|---|
| m [MIC] | n [REMOTE] |
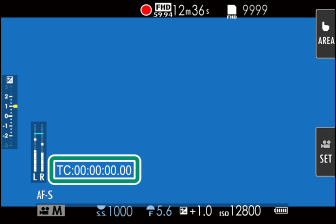
[TIME CODE SETTING]
Adjust time code (hour, minute, second, and frame number) display settings for movie recording.
[TIME CODE DISPLAY]
Select [ON] to display time codes during movie recording and playback.
| Options | |
|---|---|
| [ON] | [OFF] |
[START TIME SETTING]
Choose the time code starting time.
| Option | Description |
|---|---|
| [MANUAL INPUT] | Highlight this option and press the focus stick (focus lever) right to choose a start time manually. |
| [CURRENT TIME] | Set the start time to the current time. |
| [RESET] | Set the start time to 00:00:00. |
[COUNT UP SETTING]
Choose whether time is clocked continuously or only during movie recording.
| Option | Description |
|---|---|
| [REC RUN] | Time is clocked only during movie recording. |
| [FREE RUN] | Time is clocked continuously. |
[DROP FRAME]
At frame rates of [59.94P], and [29.97P], a discrepancy will gradually develop between the time code (measured in seconds) and the actual recording time (measured in fractions of a second). Choose whether the camera drops frames as necessary to match the recording time to the time code.
| Option | Description |
|---|---|
| [ON] | The camera drops frames as necessary to maintain a strict match between the time code and the actual recording time. |
| [OFF] | Frames are not dropped. |
The time code display varies with the option selected.

[ON]

[OFF]
Selecting a frame rate of [23.98P] disables frame drop.
[HDMI TIME CODE OUTPUT]
Choose whether time codes are output to HDMI devices.
| Options | |
|---|---|
| [ON] | [OFF] |
[TALLY LIGHT]
Choose the lamp (indicator or AF-assist) that lights during movie recording and whether the lamp blinks or remains steady.

Indicator lamp

AF-assist illuminator
| Option | Description |
|---|---|
| [FRONT OFF] [REAR]z |
The indicator lamp lights during movie recording. |
| [FRONT OFF] [REAR]y |
The indicator lamp blinks during movie recording. |
| [FRONT]z [REAR]z |
The indicator and AF-assist lamps light during movie recording. |
| [FRONT]z [REAR OFF] |
The AF-assist lamp lights during movie recording. |
| [FRONT]y [REAR]y |
The indicator and AF-assist lamps blink during movie recording. |
| [FRONT]y [REAR OFF] |
The AF-assist lamp blinks during movie recording. |
| [FRONT OFF] [REAR OFF] |
The indicator and AF-assist lamps remain off during movie recording. |
[MOVIE SILENT CONTROL]
Select [ON] to disable camera dials and adjust movie settings using touch-screen controls, preventing the sounds made by camera controls being recorded with the movie (aMuting Movie Controls).
| Options | |
|---|---|
| [ON] | [OFF] |