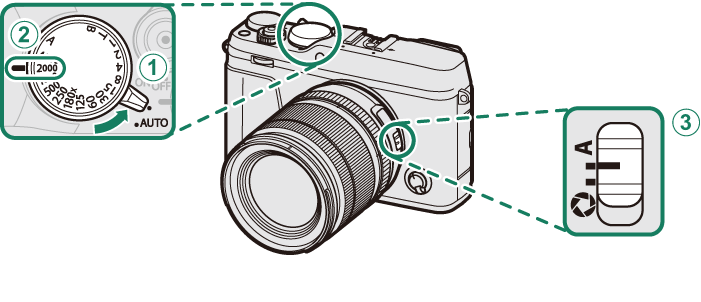
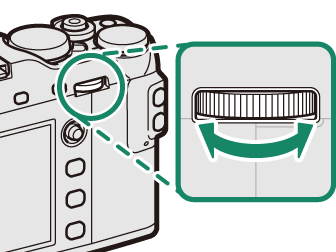
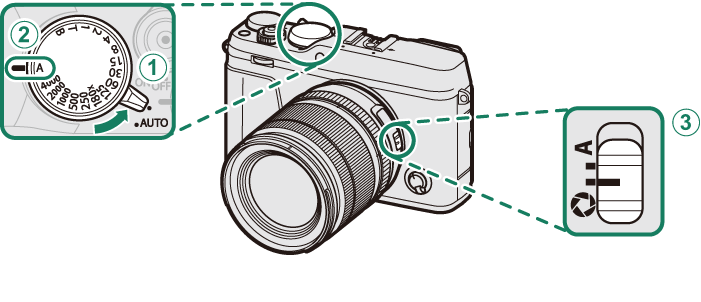
For control over shutter speed and aperture ([P], [S], [A], and [M] modes), rotate the auto mode selector lever to  . Rotate the lever to [AUTO] to choose from modes suited to specific subject types, or select
  [ADVANCED SR AUTO] to let the camera automatically match the mode to the subject.
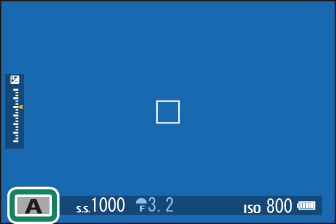
Let the camera choose shutter speed and aperture for optimal exposure. Other values that produce the same exposure can be selected with program shift.

Adjust settings as follows:
 Auto mode selector lever:
 Shutter speed: [A] (auto)
 Aperture: [A] (auto)
Confirm that [P] appears in the display.
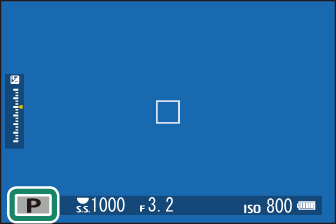
If the subject is outside the metering range of the camera, the shutter speed and aperture displays will show “– – –”.
Program Shift
If desired, you can rotate the rear command dial to select other combinations of shutter speed and aperture without altering exposure (program shift).
Aperture
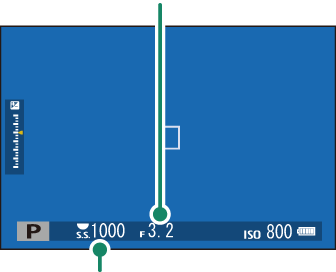
Shutter speed
Program shift is not available during movie recording or if the flash supports TTL auto or an auto option is selected for  [IMAGE QUALITY SETTING] > [DYNAMIC RANGE].
To cancel program shift, turn the camera off.
Choose a shutter speed and let the camera adjust aperture for optimal exposure.
Adjust settings as follows:
Auto mode selector lever:
Shutter speed: Choose a shutter speed
Aperture: [A] (auto)
Confirm that [S] appears in the display.
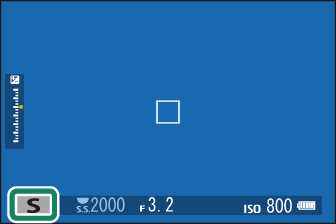
If the correct exposure cannot be achieved at the selected shutter speed, aperture will be displayed in red. If the subject is outside the metering range of the camera, the aperture display will show “– – –”.
At settings other than [180X], shutter speed can also be adjusted in increments of 1/3 EV by rotating the rear command dial. Shutter speed can be adjusted even while the shutter button is pressed halfway.
Sensitivity and Depth of Field
If you choose a fast shutter speed when the subject is poorly lit, the camera autoexposure program will select a wider aperture. This will produce the correct exposure but may also reduce depth of field so that less of the area behind and in front of your subject appears to be in focus. To stop aperture down and increase depth of field, select a higher sensitivity.
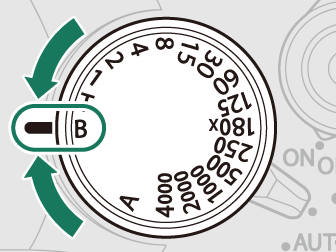
Rotate the shutter speed dial to [T] (time) to choose slow shutter speeds for long time-exposures. Use of a tripod is recommended to prevent the camera moving during the exposure.
Rotate the shutter speed dial to [T].
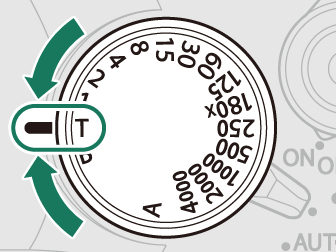
Rotate the rear command dial to choose a shutter speed.
Press the shutter button all the way down to take a picture at the selected shutter speed. At speeds of 1 s or slower, a count-down timer will be displayed while the exposure is in progress.
To reduce “noise” (mottling) in long time-exposures, select [ON] for [IMAGE QUALITY SETTING] > [LONG EXPOSURE NR]. Note that this may increase the time needed to record images after shooting.
Select a shutter speed of [B] (bulb) for long time-exposures in which you open and close the shutter manually. Use of a tripod is recommended to prevent the camera moving during the exposure.
Rotate the shutter speed dial to [B].
Press the shutter button all the way down. The shutter will remain open for up to 60 minutes while the shutter button is pressed; the display shows the time elapsed since the exposure started (if the electronic shutter is used, the shutter will remain open for 1 second, regardless of how long the shutter button is pressed).
Selecting an aperture of [A] fixes shutter speed at 30 s.
To reduce “noise” (mottling) in long time-exposures, select [ON] for [IMAGE QUALITY SETTING] > [LONG EXPOSURE NR]. Note that this may increase the time needed to record images after shooting.
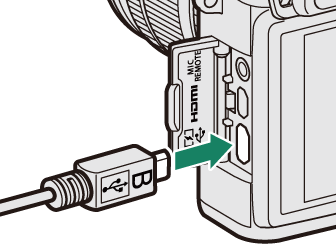
Using a Remote Release
An optional RR-90 remote release can be used for long time-exposures. The RR‑90 connects via the Micro USB (Micro-B) USB 2.0 connector.
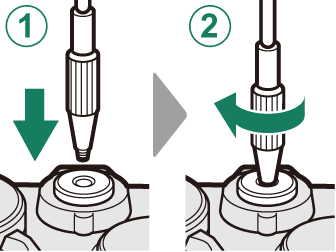
Alternatively, electronic releases from third-party suppliers can be connected via the microphone/remote release connector (Φ2.5 mm 3-pole mini jack).
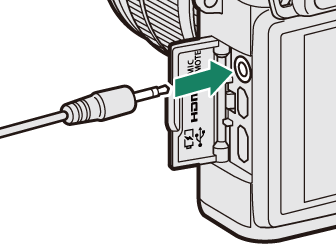
Third-party mechanical releases connect as shown.
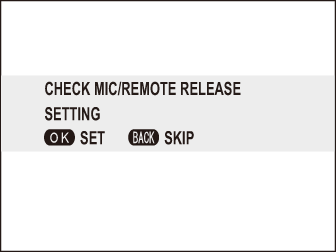
A confirmation dialog will be displayed when a third-party release is connected; press [MENU/OK] and select  [REMOTE] for [MIC/REMOTE RELEASE].
Choose an aperture and let the camera adjust shutter speed for optimal exposure.
Adjust settings as follows:
Auto mode selector lever:
Shutter speed: [A] (auto)
Aperture: Select  and rotate the lens aperture ring to adjust aperture
Confirm that [A] appears in the display.
If the correct exposure cannot be achieved at the selected aperture, shutter speed will be displayed in red. If the subject is outside the metering range of the camera, the shutter speed display will show “– – –”.
Aperture can be adjusted even while the shutter button is pressed halfway.
Previewing Depth of Field
When [PREVIEW DEPTH OF FIELD] is assigned to a function button, pressing the button stops aperture down to the selected setting, allowing depth of field to be previewed in the display.

If both [AF DISTANCE INDICATOR] and [MF DISTANCE INDICATOR] are selected in the  [SCREEN SET-UP] > [DISP. CUSTOM SETTING] list, depth of field can also be previewed using the depth-of-field indicator in the standard display. Use the [DISP/BACK] button to display standard indicators.
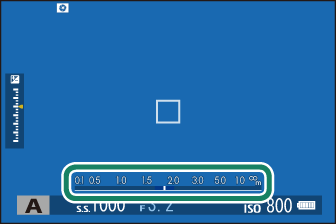
Depth of field
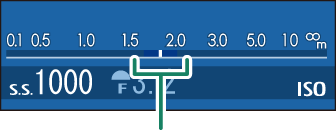
Use the  [AF/MF SETTING] > [DEPTH-OF-FIELD SCALE] option to choose how depth of field is displayed. Choose [FILM FORMAT BASIS] to help you make practical assessments of depth of field for pictures that will be viewed as prints and the like, [PIXEL BASIS] to help you assess depth of field for pictures that will be viewed at high resolutions on computers or other electronic displays.
Sensitivity and Motion Blur
If you choose a narrow aperture when the subject is poorly lit, the shutter speed selected by the autoexposure program may not be fast enough to prevent motion blur. For faster shutter speeds that reduce motion blur, select a higher sensitivity.

Alter exposure from that selected by the camera.

Adjust settings as follows:
Auto mode selector lever:
Shutter speed: Choose a shutter speed
Aperture: Select and rotate the lens aperture ring to adjust aperture
Confirm that [M] appears in the display. The amount the picture would be under- or over-exposed at current settings is shown by the exposure indicator; adjust shutter speed and aperture until the desired exposure is reached.
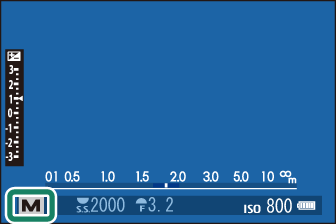
At settings other than [180X], shutter speed can also be adjusted in increments of 1/3 EV by rotating the rear command dial.
Exposure Preview
To preview exposure in the LCD monitor, select an option other than [OFF] for [SCREEN SET-UP] > [PREVIEW EXP./WB IN MANUAL MODE]. Select [OFF] when using the flash or on other occasions on which exposure may change when the picture is taken.
![]()
The camera adjusts settings automatically according to the option selected by rotating the front command dial. Choose from modes suited to specific subject types, or select  [ADVANCED SR AUTO] to let the camera automatically match the mode to the subject.
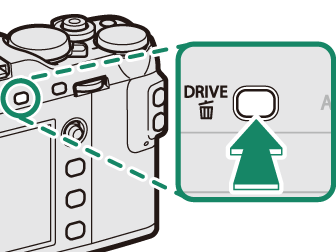
Press the [DRIVE] button and select  ([STILL IMAGE]) from the list of drive mode options.
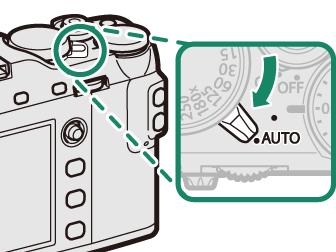
Rotate the auto mode selector lever to [AUTO].
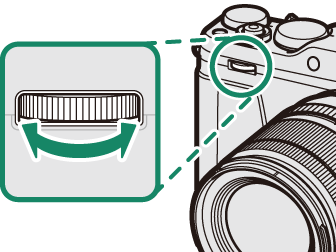
Rotate the front command dial to choose an option.
The currently-selected scene appears in the display.
| Mode | Description |
|---|---|
|
[ADVANCED SR AUTO]
|
The camera automatically optimizes settings to suit the scene. |
 [PORTRAIT] [PORTRAIT]
|
Choose for portraits. |
 [PORTRAIT ENHANCER] [PORTRAIT ENHANCER]
|
Processes portraits to give the subject a smooth, natural-looking complexion. |
 [LANDSCAPE] [LANDSCAPE]
|
Choose for daylight shots of buildings and landscapes. |
 [SPORT] [SPORT]
|
Choose when photographing moving subjects. |
 [NIGHT] [NIGHT]
|
Choose for poorly lit twilight or night scenes. |
 [NIGHT (TRIPOD)] [NIGHT (TRIPOD)]
|
Choose this mode for slow shutter speeds when shooting at night. |
 [FIREWORKS] [FIREWORKS]
|
Slow shutter speeds are used to capture the expanding burst of light from a firework. |
 [SUNSET] [SUNSET]
|
Choose this mode to record the vivid colors in sunrises and sunsets. |
 [SNOW] [SNOW]
|
Choose for crisp, clear shots that capture the brightness of scenes dominated by shining white snow. |
 [BEACH] [BEACH]
|
Choose for crisp, clear shots that capture the brightness of sunlit beaches. |
 [UNDERWATER] [UNDERWATER]
|
Reduces the blue cast typically associated with underwater lighting. |
 [PARTY] [PARTY]
|
Capture indoor background lighting under low-light conditions. |
 [FLOWER] [FLOWER]
|
Effective for taking more vivid shots of flowers. |
 [TEXT] [TEXT]
|
Take clear pictures of text or drawings in print. |
Scene selection is also available using [SHOOTING SETTING] > [SCENE POSITION] in the shooting menu.
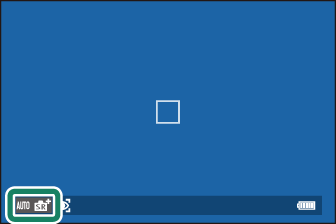
[ADVANCED SR AUTO]The scene selected by the camera in [ADVANCED SR AUTO] mode is shown by an icon in the display.

 [AUTO]
 [LANDSCAPE]
 [NIGHT]
 [NIGHT (TRIPOD)]
 [MACRO]
 [BEACH]
 [SUNSET]
 [SNOW]
 [SKY]
[SKY]
 [GREENERY]
 [SKY & GREENERY]
 [PORTRAIT]
 [BACKLIT PORTRAIT]
 [MOVING OBJECT]
 [PORTRAIT&MOTION]
 [BACKLIT PORTRAIT&MOTION]
The mode selected may vary with shooting conditions. If the mode and subject do not match, select a scene manually.
 .
.