.
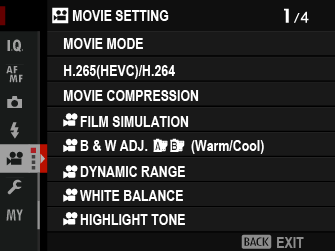
.BThe Shooting Menus ([MOVIE SETTING])
Adjust movie-recording options.
To display options for movie recording, press [MENU]/[OK] in the shooting display and select the B ([MOVIE SETTING]) tab.
The options available vary with the shooting mode selected.
- [MOVIE AF MODE]
- F[AF-C CUSTOM SETTING]
- F[FACE/EYE DETECTION SETTING]
- F[MF ASSIST]
- F[FOCUS CHECK]
- [4K MOVIE OUTPUT]
- [FULL HD MOVIE OUTPUT]
- [HDMI OUTPUT INFO DISPLAY]
- [4K HDMI STANDBY QUALITY]
- [HDMI REC CONTROL]
- [ZEBRA SETTING]
- [ZEBRA LEVEL]
- [AUDIO SETTING]
- [TIME CODE SETTING]
- [TALLY LIGHT]
- [MOVIE SILENT CONTROL]
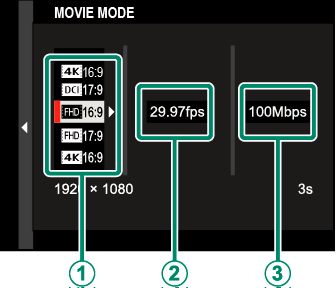
[MOVIE MODE]
Before shooting movies, choose the frame rate, bit rate, and frame size and aspect ratio.
-
In the shooting menu, select B[MOVIE SETTING], then highlight [MOVIE MODE] and press [MENU]/[OK].
-
Press the focus stick (focus lever) up or down to highlight the desired frame size and aspect ratio (A) and press the stick right.
- Choose V[16:9] or d[17:9] for 4K movies with aspect ratios of 16 or 17 to 9.
- Choose W[16:9] or W[17:9] for Full HD movies with aspect ratios of 16 or 17 to 9.
-
Press the focus stick (focus lever) up or down to highlight a frame rate (B) and press the stick right.
Options [59.94P] [50P] [29.97P] [25P] [24P] [23.98P] -
Press the focus stick up or down to highlight a bit rate (C) and press [MENU]/[OK].
Options [400Mbps] [200Mbps] [100Mbps] [50Mbps]
The choice of frame and bit rates varies with the movie mode.
[H.265(HEVC)/H.264]
Choose a codec for movie recording.
| Option | Description |
|---|---|
| [H.265(HEVC)] | Use for higher quality footage with a high compression ratio. Movies can be viewed only on devices that support H.265 (HEVC). |
| [H.264] | Movies filmed using this widely-supported codec can be viewed on a variety devices. |
[MOVIE COMPRESSION]
Choose type of compression used to record movies.
| Option | Description |
|---|---|
| [ALL-Intra] | Each frame is compressed separately. Files are larger, but the fact that the data for each frame are saved separately makes this a good choice for footage that will be further processed. |
| [Long GOP] | Balances good image quality with high compression. Files are smaller, making this a good choice for longer movies. |
F[FILM SIMULATION]
Choose a film simulation effect for movie recording.
| Option | Description |
|---|---|
| c [PROVIA/ STANDARD] |
See “[FILM SIMULATION]”. |
| d[Velvia/VIVID] | |
| e[ASTIA/ SOFT] |
|
| i[CLASSIC CHROME] | |
| g[PRO Neg. Hi] | |
| h[PRO Neg. Std] | |
| g[CLASSIC Neg.] | |
| X[ETERNA/CINEMA] | |
| N[ETERNA ETERNA BLEACH BYPASS] |
|
| a[ACROS] | |
| b[MONOCHROME] | |
| f[SEPIA] |
F[B & W ADJ.ab (Warm/Cool)]
Add a reddish or bluish tinge (warm or cool color cast) to monochrome pictures taken with the a[ACROS] or b[MONOCHROME] film simulation.
| Option | Description |
|---|---|
| [+9] — [+1] | Higher positive values equate to a redder color cast. |
| [0] | Normal monochrome (grayscale). |
| [-1] — [-9] | Lower negative values equate to a bluer color cast. |
F[DYNAMIC RANGE]
Choose a dynamic range for movie recording.
| Option | Description |
|---|---|
| V[100%] | See “[DYNAMIC RANGE]”. |
| W[200%] | |
| X[400%] |
Auto dynamic range adjustment ([AUTO]) is not supported.
W[200%] is available at sensitivities of from ISO 400 to ISO 12800, X[400%] at sensitivities of from ISO 800 to 12800.
The B[MOVIE SETTING] > F[DYNAMIC RANGE] option is available when b P Y P is selected for B[MOVIE SETTING] > [F-Log/HLG/RAW RECORDING].
F[WHITE BALANCE]
Adjust white balance for movie recording.
| Option | Description |
|---|---|
| [AUTO] | See “[WHITE BALANCE]”. |
| k/l/m | |
| k | |
| i | |
| j | |
| k | |
| l | |
| m | |
| n | |
| g |
F[HIGHLIGHT TONE]
Choose how the camera records highlights when shooting movies.
| Options | ||||||
|---|---|---|---|---|---|---|
| [+4] | [+3] | [+2] | [+1] | [0] | [-1] | [-2] |
F[SHADOW TONE]
Choose how the camera records shadows when shooting movies.
| Options | ||||||
|---|---|---|---|---|---|---|
| [+4] | [+3] | [+2] | [+1] | [0] | [-1] | [-2] |
F[COLOR]
Adjust color density for movie recording.
| Options | ||||||||
|---|---|---|---|---|---|---|---|---|
| [+4] | [+3] | [+2] | [+1] | [0] | [-1] | [-2] | [-3] | [-4] |
F[SHARPNESS]
Sharpen or soften outlines in movies.
| Options | ||||||||
|---|---|---|---|---|---|---|---|---|
| [+4] | [+3] | [+2] | [+1] | [0] | [-1] | [-2] | [-3] | [-4] |
F[NOISE REDUCTION]
Reduce noise in movies shot at high sensitivities.
| Options | ||||||||
|---|---|---|---|---|---|---|---|---|
| [+4] | [+3] | [+2] | [+1] | [0] | [-1] | [-2] | [-3] | [-4] |
V[INTERFRAME NR]
Select [ON] to enable interframe noise reduction.
| Options | |
|---|---|
| [ON] | [OFF] |
Interframe noise reduction is available only when frame rates of [29.97P] or slower are selected at a frame size of V or d.
“Ghosting” may occur with moving subjects or if the camera is moved during shooting.
[F-Log/HLG/RAW RECORDING]
Choose the destination for F-Log, HLG (Hybrid Log-Gamma), or RAW movies shot while the camera is connected to an HDMI device.
| Option | Description |
|---|---|
| bP YP | The footage is processed using film simulation and both saved to the memory card and output to the HDMI device. |
| b[F-Log] Y[F-Log] | The footage is recorded to the memory card and output to the HDMI device in F-Log format. |
| bP Y[F-Log] | The footage is output to the HDMI device in F-Log format but saved to the memory card with film simulation applied. |
| b[F-Log] YP | The footage is recorded to the memory card in F-Log format but output to the HDMI device with film simulation applied. |
| b[HLG] Y[HLG] | The footage is recorded to the memory card and output to the HDMI device in HLG format. |
| bP Y[RAW] | The footage is output to the HDMI device in RAW format but saved to the memory card with film simulation applied. |
| b[F-Log] Y[RAW] | The footage is recorded to the memory card in F-Log format and output to the HDMI device in RAW format. |
| b[HLG] Y[RAW] | The footage is recorded to the memory card in HLG format and output to the HDMI device in RAW format. |
F-Log offers a gentle gamma curve with a wide gamut suitable for further processing post-production. Sensitivity is restricted to values between ISO 800 and ISO 12800.
The [HLG] (Hybrid Log-Gamma) recording format conforms to the international ITU-R BT2100 standard. When viewed on HLG-compatible displays, high-quality HLG footage faithfully captures high-contrast scenes and vivid colors. Sensitivity is restricted to values between ISO 1250 and ISO 12800. HLG recording is available when [H.265 (HEVC)] is selected for B[MOVIE SETTING] > [H.265(HEVC)/H.264] in the shooting menu.
Film simulation (P) footage is recorded using the option selected for B[MOVIE SETTING] > F[FILM SIMULATION] in the shooting menu.
Footage shot with bP Y[F-Log] or b[F-Log] YP cannot be recorded to the memory card and output to the HDMI at different frame sizes (4K, Full HD). In addition, the following B[MOVIE SETTING] options are unavailable:
- [MOVIE MODE] frame rate options of [59.94P] and [50P]
- V[INTERFRAME NR]
- [HDMI OUTPUT INFO DISPLAY]
[RAW] output cannot be recorded to the memory card.
In-camera image enhancements are not applied to the [RAW] output.
The crop (picture angle) and quality of footage output to external devices differs from that shown in the camera monitor. View the [RAW] footage on the external device.
Footage output to external devices is generated from the original RAW data and its quality, which varies with device specifications, may not be equal to that achieved as the end result of post-production or the like.
Focus zoom is not available when [RAW] is selected for HDMI output.
[RAW] footage output via HDMI to incompatible devices will not display correctly but will instead will display as a mosaic.
The minimum and maximum sensitivities for P, [F-Log], or [HLG] footage recorded to the memory card when [RAW] is selected for HDMI output are ISO 1250 and ISO 12800, respectively.
F[PERIPHERAL LIGHT CORRECTION]
Select [ON] to enable peripheral illumination correction during movie recording.
| Options | |
|---|---|
| [ON] | [OFF] |
If [ON] is selected when a lens that does not transmit data to the camera is attached using a [FUJIFILM M MOUNT ADAPTER] (available separately), peripheral illumination will be adjusted according to the option selected for A[SHOOTING SETTING] > [MOUNT ADAPTER SETTING] > [PERIPHERAL ILLUMINATION CORRECTION] in the shooting menu (aPeripheral Illumination Correction).
Select [OFF] if you notice banding in movies recorded using this option.
F[FOCUS AREA]
Choose the focus area for movies shot using autofocus. You can also choose the focus area (and consequently also the focus zoom position) for movies shot using manual focus.
[MOVIE AF MODE]
Choose how the camera selects the focus point for movie recording.
| Option | Description |
|---|---|
| [MULTI] | Automatic focus-point selection. |
| [AREA] | The camera focuses on the subject in the selected focus area. |
F[AF-C CUSTOM SETTING]
Select focus-tracking options when recording movies in focus mode [C].
[TRACKING SENSITIVITY]
Choose how long the camera waits to switch focus when an object enters the focus area behind or in front of the current subject. See “[TRACKING SENSITIVITY]”.
| Options | ||||
|---|---|---|---|---|
| [0] | [1] | [2] | [3] | [4] |
[AF SPEED]
Adjust the autofocus response speed.
| Options | ||||||||||
|---|---|---|---|---|---|---|---|---|---|---|
| [-5] | [-4] | [-3] | [-2] | [-1] | [0] | [+1] | [+2] | [+3] | [+4] | [+5] |
F[FACE/EYE DETECTION SETTING]
Enable or disable Intelligent Face Detection when recording movies.
| Option | Description |
|---|---|
| [FACE DETECTION ON] | See “[FACE/EYE DETECTION SETTING]”. |
| [OFF] | Intelligent Face Detection and eye priority off. |
When Intelligent Face Detection is enabled, the camera will focus using continuous AF even when single AF ([S]) is chosen with the focus mode selector. Intelligent Face Detection is not available in manual focus mode.
F[MF ASSIST]
Choose how focus is displayed in manual focus mode.
| Option | Description |
|---|---|
| [STANDARD] | Focus is displayed normally (focus peaking is not available). |
| [FOCUS PEAK HIGHLIGHT] | The camera heightens high-contrast outlines. Choose a color and peaking level. |
F[FOCUS CHECK]
If [ON] is selected, the display will automatically zoom in on the selected focus area when the focus ring is rotated in manual focus mode.
| Options | |
|---|---|
| [ON] | [OFF] |
[4K MOVIE OUTPUT]
Choose the destination for 4K movies shot while the camera is connected to an HDMI recorder or other device that supports 4K.
| Option | Description |
|---|---|
| b[4K] Y[4K] | 4K movies are recorded to the camera memory card and output to the HDMI device in 4K. |
| b[4K] Y[FHD] | 4K movies are recorded to a camera memory card in 4K and output to the HDMI device in Full HD. |
| b[FHD] Y[4K] | 4K movies are output to the HDMI device in 4K and recorded to the camera memory card in Full HD. |
| b― Y[4K] | 4K movies are output to the HDMI device in 4K. The camera does not record 4K movies to a memory card. |
This option is only available when V[16:9] or d[17:9] is selected for B[MOVIE SETTING] > [MOVIE MODE] in the shooting menu.
[FULL HD MOVIE OUTPUT]
Choose the destination for Full HD movies shot while the camera is connected to an HDMI device.
| Option | Description |
|---|---|
| b[FHD] Y[FHD] | Full HD movies are output to the HDMI device and recorded to the camera memory card. |
| b― Y[FHD] | Full HD movies are not recorded to the camera memory card but are output to the HDMI device. |
This option is only available when W[16:9] or W[17:9] is selected for B[MOVIE SETTING] > [MOVIE MODE] in the shooting menu.
When [OFF] is selected for [HDMI OUTPUT INFO DISPLAY], movies will be output to the HDMI device in 4:2:2 10-bit format.
[HDMI OUTPUT INFO DISPLAY]
If [ON] is selected, HDMI devices to which the camera is connected will mirror the information in the camera display.
| Options | |
|---|---|
| [ON] | [OFF] |
[4K HDMI STANDBY QUALITY]
Choose whether output to connected HDMI devices switches from 4K to Full HD during standby.
| Option | Description |
|---|---|
| V | Output to HDMI devices continues at 4K during standby. |
| W | Output to HDMI devices switches to Full HD during standby, reducing the drain on the battery. |
[HDMI REC CONTROL]
Choose whether the camera sends movie start and stop signals to the HDMI device when the shutter button is pressed to start and stop movie recording.
| Options | |
|---|---|
| [ON] | [OFF] |
[ZEBRA SETTING]
Highlights that may be overexposed are shown by zebra stripes in the movie mode display.
| Option | Description |
|---|---|
| [ZEBRA RIGHT] |  Right-slanting stripes. Right-slanting stripes. |
| [ZEBRA LEFT] |  Left-slanting stripes. Left-slanting stripes. |
| [OFF] | Stripes off. |
[ZEBRA LEVEL]
Choose the brightness threshold for the zebra stripe display.
| Options | ||||||||||
|---|---|---|---|---|---|---|---|---|---|---|
| [100] | [95] | [90] | [85] | [80] | [75] | [70] | [65] | [60] | [55] | [50] |
[AUDIO SETTING]
Adjust audio-related settings for movie recording.
[INTERNAL MIC LEVEL ADJUSTMENT]
Adjust the recording level for the built-in microphone.
| Option | Description |
|---|---|
| [AUTO] | The camera adjusts the recording level automatically. |
| [MANUAL] | Adjust the recording level manually. Press the focus stick (focus lever) right to choose from 25 recording levels. |
| [OFF] | Turn the built-in microphone off. |
[EXTERNAL MIC LEVEL ADJUSTMENT]
Adjust the recording level for external microphones.
| Option | Description |
|---|---|
| [AUTO] | The camera adjusts the recording level automatically. |
| [MANUAL] | Adjust the recording level manually. Press the focus stick (focus lever) right to choose from 25 recording levels. |
| [OFF] | Disable recording using external microphones. |
[MIC LEVEL LIMITER]
Reduces distortion caused by input that exceeds the limits of the microphone’s audio circuits.
| Options | |
|---|---|
| [ON] | [OFF] |
[WIND FILTER]
Choose whether to enable wind noise reduction during movie recording.
| Options | |
|---|---|
| [ON] | [OFF] |
[LOW CUT FILTER]
Choose whether to enable the low-cut filter, reducing low-frequency noise during movie recording.
| Options | |
|---|---|
| [ON] | [OFF] |
[HEADPHONES VOLUME]
Adjust the headphone volume.
| Option | Description |
|---|---|
| [10]—[1] | Choose a volume of from 1 to 10. |
| [0] | Mute output to the headphones. |
[TIME CODE SETTING]
Adjust time code (hour, minute, second, and frame number) display settings for movie recording.
[TIME CODE DISPLAY]
Select [ON] to display time codes during movie recording and playback.
| Options | |
|---|---|
| [ON] | [OFF] |
[START TIME SETTING]
Choose the time code starting time.
| Option | Description |
|---|---|
| [MANUAL INPUT] | Highlight this option and press the focus stick (focus lever) right to choose a start time manually. |
| [CURRENT TIME] | Set the start time to the current time. |
| [RESET] | Set the start time to 00:00:00. |
[COUNT UP SETTING]
Choose whether time is clocked continuously or only during movie recording.
| Option | Description |
|---|---|
| [REC RUN] | Time is clocked only during movie recording. |
| [FREE RUN] | Time is clocked continuously. |
[DROP FRAME]
At frame rates of [59.94P], and [29.97P], a discrepancy will gradually develop between the time code (measured in seconds) and the actual recording time (measured in fractions of a second). Choose whether the camera drops frames as necessary to match the recording time to the time code.
| Option | Description |
|---|---|
| [ON] | The camera drops frames as necessary to maintain a strict match between the time code and the actual recording time. |
| [OFF] | Frames are not dropped. |
The time code display varies with the option selected.


[ON]

[OFF]
Selecting a frame rate of [23.98P] disables frame drop.
[HDMI TIME CODE OUTPUT]
Choose whether time codes are output to HDMI devices.
| Options | |
|---|---|
| [ON] | [OFF] |
[TALLY LIGHT]
Choose the lamp (indicator or AF-assist) that lights during movie recording and whether the lamp blinks or remains steady.

Indicator lamp 1

AF-assist illuminator
| Option | Description |
|---|---|
| [FRONT OFF] [REAR]z |
The indicator lamp lights during movie recording. |
| [FRONT OFF] [REAR]y |
The indicator lamp blinks during movie recording. |
| [FRONT]z [REAR]z |
The indicator and AF-assist lamps light during movie recording. |
| [FRONT]z [REAR OFF] |
The AF-assist lamp lights during movie recording. |
| [FRONT]y [REAR]y |
The indicator and AF-assist lamps blink during movie recording. |
| [FRONT]y [REAR OFF] |
The AF-assist lamp blinks during movie recording. |
| [FRONT OFF] [REAR OFF] |
The indicator and AF-assist lamps remain off during movie recording. |
[MOVIE SILENT CONTROL]
Select [ON] to disable camera dials and adjust movie settings using touch-screen controls, preventing the sounds made by camera controls being recorded with the movie (aMuting Movie Controls).
| Options | |
|---|---|
| [ON] | [OFF] |