.
.The Setup Menus (CONNECTION SETTING)
Adjust settings for connection to other devices.
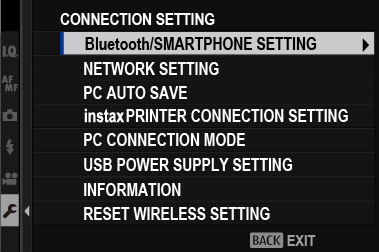
To access connection settings, press MENU/OK, select the D (SET UP) tab, and choose CONNECTION SETTING.
For more information on wireless connections, visit:
- Bluetooth/SMARTPHONE SETTING
- NETWORK SETTING
- PC AUTO SAVE
- instax PRINTER CONNECTION SETTING
- PC CONNECTION MODE
- USB POWER SUPPLY SETTING
- INFORMATION
- RESET WIRELESS SETTING
Bluetooth/SMARTPHONE SETTING
Adjust Bluetooth settings.
| Option | Description |
|---|---|
| PAIRING REGISTRATION | Pair the camera with a smartphone or tablet to which the smartphone app has been installed. |
| SELECT PAIRING DESTINATION | Choose a connection from a list of devices with which the camera has been paired using PAIRING REGISTRATION. Select NO CONNECTION to exit without connecting. |
| DELETE PAIRING REG. | Delete pairing information for selected devices. Choose the device in the device list. The selected device will also be removed from the devices listed in SELECT PAIRING DESTINATION. |
| Bluetooth ON/OFF |
|
| AUTO IMAGE TRANSFER ORDER |
Choose whether pictures are automatically marked for upload as they are taken. |
| SMARTPHONE LOCATION SYNC. |
Choose whether to synchronize the camera to the location provided by a paired smartphone. |
| NAME |
Choose a name (NAME) to identify the camera on the wireless network (the camera is assigned a unique name by default). |
| IMAGE TRANSFER WHILE POWER OFF |
Choose whether the camera uploads pictures to paired smartphones while off. |
| RESIZE IMAGE FOR SMARTPHONE H |
Choose whether to resize images for upload to smartphones. Resizing applies only to the copy uploaded to the smartphone; the original is not affected.
|
Be sure your smartphone is running the latest version of the applicable smartphone app. Different operating systems use different apps; for more information, visit:
aUsing Your Camera with Smartphones, Tablets, and Computers
Pictures will be uploaded during shooting and playback and while the camera is off if ON is selected for both Bluetooth ON/OFF and AUTO IMAGE TRANSFER ORDER or if images are currently selected for upload using the IMAGE TRANSFER ORDER option in the playback menu.
The camera clock will automatically be set to the time reported by paired smartphones whenever the app is launched.
NETWORK SETTING
Adjust settings for connection to wireless networks.
| Option | Description |
|---|---|
| WIRELESS ACCESS POINT SETTING |
|
| WIRELESS IP ADDRESS SETTING |
|
PC AUTO SAVE
Adjust settings for connection to computers via wireless LAN.
| Option | Description |
|---|---|
| PC AUTO SAVE SETTING |
Choose the method used for connection to computers via a wireless LAN.
|
| DELETE REGISTERED DESTINATION PC | Remove selected destinations. |
| DETAILS OF PREVIOUS CONNECTION | View computers to which the camera has recently connected. |
instax PRINTER CONNECTION SETTING
Adjust settings for connection to optional Fujifilm instax SHARE printers.
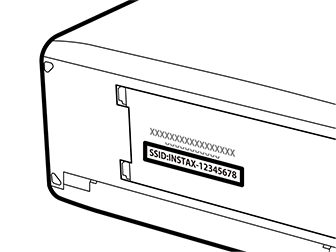
The Printer Name (SSID) and Password
The printer name (SSID) can be found on the bottom of the printer; the default password is “1111”. If you have already chosen a different password to print from a smartphone, enter that password instead.
PC CONNECTION MODE
Adjust settings for connection to a computer.
| Option | Description |
|---|---|
| USB CARD READER | Connecting the camera to a computer via USB automatically enables data transfer mode, allowing data to be copied to the computer. The camera functions normally when not connected. |
| USB TETHER SHOOTING AUTO | Connecting the camera to a computer via USB automatically enables tethered shooting mode. You can also use FUJIFILM X Acquire to save and load camera settings, allowing you to reconfigure the camera in an instant or share settings with other cameras of the same type. The camera functions normally when not connected. |
| USB TETHER SHOOTING FIXED | The camera functions in tethered shooting mode even when not connected to a computer. At default settings, pictures are not saved to the memory card, but pictures taken while the camera is not connected will be transferred to the computer when it is connected. |
| WIRELESS TETHER SHOOTING FIXED | Choose this option for wireless remote photography. Select a network using DCONNECTION SETTING > NETWORK SETTING. |
| USB RAW CONV./BACKUP RESTORE |
Connecting the camera to a computer via USB automatically enables USB RAW conversion/backup restore mode. The camera functions normally when not connected.
|
DPOWER MANAGEMENT > AUTO POWER OFF settings also apply during tethered shooting. Select OFF to prevent the camera turning off automatically.
Tethered shooting is available with software such as Capture One Pro Fujifilm or Adobe® Photoshop® Lightroom® Classic CC. If you use Adobe® Photoshop® Lightroom® Classic CC, download FUJIFILM Tether Shooting Plug-in from the Adobe Exchange website. FUJIFILM Tether Shooting Plug-in is available free of charge.
FUJIFILM X Acquire also supports tethered shooting using camera controls. FUJIFILM X Acquire can be downloaded free of charge from the Fujifilm website.
USB POWER SUPPLY SETTING
Choose whether power is supplied to the camera when it is connected to a computer or other device via a USB cable.
| Options | Description |
|---|---|
| ON | The camera draws power from the connected device, reducing the drain on the camera battery. |
| OFF | The camera does not draw power from the connected device. |
The camera cannot draw power from Lightning connections or from devices that do not supply power. Select OFF before connecting the camera to such devices. The connection may not be available for data transfer or the like when ON is selected.
The term “draw power” is used when the connected device supplies power to the camera.
Regardless of the option chosen, the battery will charge while the camera is off.
INFORMATION
View the camera’s MAC and Bluetooth address.
RESET WIRELESS SETTING
Restore wireless settings to their default values.