.
.Camera Displays
The following are displayed in the sub monitor, viewfinder (OVF or EVF), and LCD monitor during shooting.
For illustrative purposes, displays are shown with all indicators lit.
- The Sub Monitor
- The Optical Viewfinder
- The EVF/LCD Monitor
- Adjusting Display Brightness
- Display Rotation
- Bright Frame Simulation
- The DISP/BACK Button
- Customizing the Standard Display
The Sub Monitor
The information displayed in the sub monitor includes the shutter speed, aperture, and sensitivity. Use the D SCREEN SET-UP > SUB MONITOR option to choose from CLASSIC and STANDARD displays and select the items appearing in the STANDARD display.
Sub monitor
| CLASSIC | STANDARD |

The “Classic” Display
The “classic” display is inspired by the memo holders formerly seen on film cameras, and can be used in much the same way.
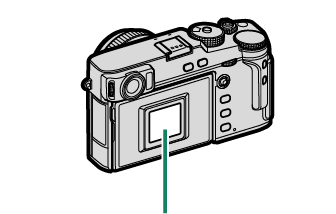
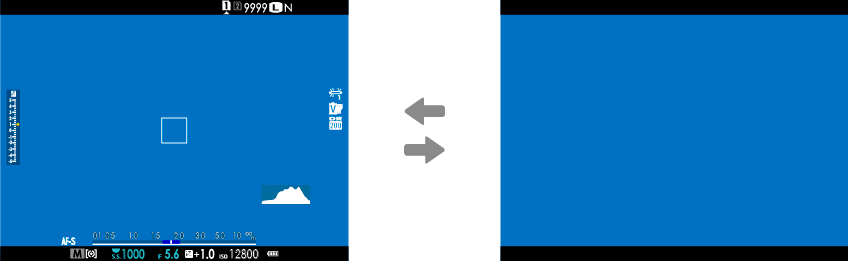
The Optical Viewfinder
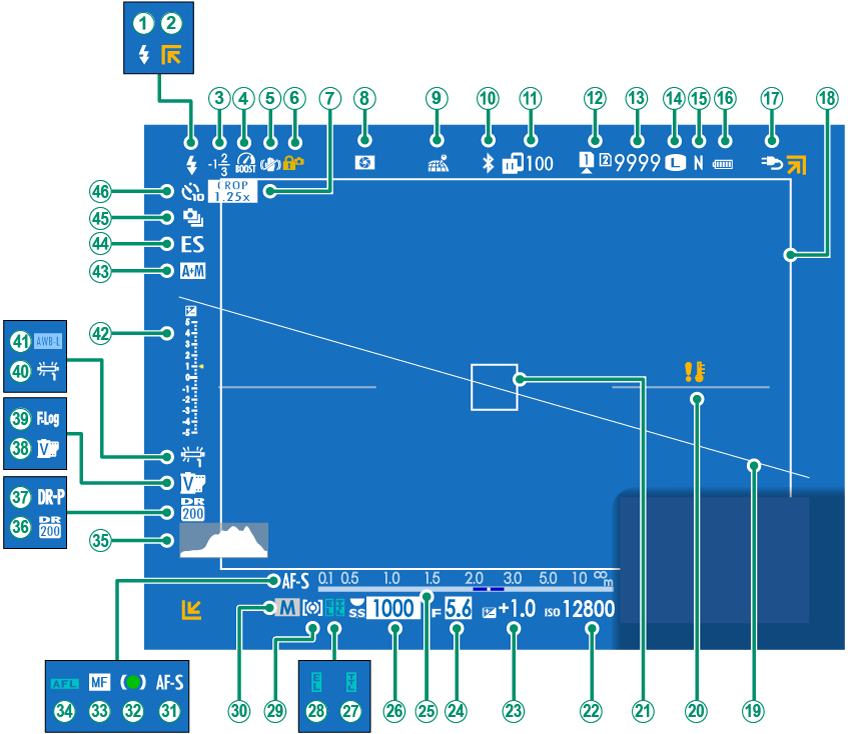
AFlash (TTL) mode
BOut-of-frame indicators
CFlash compensation
DBoost mode
EIS mode 2
FControl lock 3
GSports finder mode
HDepth-of-field preview
ILocation data download status
JBluetooth ON/OFF
KImage transfer status
LCard slot options
MNumber of available frames 1
NImage size
OImage quality
PBattery level
QExternal power source in use
RBright frame
SVirtual horizon
TTemperature warning
UFocus frame
VSensitivity
WExposure compensation
XAperture
YDistance indicator 2
ZShutter speed
aTTL lock
bAE lock
cMetering
dShooting mode
eFocus mode 2
fFocus indicator 2
gManual focus indicator 2
hAF lock
iHistogram
jDynamic range
kD-range priority
lFilm simulation
mF-Log recording
nWhite balance
oAWB lock
pExposure indicator
qAF+MF indicator 2
rShutter type
sContinuous mode
tSelf-timer indicator
1 Shows “9999” if there is space for over 9999 frames.
2 Not displayed when ON is selected for DSCREEN SET-UP > LARGE INDICATORS MODE(EVF/OVF).
3 Displayed when controls have been locked by pressing and holding the MENU/OK button. Control lock can be ended by pressing and holding the MENU/OK button again.
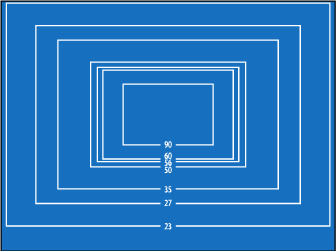
The Bright Frame
The bright frame shows the area that will appear in the final photograph. Its size varies with lens focal length.
Frame brightness can be assigned to a function button for quick access (aAssigning Roles to the Function Buttons).
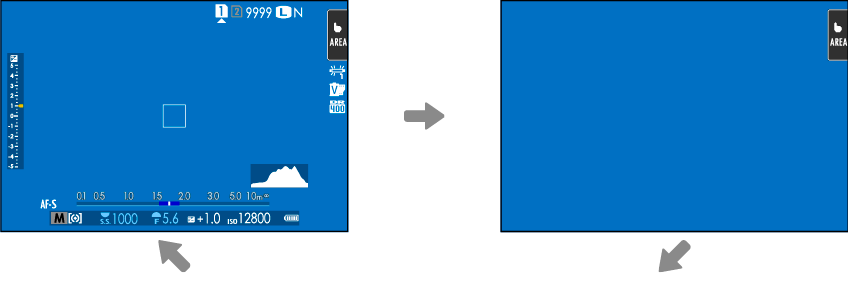
The EVF/LCD Monitor
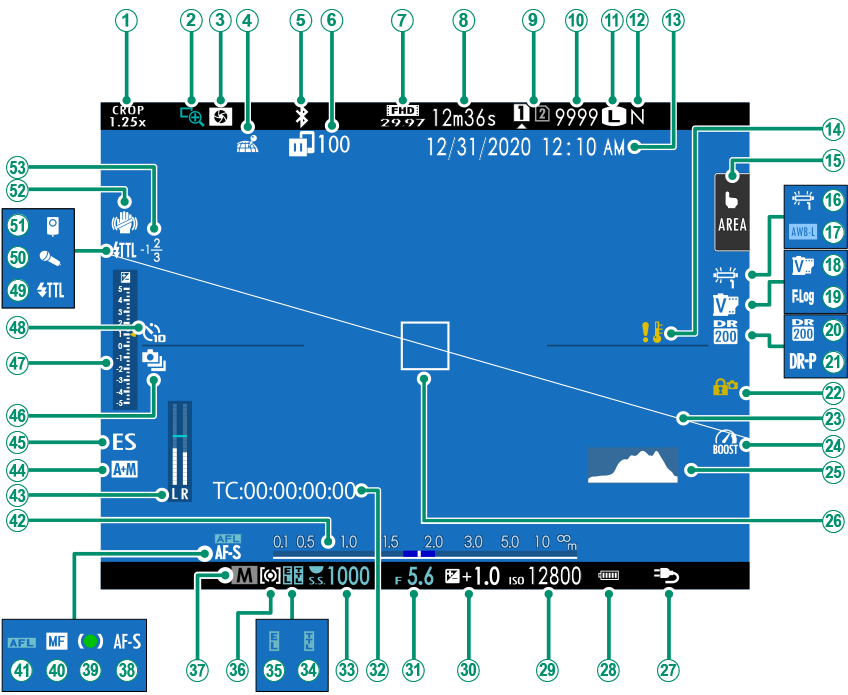
ASports finder mode
BFocus check
CDepth-of-field preview
DLocation data download status
EBluetooth ON/OFF
FImage transfer status
GMovie mode 3
HTime remaining 3
ICard slot options
JNumber of available frames 1
KImage size
LImage quality
MDate and time
NTemperature warning
OTouch screen mode 4
PWhite balance
QAWB lock
RFilm simulation
SF-Log recording
TDynamic range
UD-range priority
VControl lock 5
WVirtual horizon
XBoost mode
YHistogram
ZFocus frame
aExternal power source in use
bBattery level
cSensitivity
dExposure compensation
eAperture
fTime code
gShutter speed
hTTL lock
iAE lock
jMetering
kShooting mode
lFocus mode 2
mFocus indicator 2
nManual focus indicator 2
oAF lock
pDistance indicator 2
qRecording level 2,3
rAF+MF indicator 2
sShutter type
tContinuous mode
uExposure indicator
vSelf-timer indicator
wFlash (TTL) mode
xMicrophone
yRemote release
zIS mode 2
0Flash compensation
1 Shows “9999” if there is space for over 9999 frames.
2 Not displayed in the EVF if LARGE INDICATORS MODE(EVF/OVF) is selected for D SCREEN SET-UP or in the LCD monitor if LARGE INDICATORS MODE(LCD) is selected.
3 Displayed during movie recording only.
4 Displayed in the LCD monitor only. Camera functions can also be accessed via touch controls.
5 Displayed when controls have been locked by pressing and holding the MENU/OK button. Control lock can be ended by pressing and holding the MENU/OK button again.
Adjusting Display Brightness
The brightness and hue of the viewfinder and LCD monitor can be adjusted using the items in the D SCREEN SET-UP menu. Choose EVF BRIGHTNESS or EVF COLOR to adjust viewfinder brightness or hue, LCD BRIGHTNESS or LCD COLOR to do the same for the LCD monitor.
Display Rotation
When ON is selected for D SCREEN SET-UP > AUTOROTATE DISPLAYS, the indicators in the viewfinder and LCD monitor automatically rotate to match camera orientation.
Bright Frame Simulation
The angle of view covered by the bright frame in the OVF/ERF display varies with the focal length of the lens. The bright frame simulation display can be viewed by pulling the viewfinder selector right.

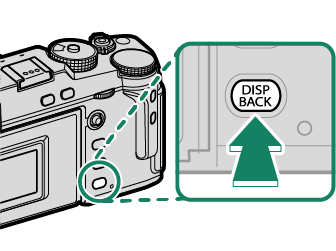
The DISP/BACK Button
The DISP/BACK button controls the display of indicators in the viewfinder and LCD monitor.
Indicators for the EVF, OVF, and LCD must be selected separately. To choose the indicators displayed in the EVF and OVF, place your eye to the viewfinder and press the DISP/BACK button.
Viewfinder (OVF)
| Standard indicators | Full screen (no indicators) |
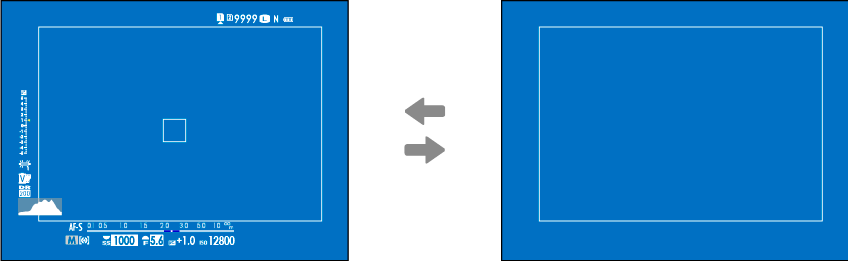
Viewfinder (EVF)
| Standard indicators | Full screen (no indicators) |
LCD Monitor
| Standard indicators | No indicators |

| Info display |
Customizing the Standard Display
To choose the items shown in the standard indicator display:
-
Display standard indicators.
Use the DISP/BACK button to display standard indicators.
-
Select DISP. CUSTOM SETTING.
Select DSCREEN SET-UP > DISP. CUSTOM SETTING in the setup menu.
-
Highlight OVF or EVF/LCD and press MENU/OK.
-
Choose items.
Highlight items and press MENU/OK to select or deselect.
- FRAMING GUIDELINE
- ELECTRONIC LEVEL
- FOCUS FRAME
- AF DISTANCE INDICATOR
- MF DISTANCE INDICATOR
- HISTOGRAM
- LIVE VIEW HIGHLIGHT ALERT *
- SHOOTING MODE
- APERTURE/S-SPEED/ISO
- INFORMATION BACKGROUND *
- Expo. Comp. (Digit)
- Expo. Comp. (Scale)
- FOCUS MODE
- PHOTOMETRY
- SHUTTER TYPE
- FLASH
- CONTINUOUS MODE
- DUAL IS MODE
- TOUCH SCREEN MODE *
- WHITE BALANCE
- FILM SIMULATION
- DYNAMIC RANGE
- BOOST MODE
- FRAMES REMAINING
- IMAGE SIZE/QUALITY
- MOVIE MODE & REC. TIME *
- IMAGE TRANSFER ORDER
- MIC LEVEL *
- GUIDANCE MESSAGE
- BATTERY LEVEL
- FRAMING OUTLINE *
* EVF/LCD monitor only.
-
Save changes.
Press DISP/BACK to save changes.
-
Exit the menus.
Press DISP/BACK as needed to exit the menus and return to the shooting display.
Virtual Horizon
Selecting ELECTRONIC LEVEL displays a virtual horizon. The camera is level when the two lines overlap. Note that the virtual horizon may not be displayed if the camera lens is pointed up or down. For a 3D display (shown), press the function button to which ELECTRONIC LEVEL is assigned (aFUNCTION (Fn) SETTING, Assigning Roles to the Function Buttons).
Roll
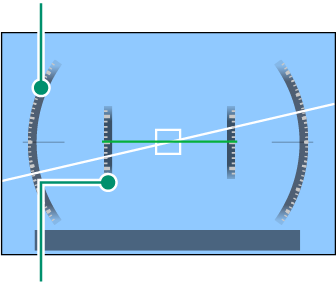
Pitch
Framing Outline
Enable FRAMING OUTLINE to make the borders of the frame easier to see against dark backgrounds.
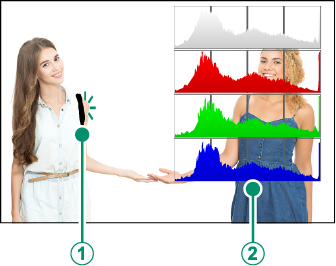
Histograms
Histograms show the distribution of tones in the image. Brightness is shown by the horizontal axis, the number of pixels by the vertical axis.
|
Number of pixels
|
 |
|
Shadows |
Pixel brightness |  Highlights Highlights |


-
Optimal exposure: Pixels are distributed in an even curve throughout the tone range.
-
Overexposed: Pixels are clustered on the right side of the graph.

-
Underexposed: Pixels are clustered on the left side of the graph.

To view separate RGB histograms and a display showing areas of the frame that will be overexposed at current settings superimposed on the view through the lens, press the function button to which HISTOGRAM is assigned (aFUNCTION (Fn) SETTING, Assigning Roles to the Function Buttons).
AOverexposed areas blink
BRGB histograms