The DISP/BACK button controls the display of indicators in the viewfinder and LCD monitor.


 Standard
 Information off

Standard
Information off

Standard
Information off
 Info display

Standard
Information off
Info display
 Favorites
To choose the items shown in the standard display:
Display standard indicators.
Press the DISP/BACK button until standard indicators are displayed.
Select DISP. CUSTOM SETTING.
Select SCREEN SETTING > DISP. CUSTOM SETTING in the setup menu.
Choose a display.
Highlight OVF or EVF/LCD and press MENU/OK.
Choose items.
Highlight items and press MENU/OK to select or deselect.
| Option | Default | |
|---|---|---|
| OVF | EVF | |
| FRAMING GUIDELINE |  |
|
| ELECTRONIC LEVEL | |
|
| FOCUS FRAME |  |
|
| AF DISTANCE INDICATOR | |
|
| MF DISTANCE INDICATOR | |
|
| HISTOGRAM | |
|
| SHOOTING MODE | |
|
| APERTURE/S-SPEED/ISO | |
|
| INFORMATION BACKGROUND | — | |
| Expo. Comp. (Digit) | |
|
| Expo. Comp. (Scale) | |
|
| FOCUS MODE | |
|
| PHOTOMETRY | |
|
| SHUTTER TYPE | |
|
| FLASH | |
|
| CONTINUOUS MODE | |
|
| DUAL IS MODE | |
|
| WHITE BALANCE | |
|
| FILM SIMULATION | |
|
| DYNAMIC RANGE | |
|
| FRAMES REMAINING | |
|
| IMAGE SIZE/QUALITY | |
|
| MOVIE MODE & REC. TIME | |
|
| BATTERY LEVEL | |
|
Save changes.
Press DISP/BACK to save changes.
Exit the menus.
Press DISP/BACK as needed to exit the menus and return to the shooting display.
Virtual Horizon
Selecting ELECTRONIC LEVEL displays a virtual horizon. The camera is level when the two lines overlap.

The virtual horizon may not be displayed if the camera lens is pointed up or down.
Histograms
Histograms show the distribution of tones in the image. Brightness is shown by the horizontal axis, the number of pixels by the vertical axis.

No. of pixels
Pixel brightness
Shadows
Highlights
Pixels are distributed in an even curve throughout the tone range.

Pixels are clustered on the right side of the graph.

Pixels are clustered on the left side of the graph.

To view separate RGB histograms and a display showing areas of the frame that will be overexposed at current settings superimposed on the view through the lens, press the function button to which HISTOGRAM is assigned.
Overexposed areas blink
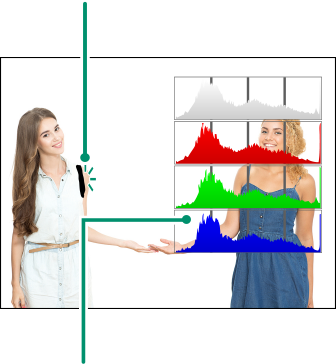
RGB histograms
 .
.