.
.DThe Setup Menus ([CONNECTION SETTING])
Adjust settings for connection to other devices.
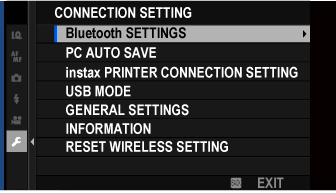
To access connection settings, press [MENU]/[OK], select the D ([SET UP]) tab, and choose [CONNECTION SETTING].
For more information on wireless connections, visit:
- [Bluetooth SETTINGS]
- [PC AUTO SAVE]
- [instax PRINTER CONNECTION SETTING]
- [USB MODE]
- [GENERAL SETTINGS]
- [INFORMATION]
- [RESET WIRELESS SETTING]
[Bluetooth SETTINGS]
Adjust Bluetooth settings.
[PAIRING REGISTRATION]
Pair the camera with a smartphone to which the FUJIFILM Camera Remote app has been installed.
[SELECT PAIRING DESTINATION]
Choose a connection from a list of devices with which the camera has been paired using [PAIRING REGISTRATION]. Select [NO CONNECTION] to exit without connecting.
[DELETE PAIRING REG.]
Delete pairing information for selected devices. Choose the device in the device list. The selected device will also be removed from the devices listed in [SELECT PAIRING DESTINATION].
[Bluetooth ON/OFF]
| Option | Description |
|---|---|
| [ON] | The camera automatically establishes a Bluetooth connection with paired devices when turned on. |
| [OFF] | The camera does not connect via Bluetooth. |
[AUTO IMAGE TAGGING]
| Option | Description |
|---|---|
| [ON] | Mark JPEG images for upload as they are taken. |
| [OFF] | Photos are not marked for upload as they are taken. |
[SEAMLESS TRANSFER]
| Option | Description |
|---|---|
| [ON] | Pictures are uploaded to paired devices after shooting. |
| [OFF] | Pictures are uploaded to paired devices only when the camera is off or starting shortly after you exit to playback. |
[SMARTPHONE SYNC. SETTING]
Choose whether to synchronize the camera to the time and/or location provided by a paired smartphone.
| Option | Description |
|---|---|
| [LOCATION &TIME] | Synchronize the time and location. |
| [LOCATION] | Synchronize the location. |
| [TIME] | Synchronize the time. |
| [OFF] | Synchronization off. |
Install the latest version of the FUJIFILM Camera Remote app on your smartphone or tablet before pairing the device with your camera or uploading images.
When [ON] is selected for both [Bluetooth ON/OFF] and [AUTO IMAGE TAGGING] and [OFF] is chosen for [SEAMLESS TRANSFER], upload to paired devices will begin when the camera is turned off or shortly after you exit to playback.
If [AUTO IMAGE TAGGING] is off, pictures can be marked for transfer using the [IMAGE TRANSFER ORDER] option in the playback menu.
[PC AUTO SAVE]
Adjust settings for connection to computers via wireless LAN.
[PC AUTO SAVE SETTING]
Choose the method used for connection to computers via a wireless LAN.
| Option | Description |
|---|---|
| [SIMPLE SETUP] | Connect using WPS. |
| [MANUAL SETUP] | Choose the network from a list ([SELECT FROM NETWORK LIST]) or enter the name manually ([ENTER SSID]). |
[DELETE REGISTERED DESTINATION PC]
Remove selected destinations.
[DETAILS OF PREVIOUS CONNECTION]
View computers to which the camera has recently connected.
[instax PRINTER CONNECTION SETTING]
Adjust settings for connection to optional [Fujifilm instax SHARE] printers.
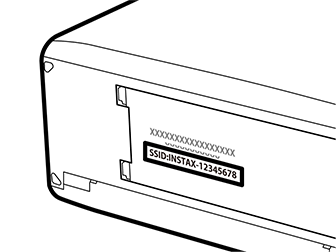
The Printer Name (SSID) and Password
The printer name (SSID) can be found on the bottom of the printer; the default password is “1111”. If you have already chosen a different password to print from a smartphone, enter that password instead.
[USB MODE]
Choose a mode for USB connections to computers, smartphones, and tablets.
| Option | Description |
|---|---|
| [USB CARD READER] | Pictures can be transferred when the camera is connected to a computer, smartphone, or tablet via USB. |
| [USB WEBCAM] | When connected to a computer via USB, the camera functions as a webcam. |
| [OFF] | Data transfer is disabled when the camera is connected to a computer, smartphone, or tablet via USB. |
Select [USB CARD READER] for [USB MODE] before connecting the USB cable to transfer pictures to a computer, smartphone, or tablet (aCopying Pictures to a Computer, aConnecting to Smartphones).
Select [USB WEBCAM] for [USB MODE] before connecting the camera for use as a webcam. “FUJIFILM X-T200” will be displayed when the computer detects the camera.
The webcam feature is supported under Windows 10 (x64), macOS 10.14 (Mojave), and macOS 10.15 (Catalina).
When [USB WEBCAM] is selected:
- H[IMAGE QUALITY SETTING] and A[SHOOTING SETTING] cannot be adjusted,
- apart from the [ON]/[OFF] button and rear command dial (which can be used only for exposure compensation), camera controls cannot be used,
- G[AF/MF SETTING] > [PRE-AF] is fixed at [ON] and the camera focuses only on the subject in the center focus area,
- G[AF/MF SETTING] > [FACE/EYE DETECTION SETTING] is set to [FACE DETECTION ON],
- HDMI output is not available,
- audio from built-in and external microphones is not output to the connected device,
- images are not displayed in the LCD monitor, and
- the AF lamp will light if the battery is low; insert a spare battery if available.
For more information on web conferencing, see the documentation for the web conference application.
[GENERAL SETTINGS]
Adjust settings for connection to wireless networks.
[NAME]
Choose a name ([NAME]) to identify the camera on the wireless network (the camera is assigned a unique name by default).
[RESIZE IMAGE FOR SMARTPHONE] H
Choose whether to resize images for upload to smartphones. Resizing applies only to the copy uploaded to the smartphone; the original is not affected.
| Option | Description |
|---|---|
| [ON] | Larger images are resized to H for upload. |
| [OFF] | Images are uploaded at their original size. |
[GEOTAGGING]
Choose whether location data downloaded from a smartphone are embedded in pictures as they are taken.
| Options | |
|---|---|
| [ON] | [OFF] |
[LOCATION INFO]
Display the location data last downloaded from a smartphone.
| Options | |
|---|---|
| [ON] | [OFF] |
r[BUTTON SETTING]
Choose the role played by function buttons assigned the [WIRELESS COMMUNICATION] function.
| Option | Description |
|---|---|
| s[PAIRING/TRANSFER ORDER] | The buttons can be used for pairing and selecting images for transfer. |
| r[WIRELESS COMMUNICATION] | The buttons can be used for wireless connections. |
[INFORMATION]
View the camera’s MAC and Bluetooth address.
[RESET WIRELESS SETTING]
Restore wireless settings to their default values.