.
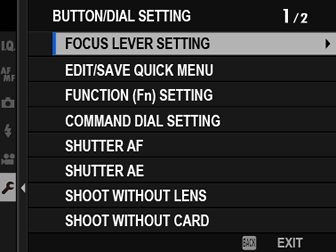
.DThe Setup Menus ([BUTTON/DIAL SETTING])
Access options for camera controls.
To access control options, press [MENU]/[OK], select the D ([SET UP]) tab, and choose [BUTTON/DIAL SETTING].
[FOCUS LEVER SETTING]
Choose the functions performed by the focus stick (focus lever).
| Option | Description |
|---|---|
| [LOCK (OFF)] | The focus stick cannot be used during shooting. |
| [PUSH n TO UNLOCK] | Press the stick to view the focus-point display and tilt the stick to select a focus point. |
| [ON] | Tilt the stick to view the focus-point display and select a focus point. |
[EDIT/SAVE QUICK MENU]
Choose the items displayed in the quick menu.
-
Select D[BUTTON/DIAL SETTING] > [EDIT/SAVE QUICK MENU] in the D ([SET UP]) tab.
-
The current quick menu will be displayed; use the focus stick (focus lever) to highlight the item you wish to change and press [MENU]/[OK].
-
Highlight any of the following options and press [MENU]/[OK] to assign it to the selected position.
[IMAGE SIZE]
[IMAGE QUALITY]
[FILM SIMULATION] *
[GRAIN EFFECT] *
[COLOR CHROME EFFECT] *
[SMOOTH SKIN EFFECT] *
[DYNAMIC RANGE] *
[WHITE BALANCE] *
[HIGHLIGHT TONE] *
[SHADOW TONE] *
[COLOR] *
[SHARPNESS] *
[NOISE REDUCTION] *
[SELECT CUSTOM SETTING] *
[AF MODE]
[FACE/EYE DETECTION SETTING]
[MF ASSIST]
[TOUCH SCREEN MODE]
[SELF-TIMER]
[PHOTOMETRY]
[SHUTTER TYPE]
[FLICKER REDUCTION]
[ISO] *
[FLASH FUNCTION SETTING]
[FLASH COMPENSATION]
[MOVIE MODE]
[MIC LEVEL ADJUSTMENT]
[EVF/LCD BRIGHTNESS]
[EVF/LCD COLOR]
[NONE]
* Stored in custom settings bank.
Select [NONE] to assign no option to the selected position.
When [SELECT CUSTOM SETTING] is selected, current settings are shown in the quick menu by the label [BASE].
The quick menu can also be accessed in shooting mode by holding the [Q] button.
[FUNCTION (Fn) SETTING]
Choose the roles played by the function buttons.
-
Select D[BUTTON/DIAL SETTING] > [FUNCTION (Fn) SETTING] in the D ([SET UP]) tab.
-
Highlight the desired control and press [MENU]/[OK].
-
Highlight any of the following options and press [MENU]/[OK] to assign it to the selected control.
[IMAGE SIZE]
[IMAGE QUALITY]
[RAW]
[FILM SIMULATION]
[GRAIN EFFECT]
[COLOR CHROME EFFECT]
[SMOOTH SKIN EFFECT]
[DYNAMIC RANGE]
[WHITE BALANCE]
[SELECT CUSTOM SETTING]
[FOCUS AREA]
[FOCUS CHECK]
[AF MODE]
[RAPID AF]
[FACE/EYE DETECTION SETTING]
[DRIVE BUTTON]
[SELF-TIMER]
[AE BKT SETTING]
[FOCUS BKT SETTING]
[PHOTOMETRY]
[SHUTTER TYPE]
[FLICKER REDUCTION]
[ISO]
[35mm FORMAT MODE]
[WIRELESS COMMUNICATION]
[FLASH FUNCTION SETTING]
[TTL-LOCK]
[MODELING FLASH]
[MIC LEVEL ADJUSTMENT]
[PREVIEW DEPTH OF FIELD]
[PREVIEW EXP./WB IN MANUAL MODE]
[NATURAL LIVE VIEW]
[HISTOGRAM]
[ELECTRONIC LEVEL]
[LARGE INDICATORS MODE]
[FRONT COMMAND DIAL SWITCH]
[AE LOCK ONLY]
[AF LOCK ONLY]
[AE/AF LOCK]
[AF-ON]
[APERTURE SETTING]
[LOCK SETTING]
[AUTO IMAGE TRANSFER ORDER]
[SELECT PAIRING DESTINATION]
[Bluetooth ON/OFF]
[PLAYBACK]
[NONE] (control disabled)
[AE LOCK ONLY], [AF LOCK ONLY], [AE/AF LOCK], and [AF-ON] cannot be assigned to the touch function buttons ([T-Fn1] through [T-Fn4]).
Function button assignment options can also be accessed by holding the [DISP]/[BACK] button.
[AF-ON]
If [AF-ON] is selected, you can press the control instead of keeping the shutter button pressed halfway.
[MODELING FLASH]
If [MODELING FLASH] is selected when a compatible shoe-mounted flash unit is attached, you can press the control to test-fire the flash and check for shadows and the like (modeling flash).
[TTL-LOCK]
If [TTL-LOCK] is selected, you can press the control to lock flash output according to the option selected for F[FLASH SETTING] > [TTL-LOCK MODE] (a[TTL-LOCK MODE]).
[COMMAND DIAL SETTING]
Choose the roles played by the command dials.
| Option | Description |
|---|---|
| [FRONT COMMAND DIAL 1] | Assign shutter speed ([S.S. (PROGRAM SHIFT)]) or aperture ([APERTURE]) 1 to [FRONT COMMAND DIAL 1]. |
| [FRONT COMMAND DIAL 2] | Assign shutter speed ([S.S. (PROGRAM SHIFT)]), aperture ([APERTURE]) 1, exposure compensation ([EXP. COMPENSATION]) 2, sensitivity ([ISO]), or no role ([NONE]) to [FRONT COMMAND DIAL 2] or [FRONT COMMAND DIAL 3]. |
| [FRONT COMMAND DIAL 3] | |
| [REAR COMMAND DIAL] | Assign shutter speed ([S.S. (PROGRAM SHIFT)]), aperture ([APERTURE]) 1, exposure compensation ([EXP. COMPENSATION]) 2, sensitivity ([ISO]), or no role ([NONE]) to the rear command dial. |
1 If the lens is equipped with an aperture ring with a “[C]” position, the camera command dials can be used to adjust aperture when the aperture ring is rotated to [C].
2 Exposure compensation dial rotated to [C].
[COMMAND DIAL SETTING] can also be accessed by pressing and holding the [Fn2] button.
You can also press the [Fn2] button to cycle through settings in the order [FRONT COMMAND DIAL 1], [FRONT COMMAND DIAL 2], and [FRONT COMMAND DIAL 3].
The [Fn2] button can be assigned other roles using DBUTTON/DIAL SETTING > FUNCTION (Fn) SETTING. The role described above can also be assigned to other function buttons (aAssigning Roles to the Function Buttons).
[SHUTTER AF]
Choose whether the camera focuses when the shutter button is pressed halfway.
| Option | Description |
|---|---|
| [AF-S] |
[ON]: Focus locks when the shutter button is pressed halfway. [OFF]: No focus operation is performed when the shutter button is pressed halfway. |
| [AF-C] |
[ON]: The camera focuses while the shutter button is pressed halfway. [OFF]: No focus operation is performed when the shutter button is pressed halfway. |
[SHUTTER AE]
If [ON] is selected, exposure will lock while the shutter button is pressed halfway.
| Option | Description |
|---|---|
| [AF-S/MF] |
[ON]: Exposure locks when the shutter button is pressed halfway. [OFF]: Exposure does not lock when the shutter button is pressed halfway. |
| [AF-C] |
[ON]: Exposure locks while the shutter button is pressed halfway. [OFF]: Exposure does not lock when the shutter button is pressed halfway. |
Select [OFF] to allow the camera to adjust exposure before each shot taken in burst mode.
[SHOOT WITHOUT LENS]
Choose [ON] to enable the shutter release when no lens is attached.
| Options | |
|---|---|
| [ON] | [OFF] |
[SHOOT WITHOUT CARD]
Choose whether the shutter can be released without a memory card inserted in the camera.
| Option | Description |
|---|---|
| [ON] | When no memory card is inserted, the shutter can be released to test camera function and the shooting and setup menus can be displayed. |
| [OFF] | The shutter is disabled if no memory card is inserted, preventing accidental loss of pictures taken without a memory card. |
[FOCUS RING]
Choose the direction in which the focus ring is rotated to increase the focus distance.
| Options | |
|---|---|
| X[CW] (clockwise) | Y[CCW] (counterclockwise) |
[AE/AF-LOCK MODE]
This option determines the behavior of the button to which exposure and/or focus lock is assigned.
| Option | Description |
|---|---|
| [AE&AF ON WHEN PRESSING] | Exposure and/or focus will lock while the button is pressed. |
| [AE&AF ON/OFF SWITCH] | Exposure and/or focus will lock when the button is pressed and remain locked until it is pressed again. |
[APERTURE SETTING]
Choose the method used to adjust aperture when using lenses with no aperture rings.
| Option | Description |
|---|---|
| [AUTO] + o [MANUAL] |
Rotate the front command dial to choose the aperture. Rotate past minimum aperture to choose [A] (auto). |
| [AUTO] | Aperture is selected automatically; camera functions in exposure mode [P] (program AE) or [S] (shutter-priority AE). |
| [MANUAL] | Rotate the front command dial to choose the aperture; camera functions in exposure mode [A] (aperture-priority AE) or [M] (manual). |
a[Fn1 BUTTON SETTING]
Choose the role performed by the [Fn1] button during playback.
| Option | Description |
|---|---|
| a[SMARTPHONE TRANSFER ORDER] | Pressing the button marks the current picture for transfer. If the camera is not currently paired with a smartphone, [Bluetooth/SMARTPHONE SETTING] options will be displayed (a[Bluetooth/SMARTPHONE SETTING]). |
| d[SELECT & SMARTPHONE TRANSFER ORDER] | Pressing the button displays a dialog where pictures can be selected for upload to a smartphone with which the camera is paired (a[IMAGE TRANSFER ORDER]). If the camera is not currently paired with a smartphone, [Bluetooth/SMARTPHONE SETTING] options will be displayed instead (a[Bluetooth/SMARTPHONE SETTING]). |
| r[WIRELESS COMMUNICATION] | The button can be used for wireless connections. |
[TOUCH SCREEN SETTING]
Enable or disable touch-screen controls.
| Option | Description |
|---|---|
| [TOUCH SCREEN ON/OFF] |
[ON]: Touch controls enabled; the LCD monitor functions as a touch screen. [OFF]: Touch controls disabled; the LCD monitor cannot be used as a touch screen. |
| [EVF TOUCH SCREEN AREA SETTINGS] |
Select the area of the LCD monitor used for touch controls while the viewfinder is active. The area used for touch controls can be selected from:
Choose [OFF] to disable touch controls while the viewfinder is active. |
[LOCK]
Lock selected controls to prevent unintended operation.
| Option | Description |
|---|---|
| [LOCK SETTING] |
Choose from the following: [UNLOCK]: Reset lock options. [ALL FUNCTION]: Lock all controls in the [FUNCTION SELECTION] list. [SELECTED FUNCTION]: Lock only the controls selected in the [FUNCTION SELECTION] list. |
| [FUNCTION SELECTION] | Choose the controls locked when [SELECTED FUNCTION] is chosen for [LOCK SETTING]. |